Skip to content
 DDPAI » Product Manuals » Ranger Riding Camera User Guide
Ranger User Guide
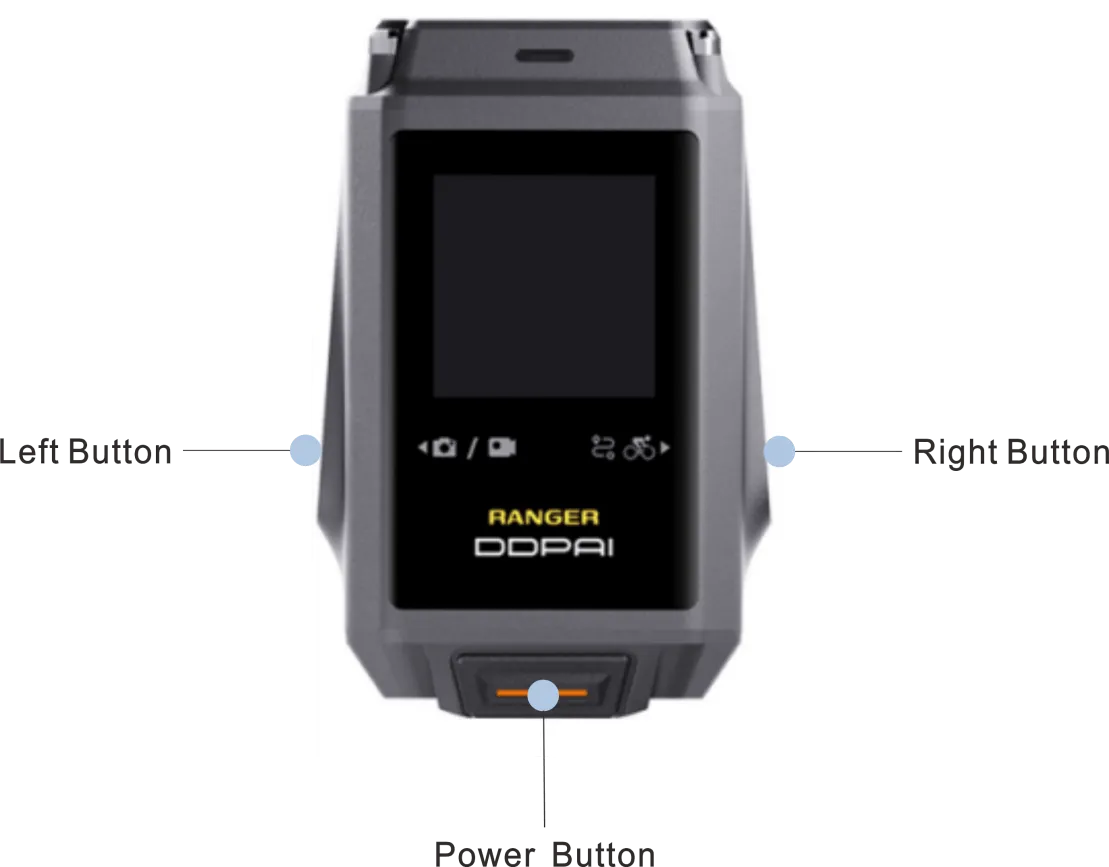
Appearance
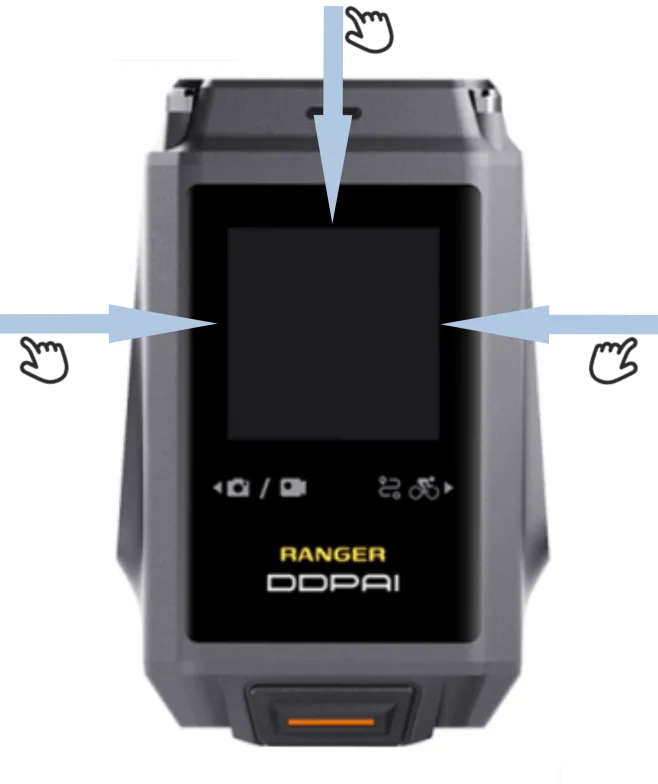
Button Function
| Button | Function |
| Power Button | Hold 1s to power on the device Press to return to the home screen Hold 2s to power off the device Hold 10s to force shutdown |
| Left Button | Press to take a photo / short video Hold 2s to start/end manual recording |
| Right Button | Press to enter the data interface/switch the data Hold 2s to start the riding mode Hold 2s to pause the riding mode After pausing, press to resume the riding mode After pausing, hold 2s to end the riding mode |
Touchscreen Description
| Operation | Function |
| Swipe Down | Access the Settings interface |
| Swipe Right | Swipe right on the home screen: Access the Album Swipe right on the other interfaces: Return to the previous interface |
| Swipe Left | Access the Data interface |
Indicator Guide
| Indicator | System Status |
| Breathing Green | Power On (Not Recording) |
| Steady Green | Recording |
| Flashes Green | Upgrading |
| Flashes Yellow | Abnormal Storage / High Temperature |
| Flashes Purple | Take Pictures / Short Videos |
| Steady Purple | USB Transfer Mode |
| Steady Red | Moment of Power On |
Installing the Riding Camera
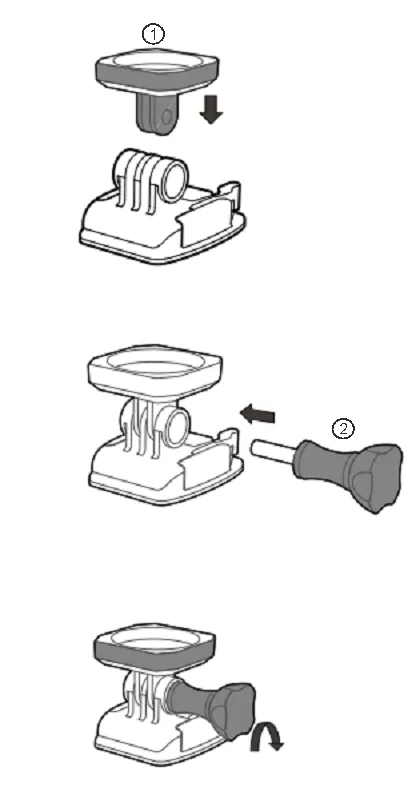
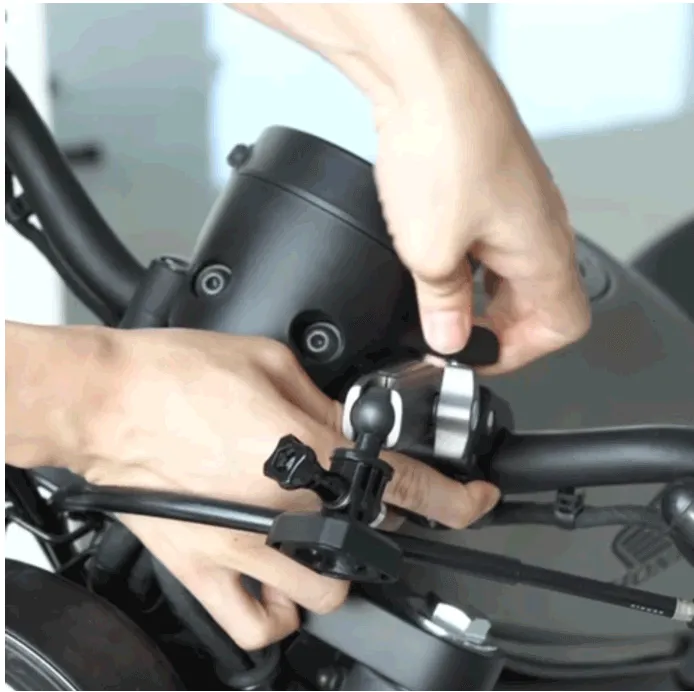
▶ Installing the Standard Bracket
Clip the camera mount adapter (1) into the quick release base, then insert the locking screw (2) and tighten it clockwise.
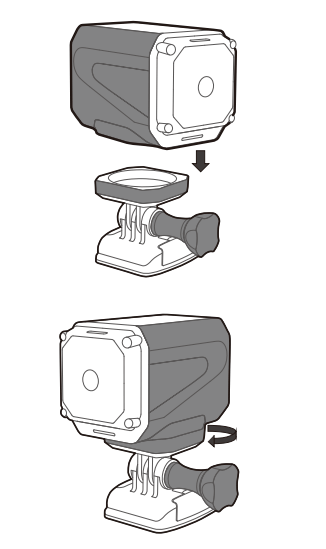
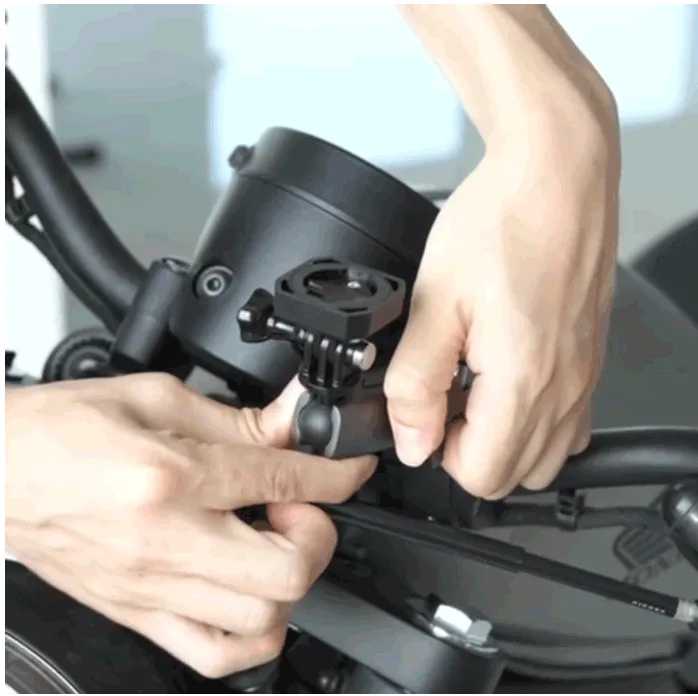
▶ Installing the Riding Camera
Align the bottom of the device with the groove of the base, rotate it 90° and click it into place.
▶ Installing the Camera Bracket (Optional)
1. Clamp the clamping claw part at the bottom of the bracket onto the handlebar, and tighten the screw clockwise to fix the base.
2. Unscrew the side knob of the bracket counterclockwise to adjust the angle of the bracket.
3. After adjusting the angle, tighten the knob clockwise to fix it.
Charging the Riding Camera
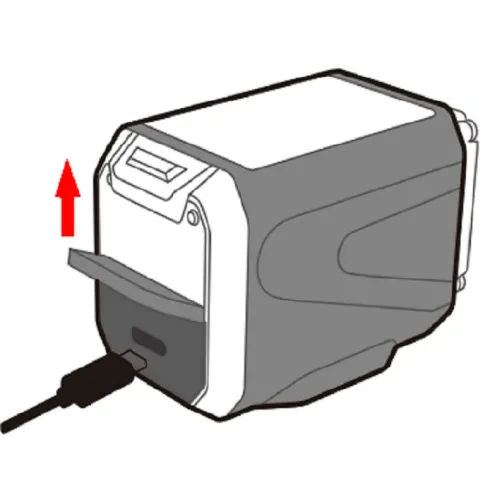
▶ Type-C Charging
Open the charging cover on the back of the device and use the included power cable to connect to the Type-C interface for charging.
▶ ACC Charging Base (Optional)
Charging Accessories Overview
① Charging Base
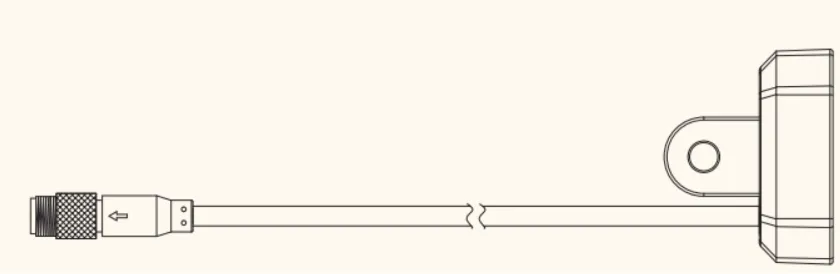
② USB Power Cable
(Note: Please ensure that the input value of the USB port can reach at least 5V⎓2A)

③ Three-end Wire
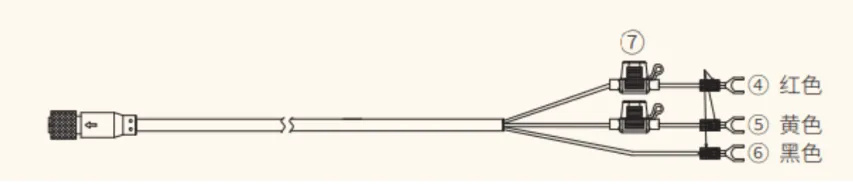
④ Red Wire (ACC Signal Line)
⑤ Yellow Wire (VCC Power Line/Positive Pole)
⑥ Black Wire (GND Ground Wire/Negative Pole or Ground)
⑦ Fuse Box
Installation Guide
1. Choose the installation method suitable for your motorcycle:
Connect three-end wire ③ or USB power cable ② to the charging base ①.
1) Three-end wire ③ installation:
a. Connect ACC signal wire ④ to the motorcycle ACC power supply, connect VCC power wire ⑤ to VCC power supply of the motorcycle, connect GND ground wire ⑥ to the motorcycle ground wire. In this way, the camera can be turned on and off automatically with the motorcycle key.
b. If there is no motorcycle ACC, you can connect the ACC signal line ④ to the motorcycle ignition interface, such as headlights, etc.
c. If there is no motorcycle ACC, you can connect the ACC signal wire ④ and the VCC power wire ⑤ together and connect them both to the positive pole of the motorcycle power supply. The GND ground wire ⑥ is connected to the motorcycle’s ground wire. After completing the wiring, the camera will automatically turn on/off. After the motorcycle is turned off, please remember to take the camera away to avoid consuming the motorcycle battery and cover the power base with a waterproof and dustproof cover.
2)USB power cable ② installation:
Plug the USB connector of the USB power cable into the USB port of the motorcycle.
2. Use cable ties to secure and store excess wire length. When fixing and removing wires, please keep them away from anklets/movable mechanisms/high-temperature devices, etc.
Before installing the camera, if there is water or dirt on the ACC charging base, please wipe it dry before installing the device. When not in use, please cover it tightly with a waterproof and dustproof cover to prevent foreign matter from remaining.
Downloading the DDPAI App
Please scan the QR code below or search for “DDPAI” in Google Play Store (Android) or App Store (iOS) to download the DDPAI App.

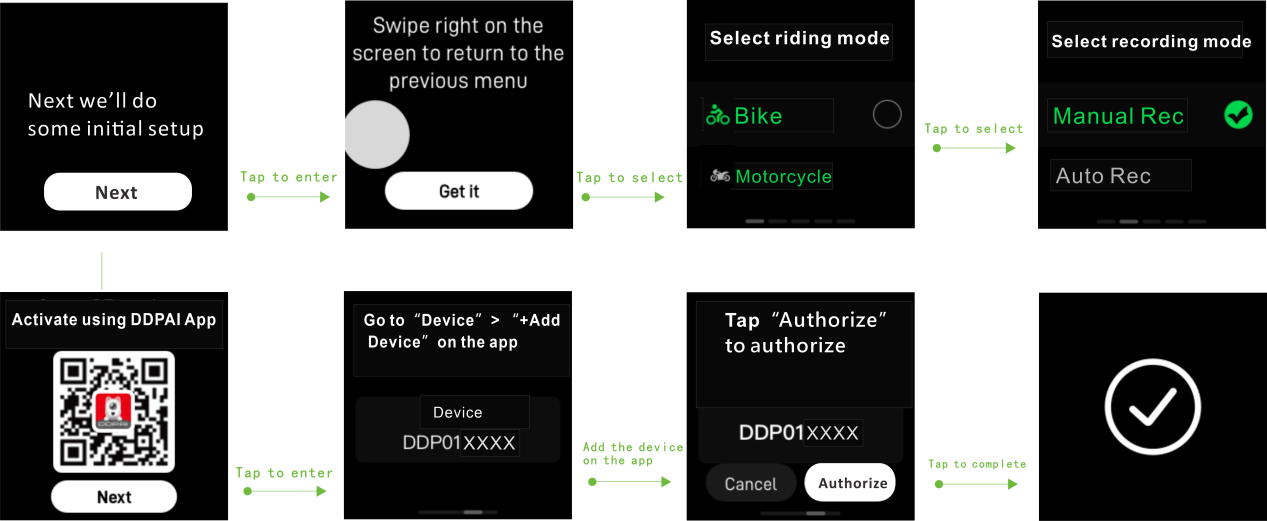
First-time Connection
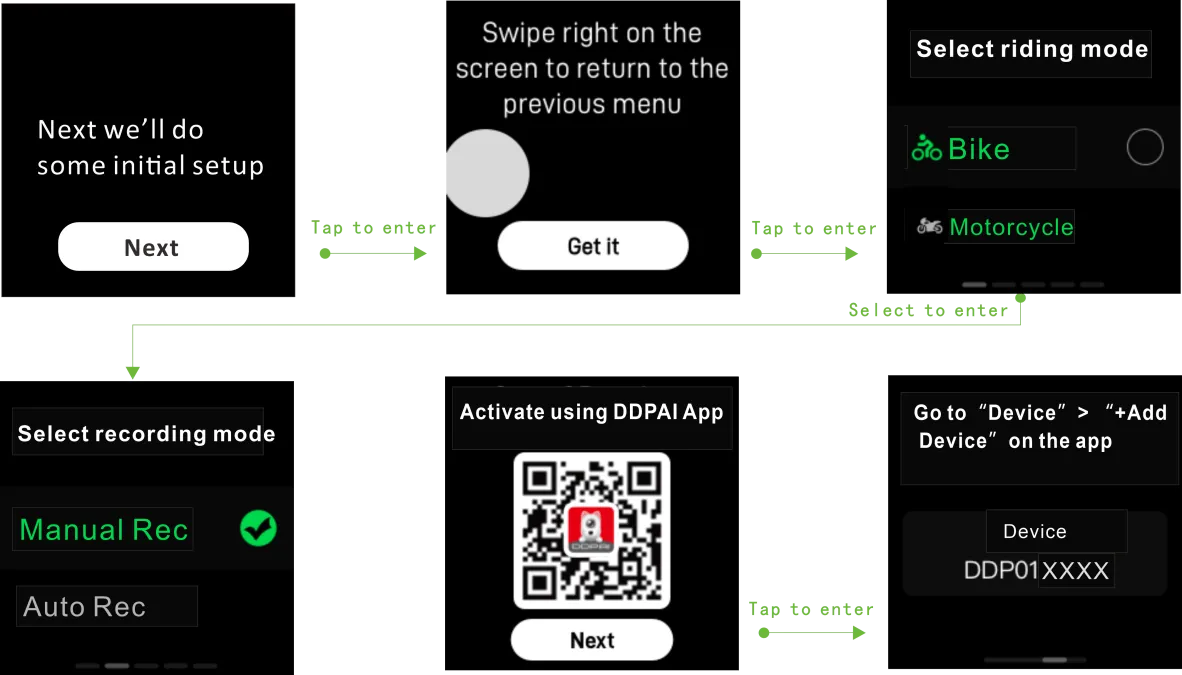
① Turn on the device and follow the instructions on the startup page, as shown in the figure below.
② Turn on Bluetooth of your phone.
③ Launch the DDPAI App, enter the “Device” interface, and tap “+ Add a device”.
④ Select the current device model (DDP01XXXX) in the Bluetooth list.
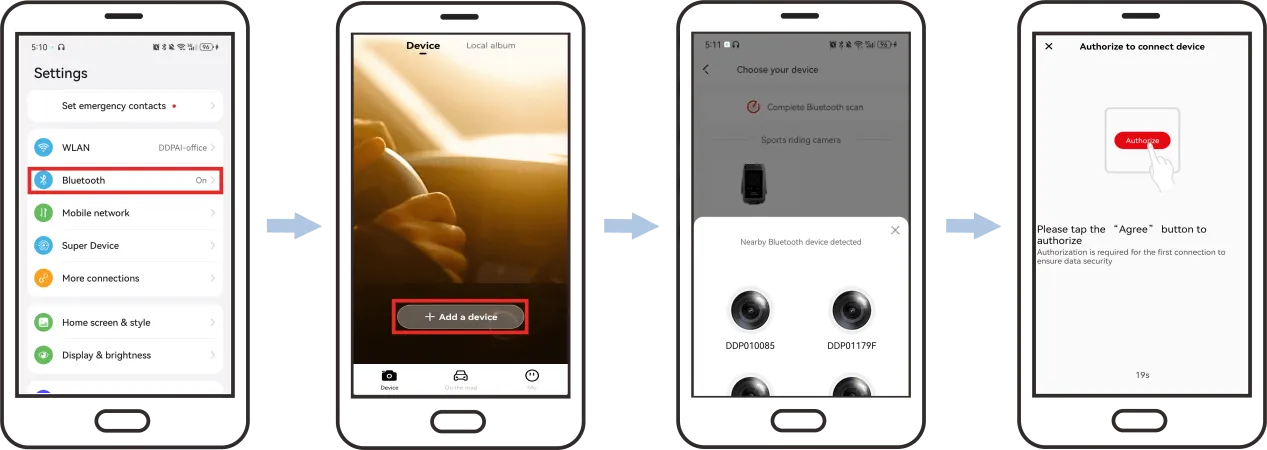
⑤ Tap the “Authorize” button on the camera screen to activate Ranger.

● When a device has been connected to a mobile phone via Bluetooth, please turn off the mobile phone's Bluetooth/delete the device on the app/reset the device to allow another mobile phone to connect to the device via Bluetooth.
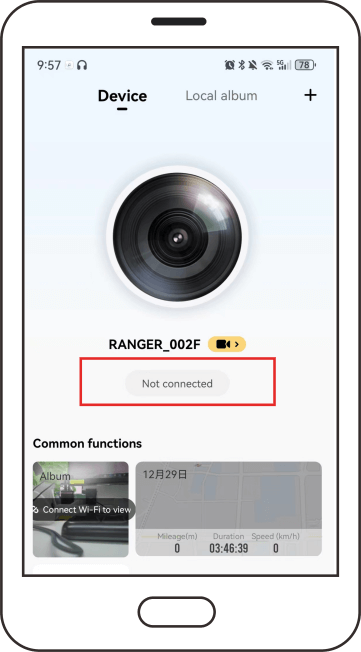
Wi-Fi Connection
For iPhones:
① Tap “Connect the device to view” > “Go to connection”.
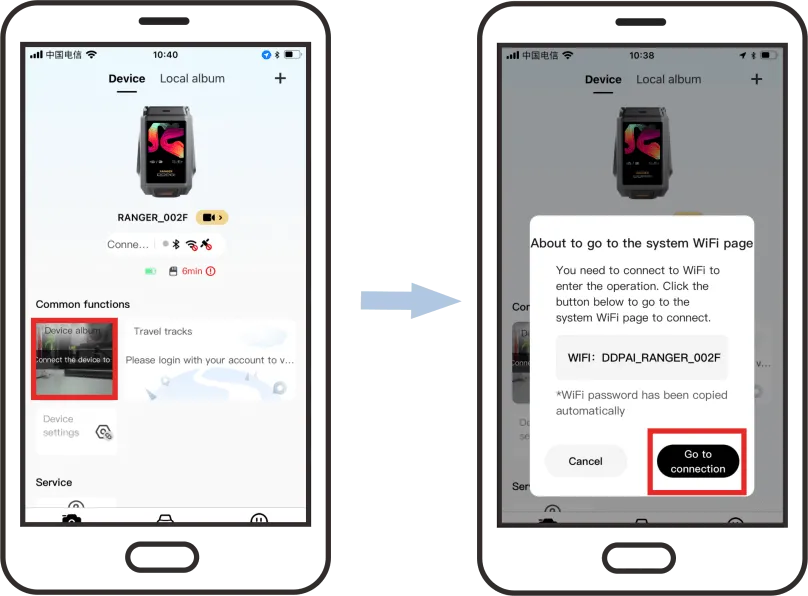
② Tap “WLAN” and select the current device “DDPAI_RANGER_XXXX”.
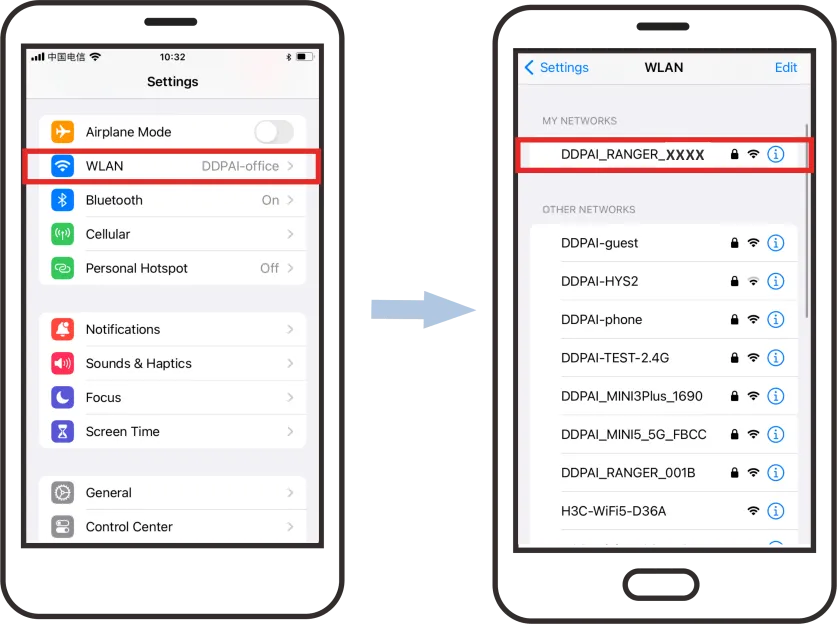
③ Paste the password directly into the edit box and tap “Join”.

For Android Phones:
When the Wi-Fi is turned on normally, the system will automatically connect.
Boot Screen
Press and hold the power button of the device to turn it on. You will enter the boot screen. Please follow the instructions on the screen to activate Ranger riding camera. For details, please see Chapter 3 “First-time Connection”.
Interface Introduction
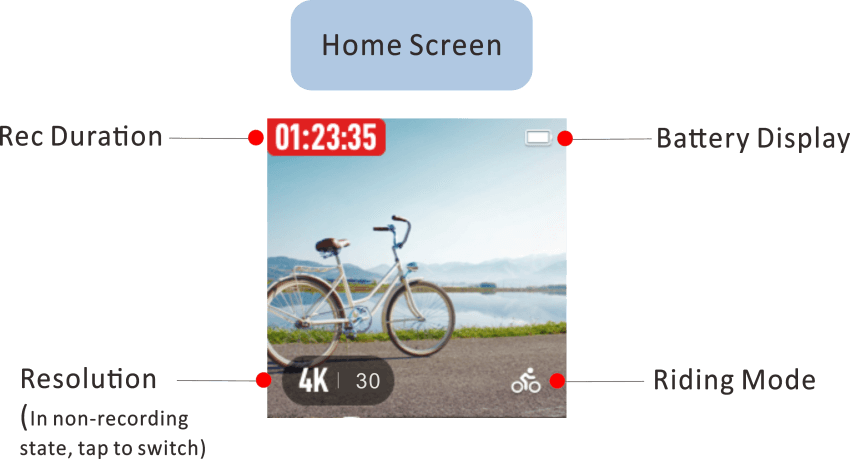
▶ Home Screen
After completing the booting process, you will enter the home screen of the device. The home screen will display information such as battery, riding mode, resolution (In non-recording state, tap to switch), recording duration (after recording is turned on), GPS positioning status icon and other information.
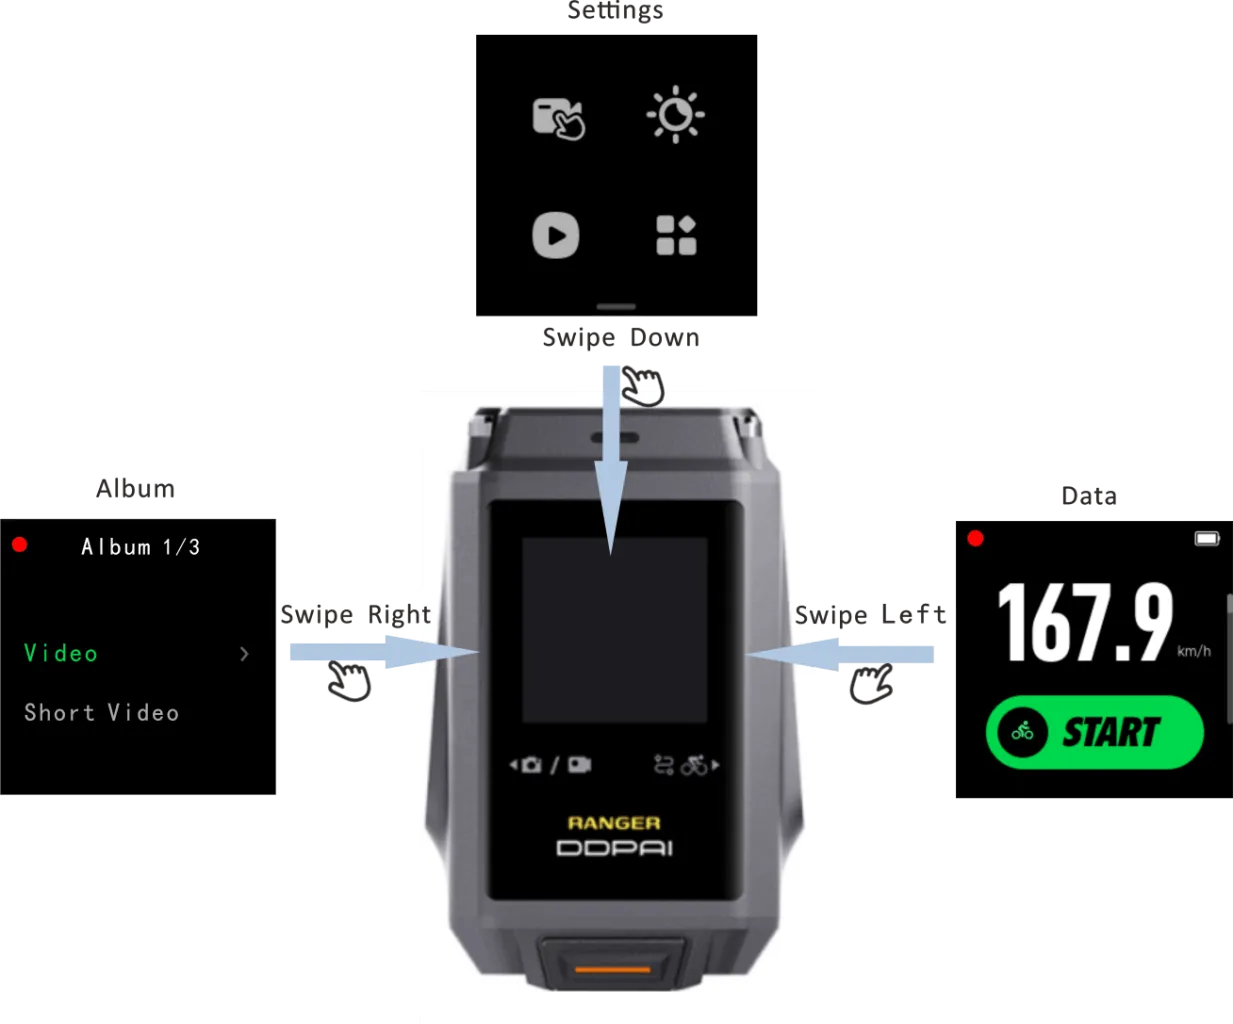
On the home screen, swipe from top to bottom to enter the Settings, swipe from left to right to enter the Album, and swipe from right to left to enter the Data interface. See the figure below for details.
▶ Settings Interface
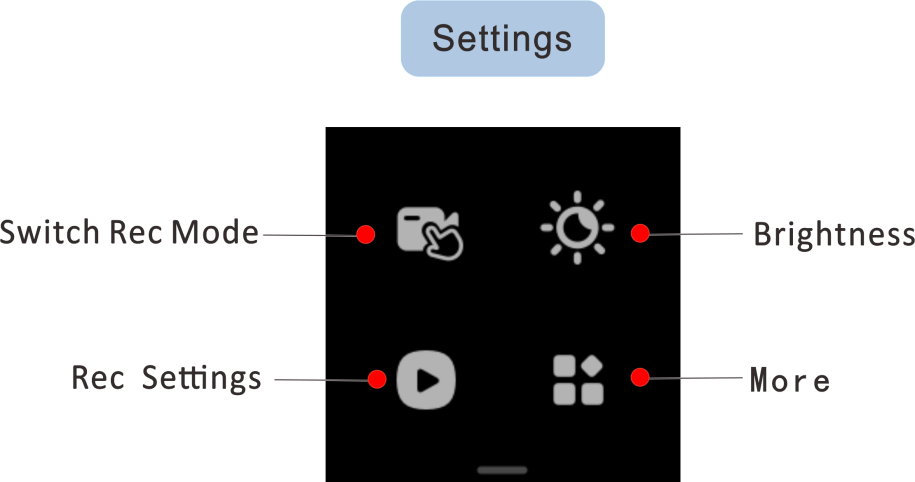
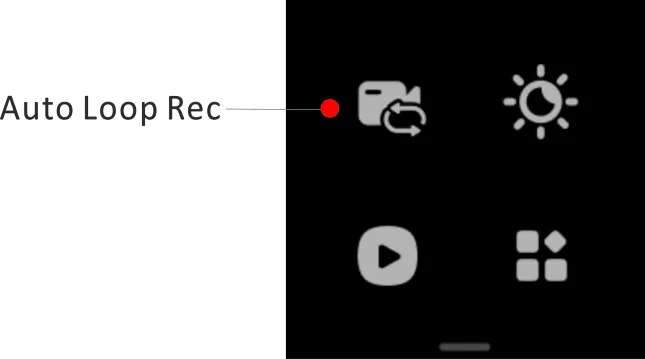
Switch Recording Mode
Tap to switch the recording mode to auto loop recording or manual recording. For details, please see Chapter 5 “Manual Recording” / “Auto Loop Recording”.
Screen Setup
Tap Brightness to adjust the brightness.
Rec Setup
Tap Rec Settings to enter the “Rec Setup” interface, where you can set the resolution, recording mode, etc.
Rec Setup > Resolution
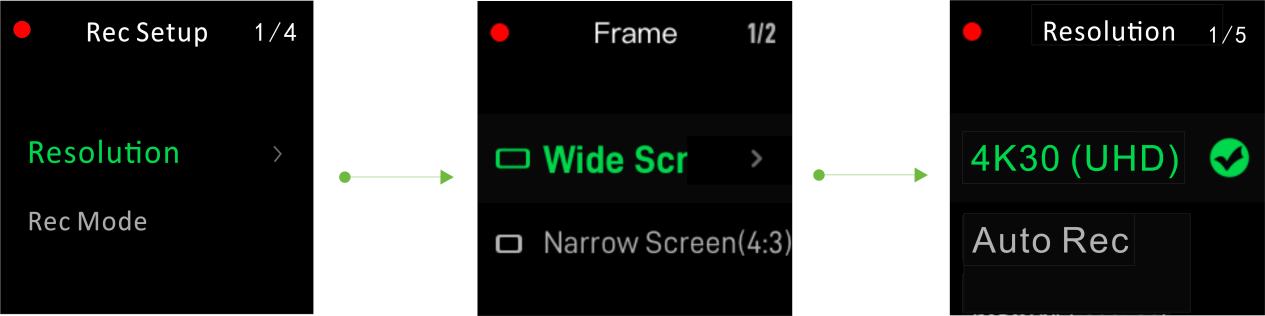
| Frame (aspect ratio) | Resolution | Frame Rate | Resolution |
| Wide Screen (16:9) | 4K (UHD) | 30fps | 3840 x 2160 |
| Wide Screen (16:9) | 4K (Night) | 25fps | 3840 x 2160 |
| Wide Screen (16:9) | 2K (Sport) | 60fps | 2560 x 1440 |
| Wide Screen (16:9) | 2K (Night) | 50fps | 2560 x 1440 |
| Wide Screen (16:9) | 1080P (Power Reserve) | 30fps | 1920 x 1080 |
| Narrow Screen (4:3) | 2K (Sport) | 60fps | 1920 x 1440 |
| Narrow Screen (4:3) | 2K (Standard) | 30fps | 1920 x 1440 |
Rec Setup > Rec Mode
The recording mode can be set to “Manual” or “Auto”. In the manual recording mode, you can start/end recording manually. In the automatic recording mode, the video recording is started when the camera is turned on. After the recording files reach the storage limit, the oldest files will be automatically deleted.

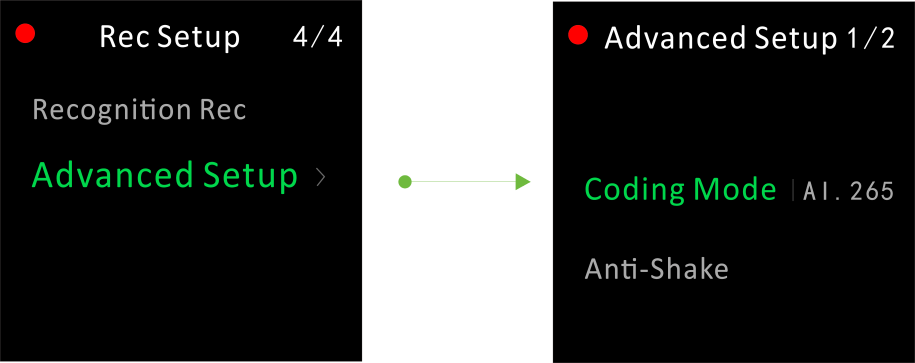
Rec Setup > Advanced Setup
Including the following detailed settings:
1. Coding mode: AI.265/H.264 (default: AI.265)
2. Anti-shake: On/Off (default: on)
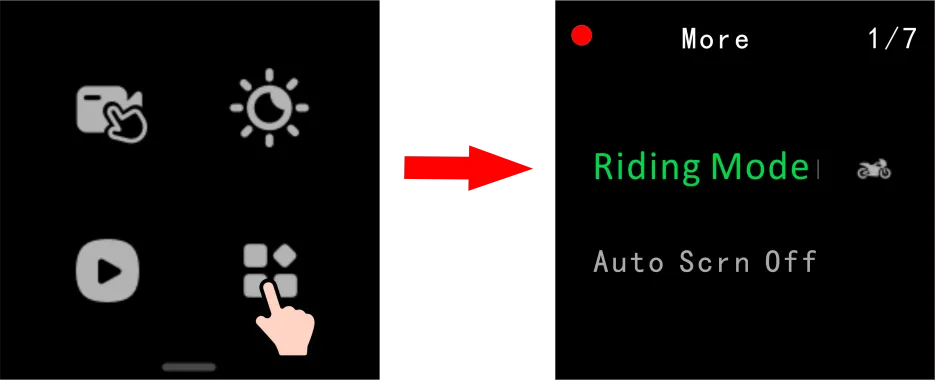
More
Tap to go to the “More” setup interface, which includes riding mode settings, storage management, language selection, factory reset, app connection, device version viewing, etc.
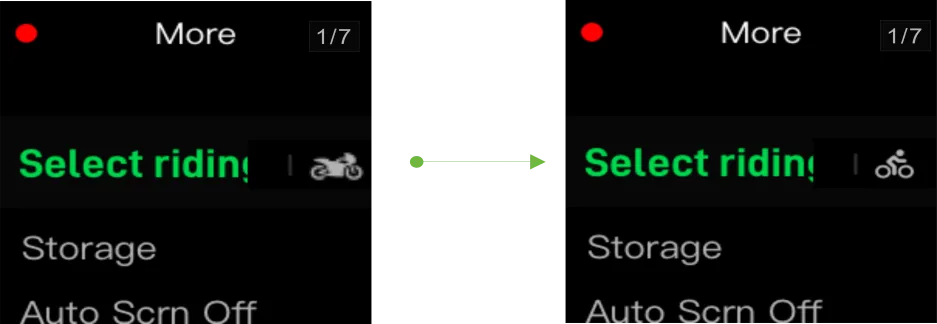
More > Riding Mode
Tap to select “Motorcycle” or “Bicycle” riding mode.
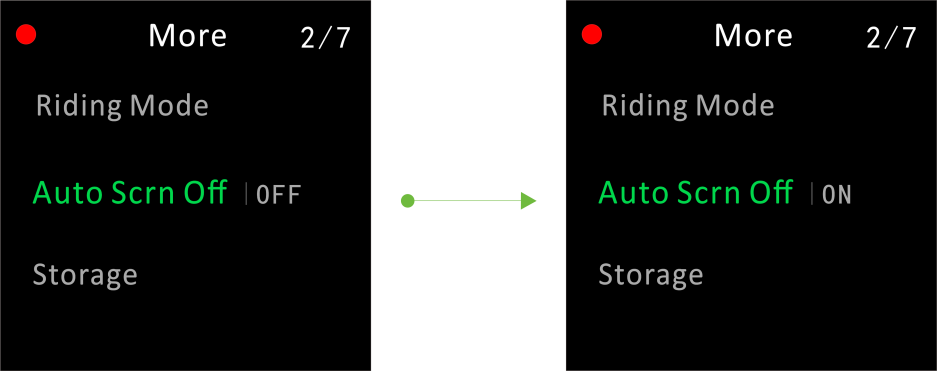
More > Auto screen off
You can select “Auto screen off” or ”Screen always on”.
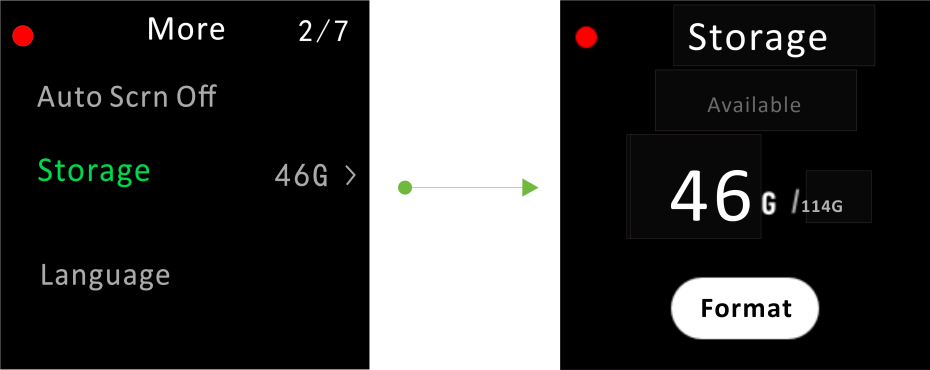
More > Storage
You can view the current storage space and format the storage space.
More > Language
Tap to select “Simplified Chinese” or “English”.

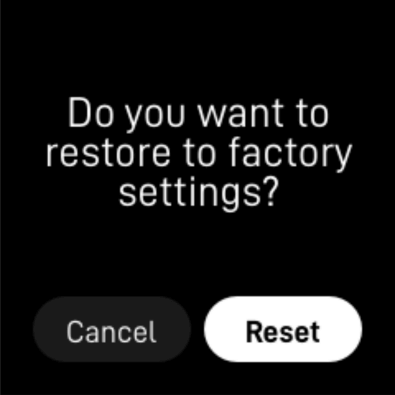
More > Reset
Tap “Reset” and you will be prompted “Do you want to restore to factory settings?”. Then tap “Reset” will restore all setting items and restart the device.
More > App Connection
Scan the QR code to download DDPAI App.

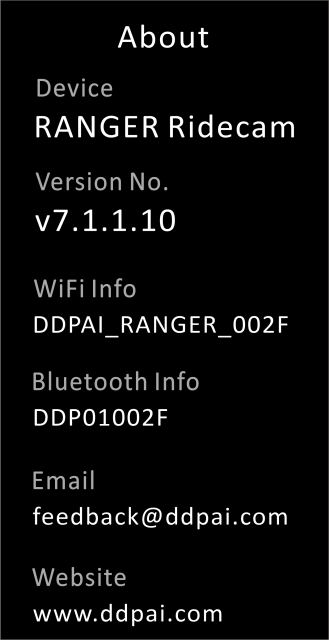
More > About
You can view the device name, version number (firmware version), Wi-Fi, Bluetooth information, etc.
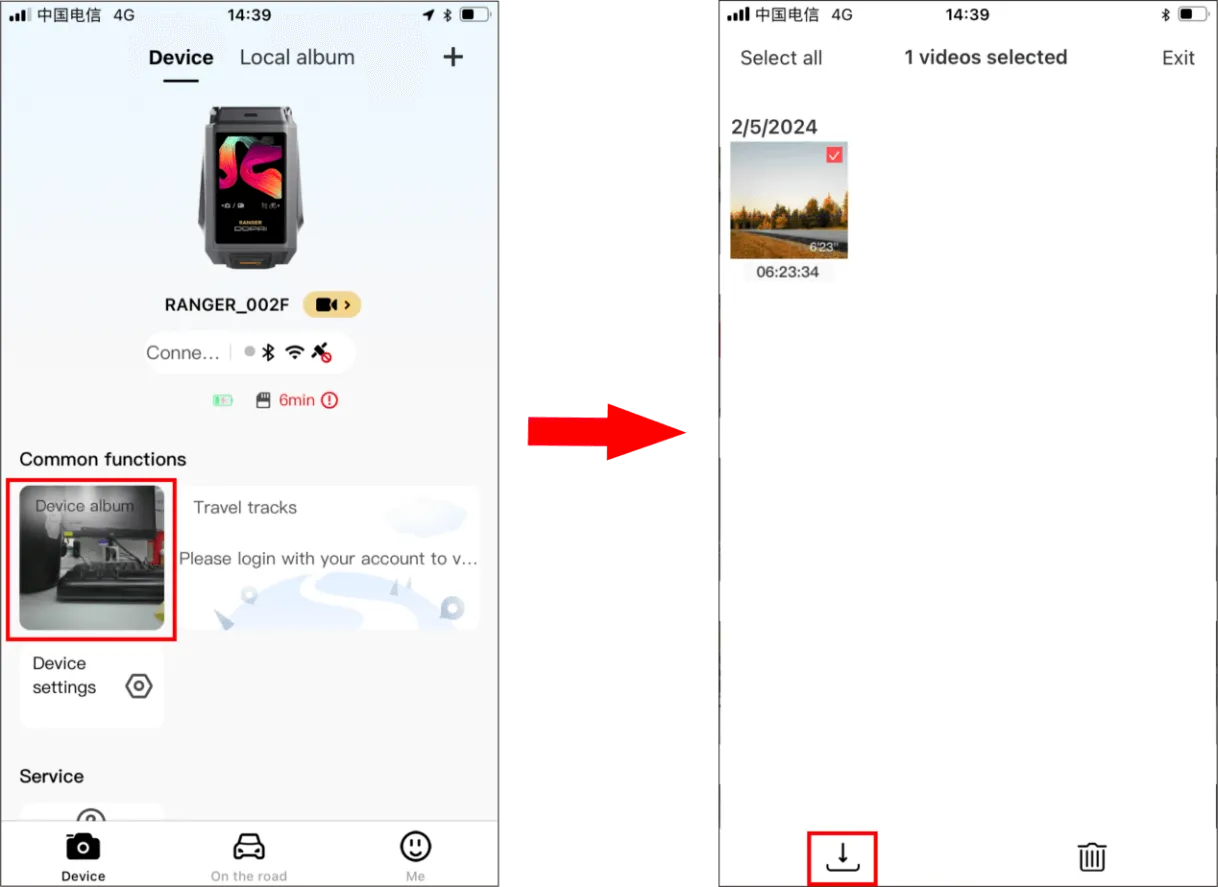
▶ Album
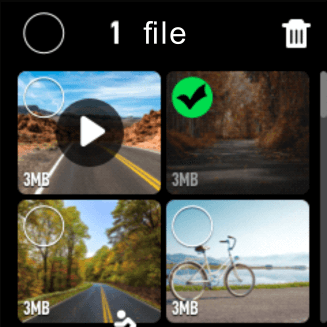
Enter the album interface, you can view videos, short videos and photos, and you can view or delete these files.
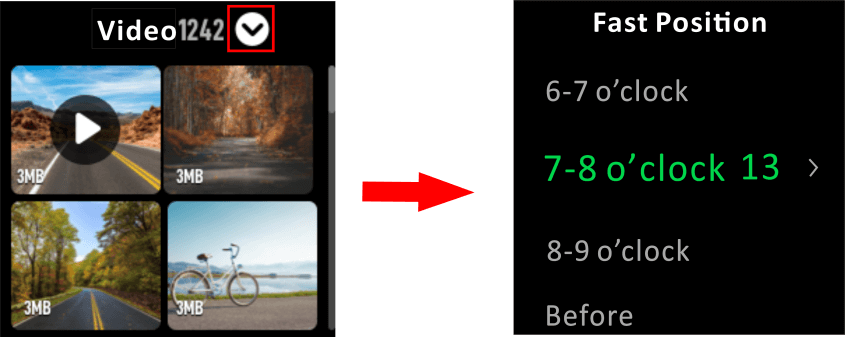
Fast position: Tap ∨ ICON to quickly find the files you want based on time points.
Play/pause the video: When you enter the single video file playback interface, tap the screen to play/pause the video.
Delete the file: Press and hold the screen to delete the single file.
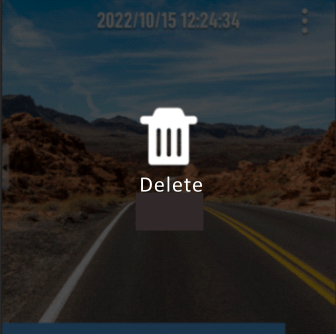
Delete the file on the list: Press and hold a single video file to enter the selection state, or tap (select all) at the top of the screen, and select the video/photo you want to delete, then tap (delete).
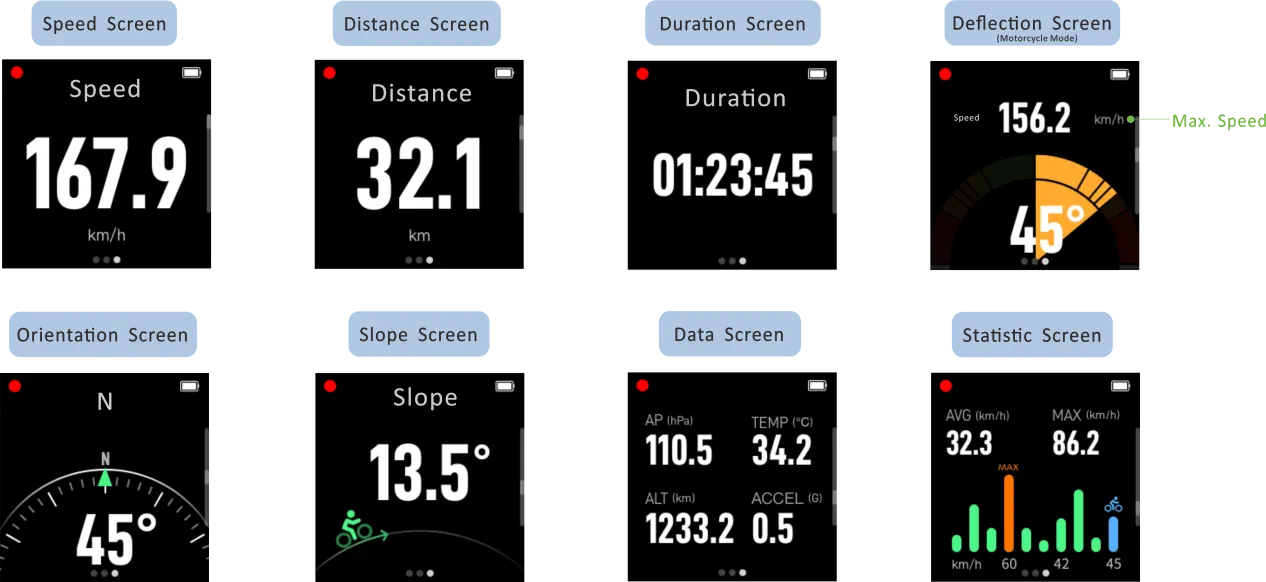
▶ Data Interface
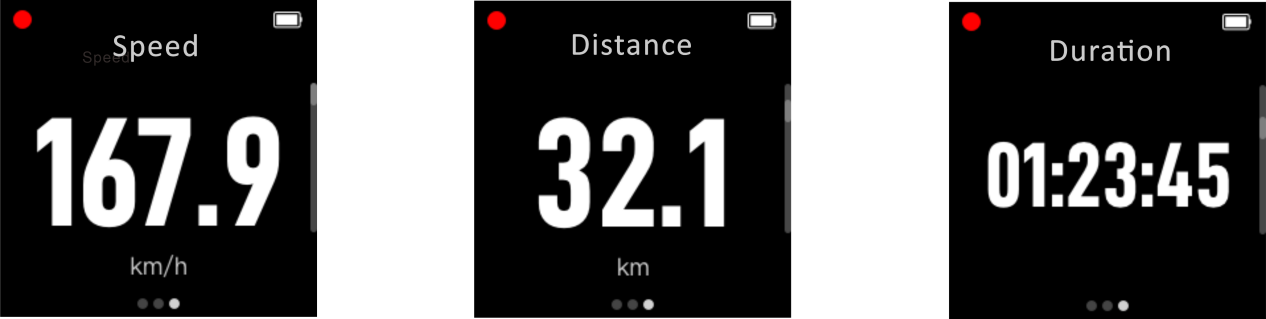
When you start the riding mode, you can swipe up on the home screen or press the right button of the device to switch the data interface, including speed, distance, duration, compass, slope, air pressure, temperature, altitude, acceleration, etc.
Start the riding mode: Press and hold the right button to directly enter the riding countdown interface (or press the right button to enter the data interface, and then tap start button).

Switch data interfaces: Swipe the screen up and down or press the right button to switch the data interfaces.
Icon Description
| Icon | Meaning |
| Recording | |
| Duration | |
| Insufficient Storage | |
| Bluetooth Connected | |
| Fully Charged | |
 | Charging (icon flashes) |
 | Low Battery |
| GPS Positioning (icon flashes) | |
| GPS Positioning Successful (icon not displayed) | |
| Bicycle | |
| Motorcycle |
Recording Function
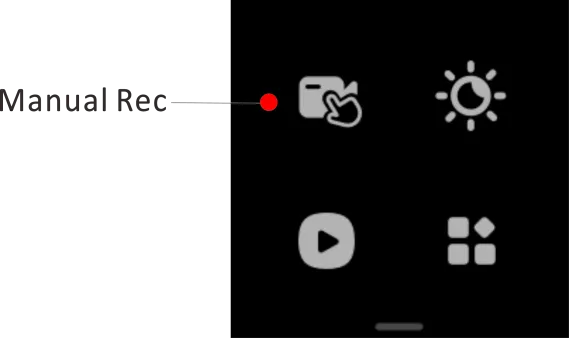
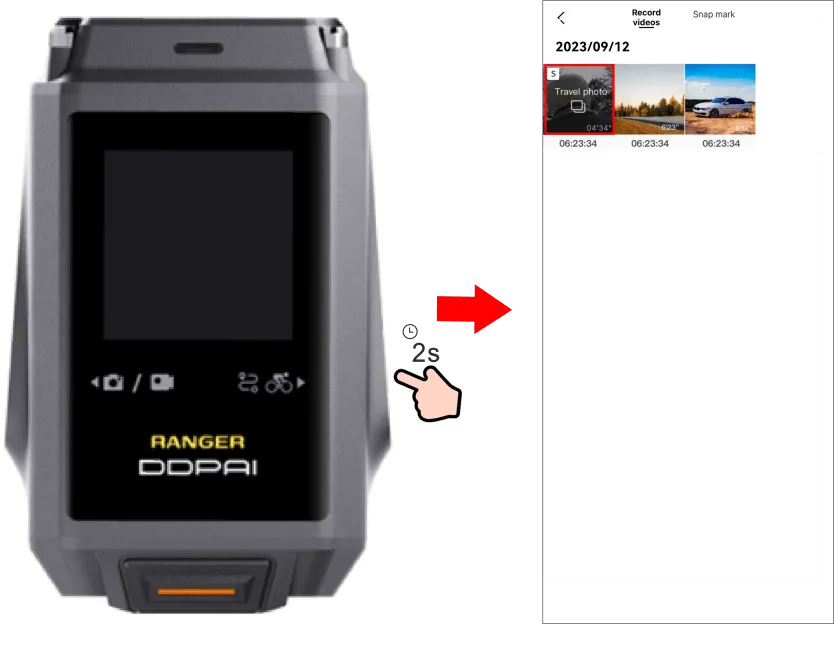
▶ Manual Recording
Swipe down on the home screen, tap the recording mode icon to switch to the manual recording mode.
1. To start: Press and holdthe left button for 2 seconds or tap start button on the app interface
2. To end: Press and hold the left button for 2 seconds or tap end icon on the app interface
● When you enters the album to play back the video or connects to the app for playback and download, the device will pause the recording.
● The maximum duration of a single file is 3 minutes.
▶ Auto Loop Recording
Swipe down on the home screen, tap the recording mode icon to switch to the auto loop recording mode.
1. To start: Recording starts as soon as the device is turned on.
2. To stop: Switch to another recording mode (manual recording) or turn off the device
● When you enters the album to play back the video or connects to the app for playback and download, the device will pause the recording.
● Loop recording videos will only be overwritten by the loop video files, manual recording files and time-lapse recording files will not be overwritten.
▶ Event Recording
If you encounter an emergency during your trip, you can take photos and generate a short video by briefly pressing the left button on the camera.
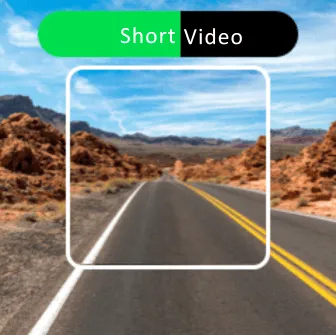
1. To start: Short press the left button of the device
2. Short video duration: 10 seconds
● When a marked short video is a segment in a recording video file, it will prompt "The deleted file contains xx related videos, do you want to keep them?". If you select to delete, both the long video and the tagged short video will be deleted.
Time-lapse Video
When the device automatically detects the movement or the user manually starts the riding mode, the time-lapse video will be turned on, and you can view the time-lapse video file by connecting the app.
1. Time-lapse multiplier: 6 times
2. To start automatically: When the device is turned on, GPS positioning is successful and the moving speed reaches 5 km/h)
To start manually: Hold the right button for 2 seconds or tap start button on the app interface
3. To pause: Hold the right button for 2 seconds or tap pause icon on the app interface
4. To end : Press and hold the right button for 2 seconds or tap end icon on the app interface.
5. To view the file: After the ride, connect to the app to view the trip trajectory and download the time-lapse video file of this trip.
● Time-lapse video only overwrites time-lapse video files, not other types of video files.
● Time-lapse video files do not contain audio.
Riding Mode
Before riding, you can freely choose the bicycle or motorcycle mode. During riding, you can view all kinds of data (speed, acceleration, distance, trajectory, inclination angle, compass, air pressure, altitude, etc.) in real time. After riding, you can connect to the app and check the trajectory and download the short video file of this riding to share your wonderful moments in time!
1. Set the riding mode: Swipe down on the home screen of the device, tap for more settings, you can select “Riding mode” > “Bicycle” / “Motorcycle”.
2. Start riding: Press and hold the right button or tap on the app interface
3. Pause riding: Press and hold the right button or tap on the app interface
4. End riding: After pausing, continue to press and hold the right button for 2 seconds or tap on the app interface.
5. Check data: Press the right button to switch the data interface
SR Function
After the video is downloaded to the app, the video stacked with motion data can be exported, including trajectory, mileage, real-time speed, G-value, height, slope and other information.
Tap “Download” first. After the video is downloaded, turn on the “SR” switch on the lower left. After turning it on, you can view the SR effect.
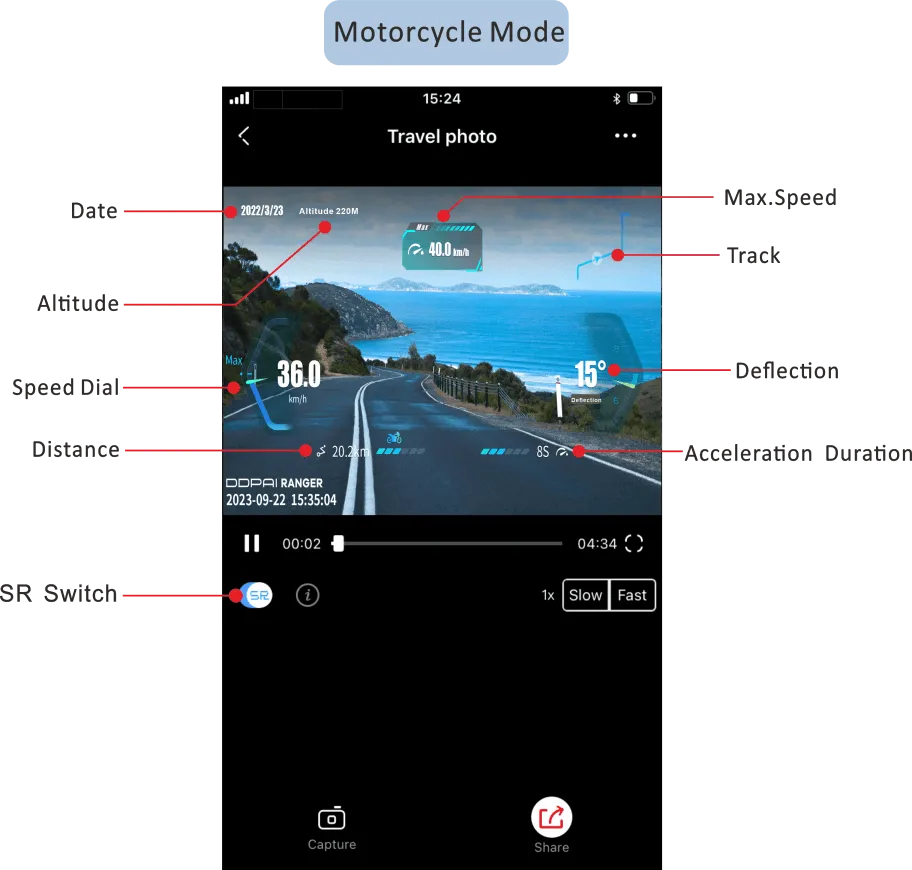
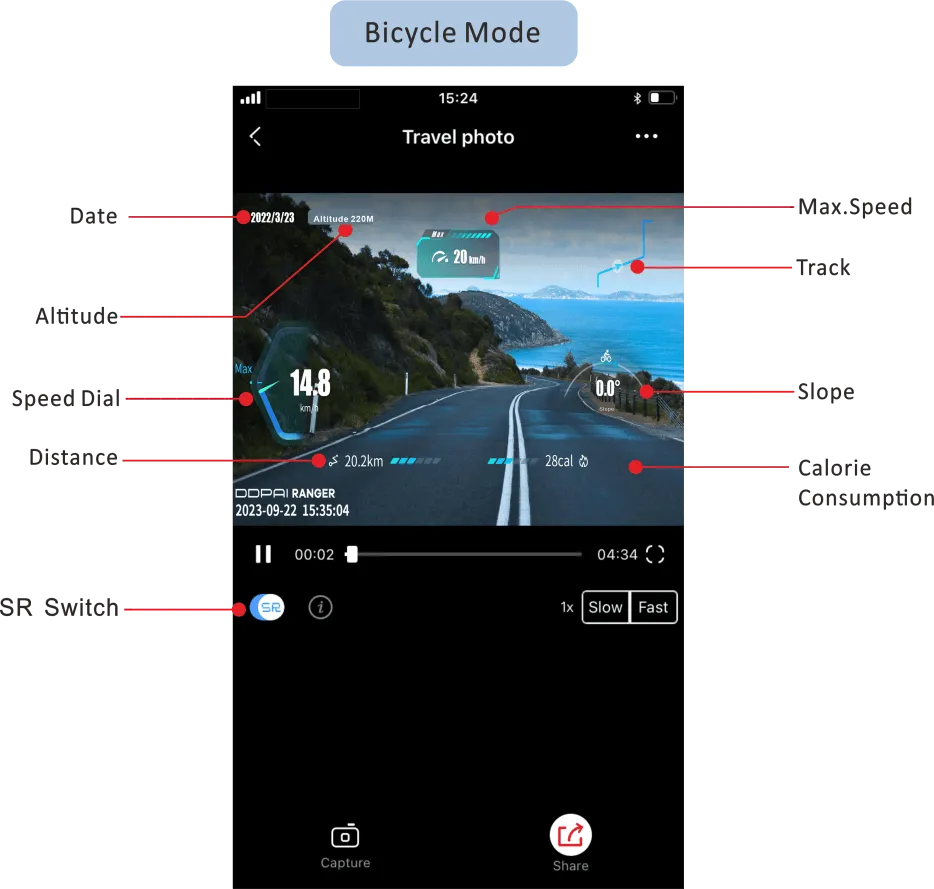
● The video file needs to be downloaded locally before the SR data can be synthesized.
● SR data is for reference only, and the accuracy of the data is closely related to the installation location of the device.
Data Transmission
You can connect the device to the computer through the included Type-C cable, and export the video/photo file of the device. You can also choose to view/download by connecting to the app.
Firmware Upgrade
Please check the camera’s battery before upgrading to ensure it is above 15%. After connecting the camera to the DDPAI App, if the app prompts you to upgrade the new firmware, please follow the interface prompts to perform the upgrade operation.
Cleaning
1. When there are foreign objects on the lens protection cover, it is recommended to clean it with clean water or use tools such as lens pens, lens air blowers, and lens cloths to clean it. Make sure the camera is dry when replacing the protective lens cap. After the device is out of the water, it needs to be dried to avoid fogging caused by the water in the gap entering the lens protection cover. Do not disassemble the lens protection cover frequently, so as to avoid dust entering the lens cover during disassembly and assembly, which will affect the shooting quality.
2. When there are foreign objects on the lens, use lens pen, lens air blower, lens cloth and other tools to clean them.
3. If there are foreign objects in the cover of the data power supply, please clean them with a dry, soft cloth or paper or air blower.
4. Pay attention to dust and sand in the quick-release base, otherwise it will affect assembly stability of the machine.
Warnings
1. The device contains strong magnetism. To avoid the effect of magnetization, please keep away from magnetic cards, IC cards, implanted medical devices (such as pacemakers), hard drives, AM chips and other vulnerable devices.
2. The built-in waterproof membrane of the sound pickup hole and the air pressure balance hole of the device is specially designed for waterproofing. Do not remove the printing by yourself or use sharp objects to damage it, otherwise the waterproof protection will be lost. After using in water, please use a soft clean cloth to clean the moisture and foreign matter on the device in time.
3. When there is water or dirt on the surface of the extension interface of the device, it must be wiped clean before connecting power supply accessories and other operations. Otherwise it will stop working or cause corrosion.
4. Do not dry the device with a hair dryer, otherwise the microphone membrane and the built-in breathable membrane will rupture and water will enter.
5. If the product catches fire, please immediately use water, water, sand, fire blanket, powder, carbon dioxide fire extinguisher to extinguish the fire. Please select the fire extinguishing method according to the above recommended order according to the actual situation.
6. Please use the product in an environment where the temperature is between -20°C and 45°C.
7. The charging environment temperature of the product is 5°C to 40°C. To optimize the life of the built-in battery, charging will be suspended when the temperature limit is reached in the power-on state, and it is recommended to charge in the power-off state.
8. Do not disassemble the product in any way. If the battery is pierced during disassembly, the electrolyte inside the battery will leak, and even cause fire and explosion. Do not mechanically strike, crush or throw the product. Do not place heavy objects on the product.
9. Do not heat the product. Do not place the product in microwave or pressure cooker.
10. It is forbidden to place the product near a heat source (stove or heater, etc.) and to place the product in a car on a hot day. Do not store the product at temperatures above 60°C.
11. Do not store the battery for a long time after it has been fully discharged to avoid battery damage caused by over-discharge. Otherwise, the device will no longer function properly.
Precautions
1. Falling from a high place or being subjected to excessive external impact may damage the device and cause abnormal operation.
2. Make sure the lens protection glass is clean. Foreign matter may scratch the lens protection glass and cause image quality damage. It is recommended to clean the device with a soft dry cloth.
3. If the lens protection glass is accidentally damaged, please handle it carefully to avoid injury.
4. When using the device, please keep it away from dust and sand. If the sound pickup hole of the device is blocked by foreign matter such as sand and dust, please wash it with water.
5. Do not use sharp objects to poke the USB-C interface, pickup holes, and speakers.
6. Do not place the device in extreme cold or heat. Low or high-temperature conditions may shorten battery life or cause temporary malfunction.
7. Do not use the device in thunderstorm weather.
8. Do not disassemble and repair the device by yourself.
9. Do not use the device in hot springs, corrosive liquids. It is not recommended to use the device in extreme water environment, or unknown liquid environment.
10. When fixing the device outside the vehicle, if the speed of the vehicle is too fast, there are impurities on the surface of the vehicle, or in strong winds or rainstorms, the fixing of the device will be affected, resulting in falling.
11. Do not use the device underwater.
12. If the battery is low, please charge it in time. Long-term (more than 4 months) low battery storage will affect the service life of the battery.
13. If the device is not used for more than 10 days, please charge or discharge the battery to 40%-60% for storage, which can prolong the service life of the battery.
FAQ
Q: GPS positioning failed?
A: It may be caused by the poor GSP signal at your current location (such as near a tall building/indoors/in a tunnel/or in a blocked location, etc.). It is recommended that you try again in an open place. If the GPS positioning fails after passing through a place with no signal, it will automatically reposition after the signal is restored.
Q: What is “Riding Mode”?
A: When you start the riding mode, the camera will record the riding data during the ride such as: speed, duration, mileage, trajectory, slope, declination, altitude and other data, and automatically start recording the trip snapshot, after finishing the ride, you can view a time-lapse video of the trip on the app.
Q: What should I do if the temperature of my camera is too high?
A: Ranger can continue to work normally within the temperature range of -10℃ to 45℃. It is normal for electronic products to heat up during use, so please feel free to use it. In addition, all DDPAI products have been tested at high temperatures. During normal use, the surface of the product will heat up due to heat dissipation from the device, which will not affect the normal operation of the device or cause safety issues.
Q: The touchscreen cannot be successfully calibrated?
A: Please try following the on-screen prompts to flip your device up, down, left, or right and draw a figure 8 for calibration.
Q: Why can’t I press and hold the left button for 2 seconds to end recording?
A:
1. Check whether the current recording mode of the device is loop recording mode. Loop recording mode does not currently support pressing the button to turn off/on recording.
2. Switch to manual recording mode, and you can start/end recording by pressing the left button.
Q: Will tapping the device screen to enter the album stop recording?
A: Enter the album will not stop recording. The device will only stop recording when playback the video.
Q: What’s the reason for lag when viewing videos on mobile phone?
A: The highest resolution of Ranger supports 4K. The 4K resolution has higher requirements on playback equipment. It is recommended that you use a mobile phone or computer with high configuration for video playback.
Q: What is the SR function?
A: The camera has a built-in SR function. After connecting to the app, the riding data and trajectory can be superimposed on the video screen to generate an exclusive cool trajectory interface, giving you a better visual and content sharing experience.
Q: How to download/share videos with SR effects?
A: First tap the “Download” button. After the video is downloaded, turn on the “SR” switch on the lower left. After turning it on, you can view the SR effect in the footage. At this time, you can tap the “Share” button to share the video.
Q: Why doesn’t my video show SR effects?
A:
1. First confirm whether the camera has been successfully positioned during riding.
2. After successful positioning, connect to the app for a few minutes and then download the video and the SR effect will appear.
Q: Why can’t my device charge?
A: In order to ensure the durability of the device (battery/sensor inside the fuselage, etc.), charging will stop when the safe charging temperature range of the fuselage is exceeded. It is recommended that the device is turned off and then charged.
Q: Can the ACC charging base (optional) be soaked in water?
A: The ACC charging base (installed with Ranger riding camera) supports IP4 rain resistance, but does not support long-term immersion in water.