Appearance
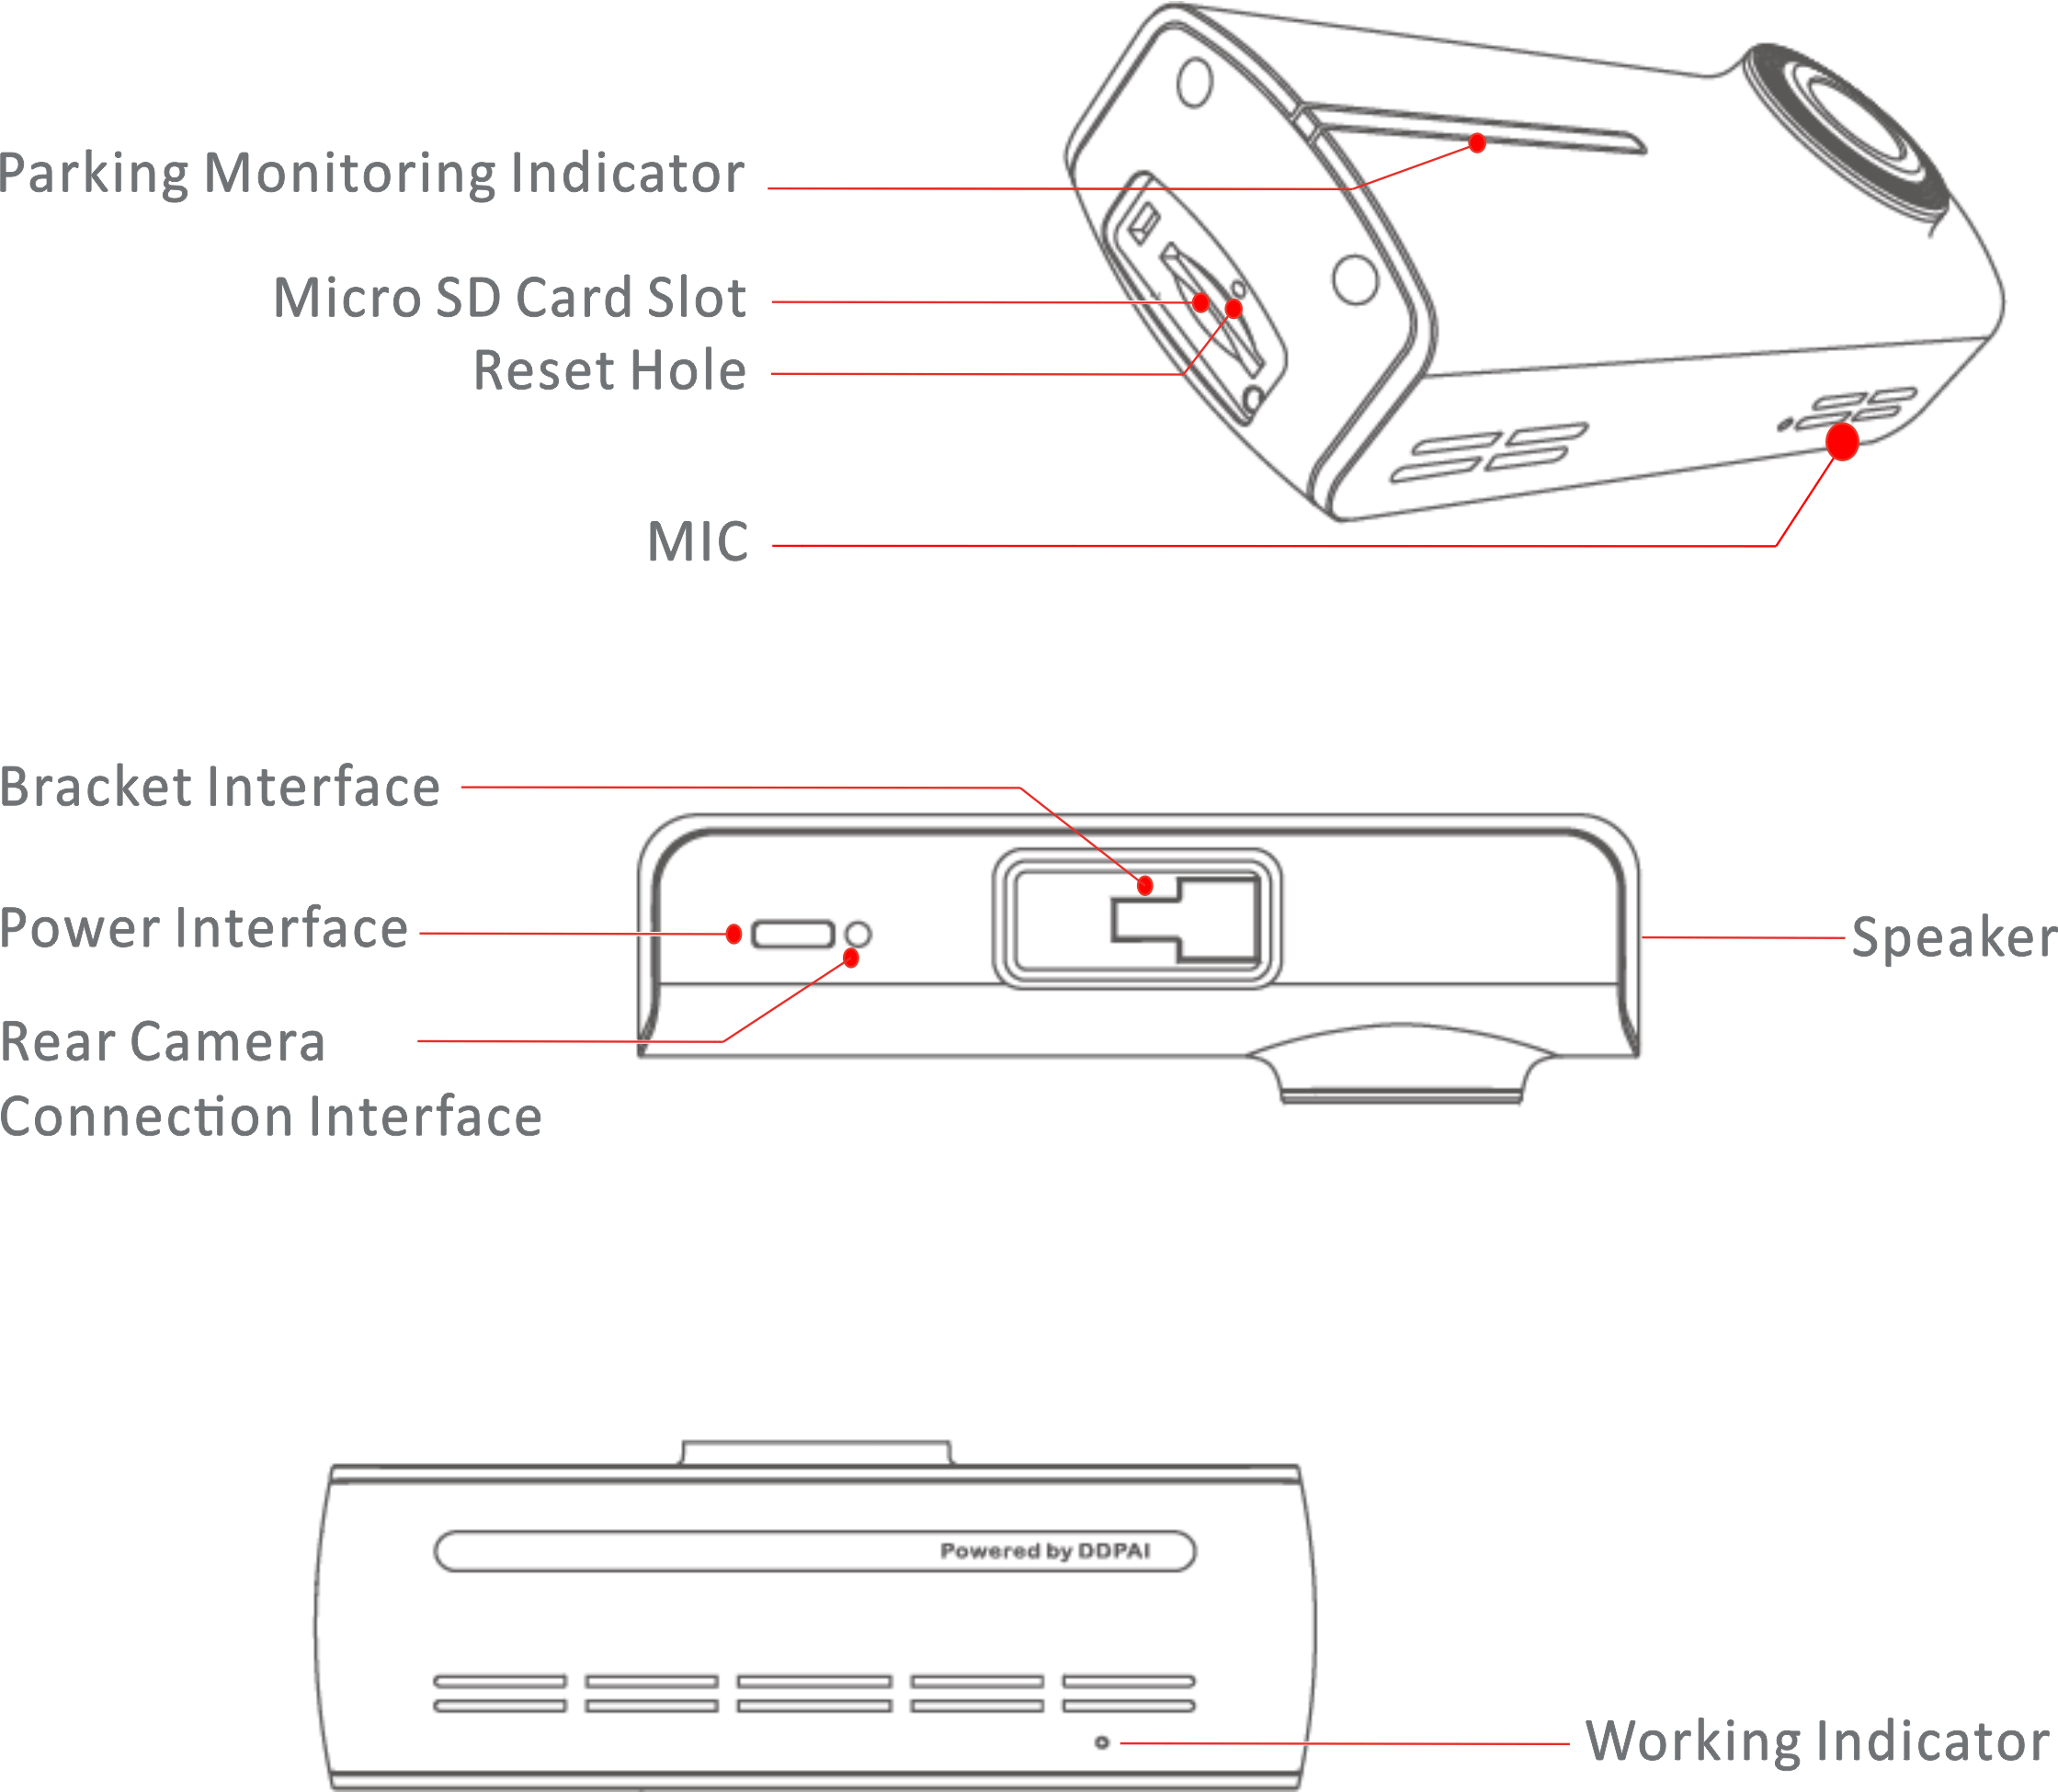
Indicator Guide
Specifications
Dash Cam Installation
The wiring and power-taking installation method of the dash cam include the following two types:
● Cigarette Lighter Power Supply
Insert the car charger into the cigarette lighter, and connect the car charger and the dash cam through the power cord. Most of the power cord will be embedded in the plastic guard plate of the car, and a small part will be exposed in the car. This wiring method is simple and easy to operate.
Step 1: Wipe the front windshield
Wipe the front windshield with a clean soft cloth to ensure that the bracket can stick firmly.
Step 2: Install the dash cam on the bracket
Remove the dash cam and bracket from the package, and install the bracket on the dash cam.
Step 3: Power on the dash cam
After inserting the car charger into the cigarette lighter, connect the dash cam to the car charger using the specified Type-C power cord.
After the car starts, the dash cam will automatically start when it is powered on, and the start-up prompt tone “Hello, DDPAI” will be issued, and the dash cam will start recording at this time.
Step 4: Determine the installation position of the dash cam and adjust the lens angle
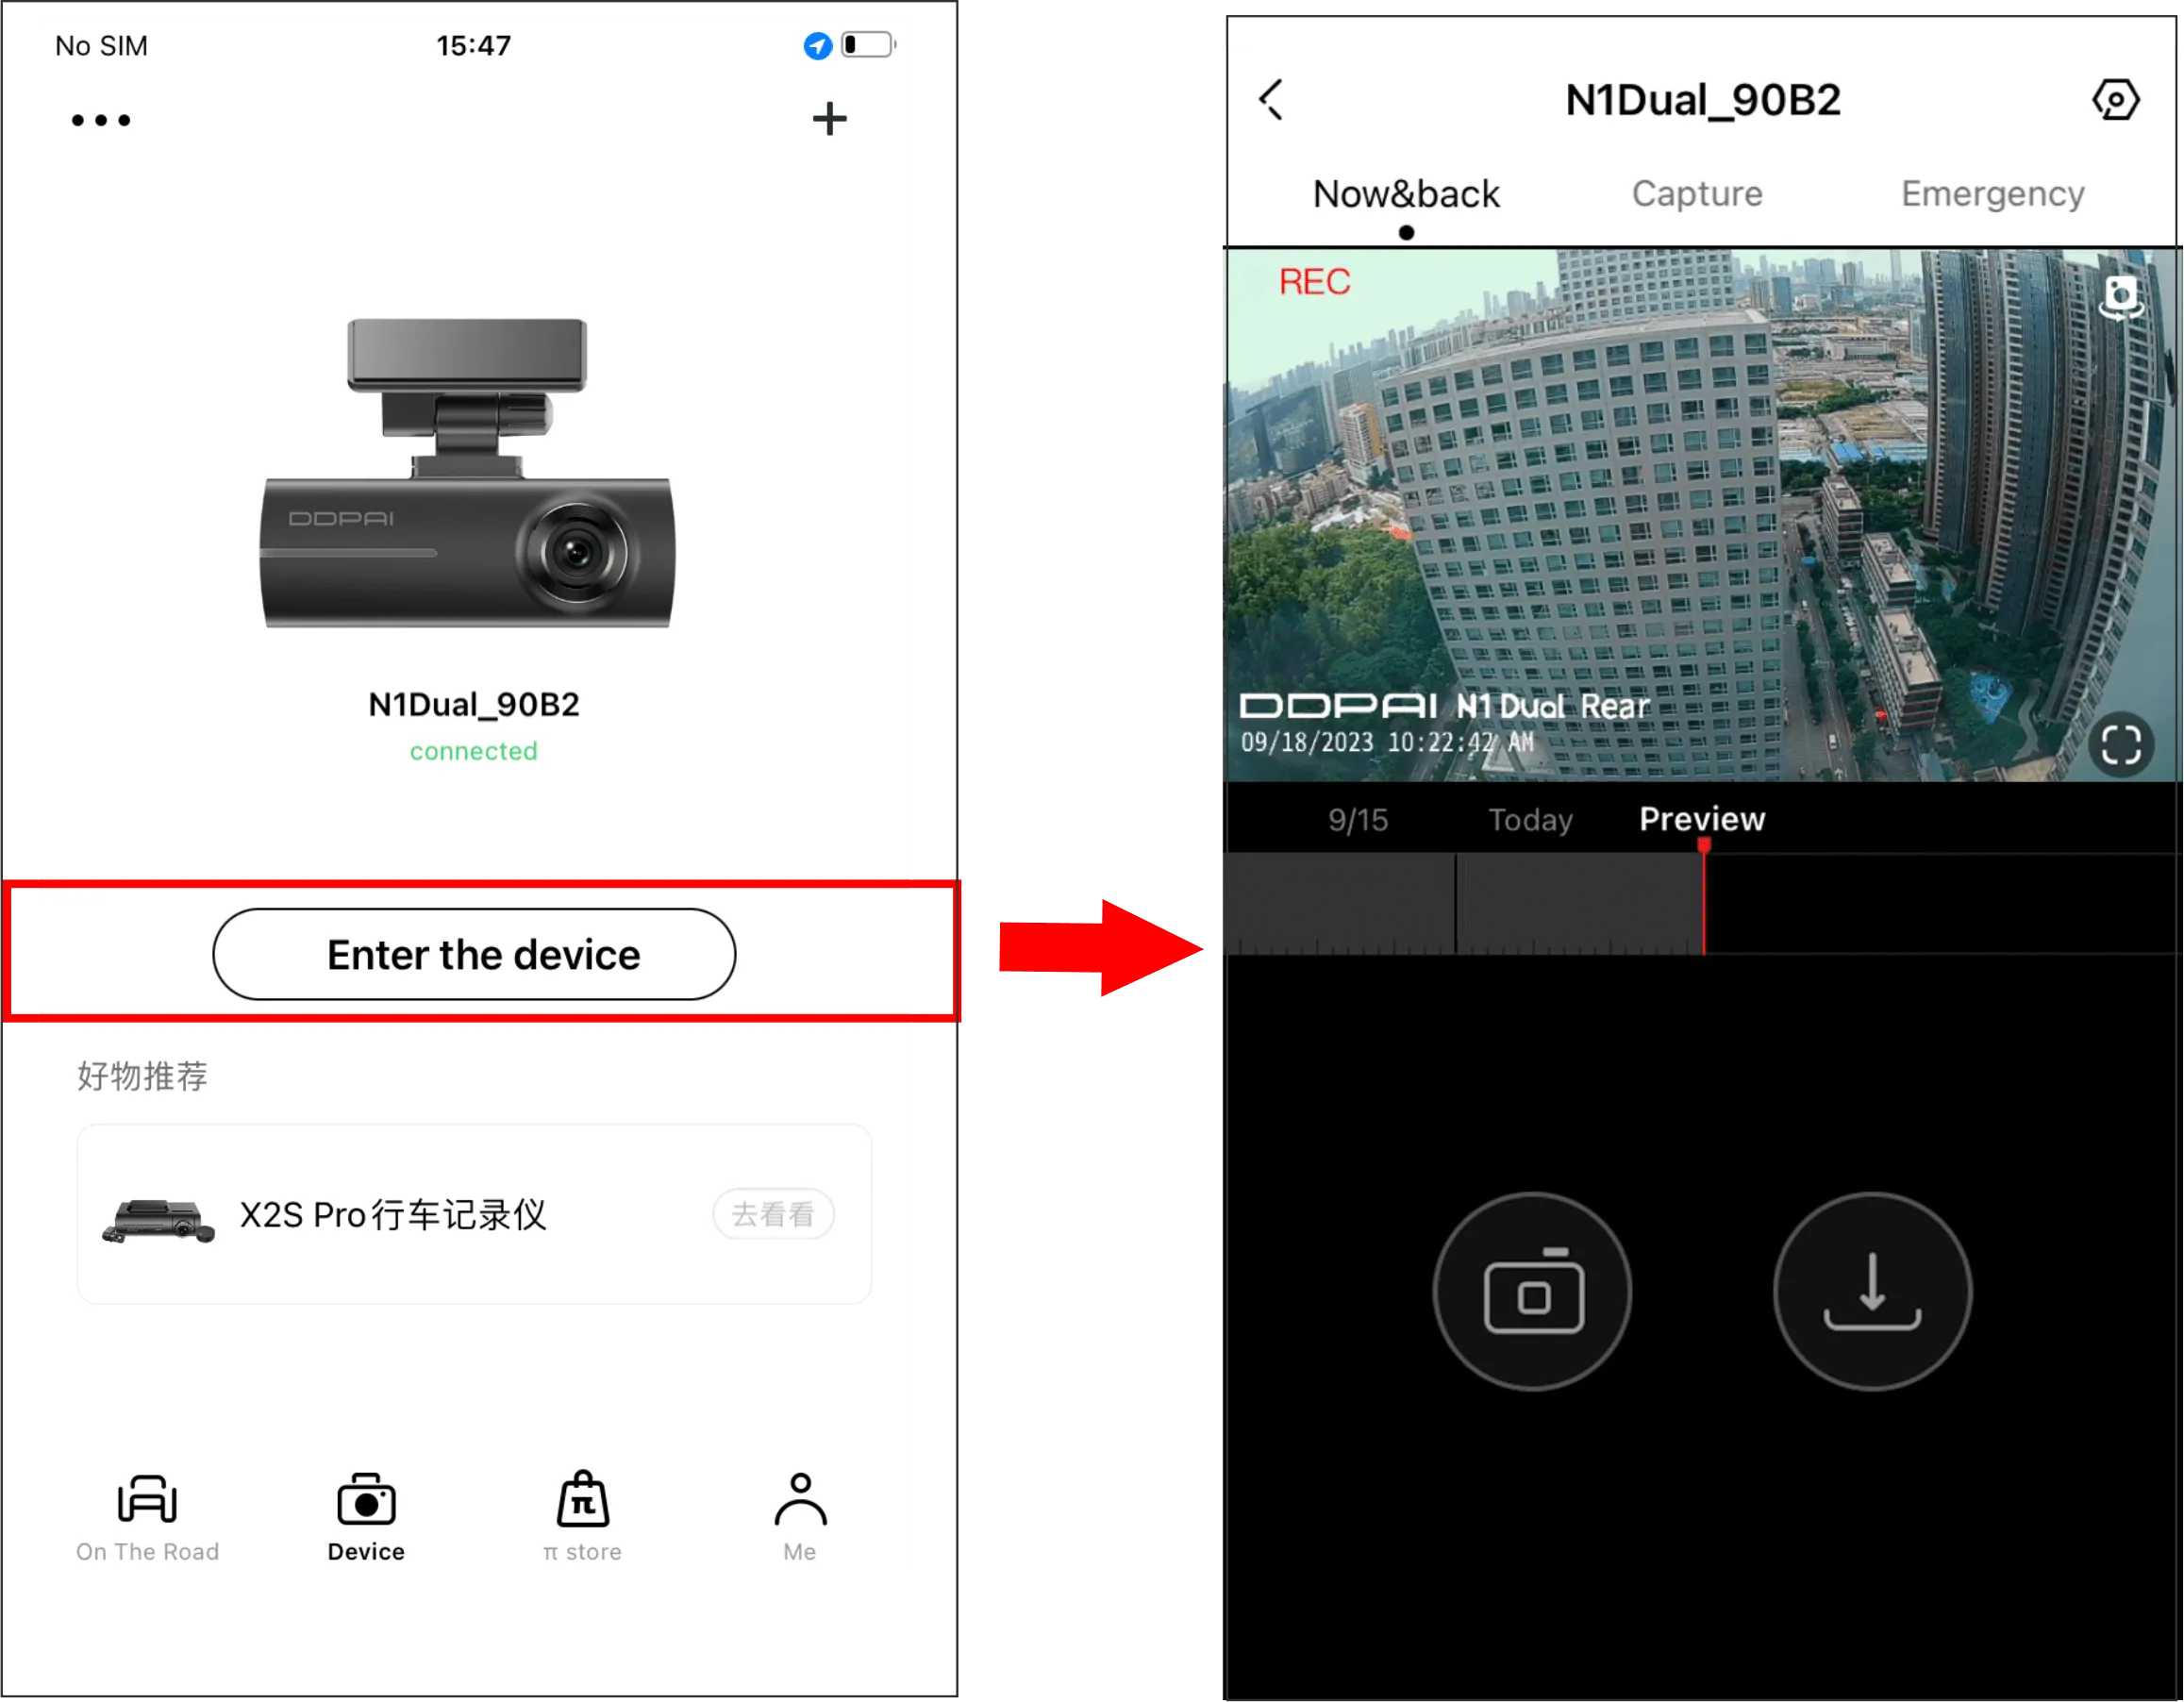
① After connecting the DDPAI App to the dash cam, enter the app, select “Device” > “Connect to Camera”, and enter the “Now&back” interface, where the horizontal center line and vertical center line are displayed.
② Place the dash cam in the middle of the front windshield, so that the bottom of the bracket is attached to the front windshield, and the lens faces outward. According to the horizontal and vertical center lines in the picture, move the dash cam left and right to ensure that the center line of the front of the car is at the vertical center line, and then rotate the device to ensure that the disappearing line of the ground plane is at the center line of the picture.

Note: Please refer to the horizon line and vertical center line to determine the position of the dash cam, otherwise it will affect the use of some functions of the dash cam.
Step 5: Stabilize the dash cam
① After determining the installation position of the dash cam, attach the electrostatic sticker to the installation position.
② Peel off the film of the 3M sticker on the bracket, and stick the bracket to the center of the electrostatic sticker.
Note: Please pay attention to the direction and position when attaching the 3M sticker which is a disposable item. Please confirm that the recording angle of the dash cam is correct before attaching.
Step 6: Wiring
As shown in the following figure, please place the power cord from the cigarette lighter receptacle to the fixed position of the dash cam, and hide the power cord in the plastic guard plate of the car by using the included crowbar.

Note: The cigarette lighter receptacle might be positioned differently in your car. The picture is provided for reference only.
● Connect the fuse box (step-down line is required)
This wiring method ensures neatness and beauty in the car and realizes the parking monitoring function at the same time. But the wiring operation is complicated. To avoid vehicle damage caused by misoperation, please complete the installation at a professional automobile service shop.
Note: The step-down line needs to be purchased separately or by purchasing a package including the step-down line.
SD Card Installation
Please make sure the lens of the dash cam is facing up, and the chip of the SD card is facing up, then insert the SD card into the slot. Please refer to the silkscreen printed pattern beside the SD card slot to install the SD card.

Note: SD card hot plug is not supported, you can restart after hot plug is abnormal to return to normal.
Connecting N1 Dual with Smart Phone
Note: As the APP is constantly upgraded, the actual operation may be slightly different from the following description. Please connect your device to a phone according to the prompts in the DDPAI App.
Step 1: Downloading the DDPAI App
Please scan the QR code below or search for“DDPAI” in the Google Play Store (Android) or App Store (iOS) to download the DDPAI App.

Step 2: Connecting N1 Dual with Smart Phone
The dashcam has built-in wireless Wi-Fi module, and the mobile phone can be directly connected with it to form a wireless local area network. Through the wireless data transmission function, you can preview, playback, download and share driving videos and photos in real-time in the app.
Note: The above operation does not consume mobile phone traffic. The built-in Wi-Fi of the dashcam cannot be used as a mobile phone data network or as a hot spot. After scanning the QR code and downloading the app, you can operate and set up the dash cam on your phone.
① Open the DDPAI App, enter the “Device” page, tap “+ Connect New Device“, enter the “Choose your device” interface, and then tap “Screen-less Dash Cam“.

② Tap “Next” > “Connect to Wi-Fi” in turn, and the detected Wi-Fi of the dash cam (such as DDPAI_N1 Dual_XXXX) will be displayed. Tap Connect.

③ Connect your phone to the built-in Wi-Fi “DDPAI_N1 Dual_XXXX” of the dash cam, and the default password is 1234567890.
▶ For iPhone: When you enter the“Settings”interface, select “WLAN” > “DDPAI_N1 Dual_XXXX“, enter the initial password (1234567890), and tap Join.

▶ For Android phones: In the Wi-Fi list, select “DDPAI_N1Dual_XXXX”, enter the initial password(1234567890), and tap Connection.

④ After successful connection, you can directly enter the “Now&back” interface of DDPAI App.
Note:
When you connect the dash cam for the first time, you will be prompted:
● To modify the Wi-Fi password: Please modify it according to your needs, and save the password properly after modification (if you forget the password, please hold the reset button on the dash cam with a pin for 6 to 8 seconds to restore the factory settings, and then reconnect the dash cam with the initial password).
● Whether to enable high-compression video encoding: It is recommended to enable. After enabling, the recorded video quality will be improved, which is clearer than the default configuration.
Now&back
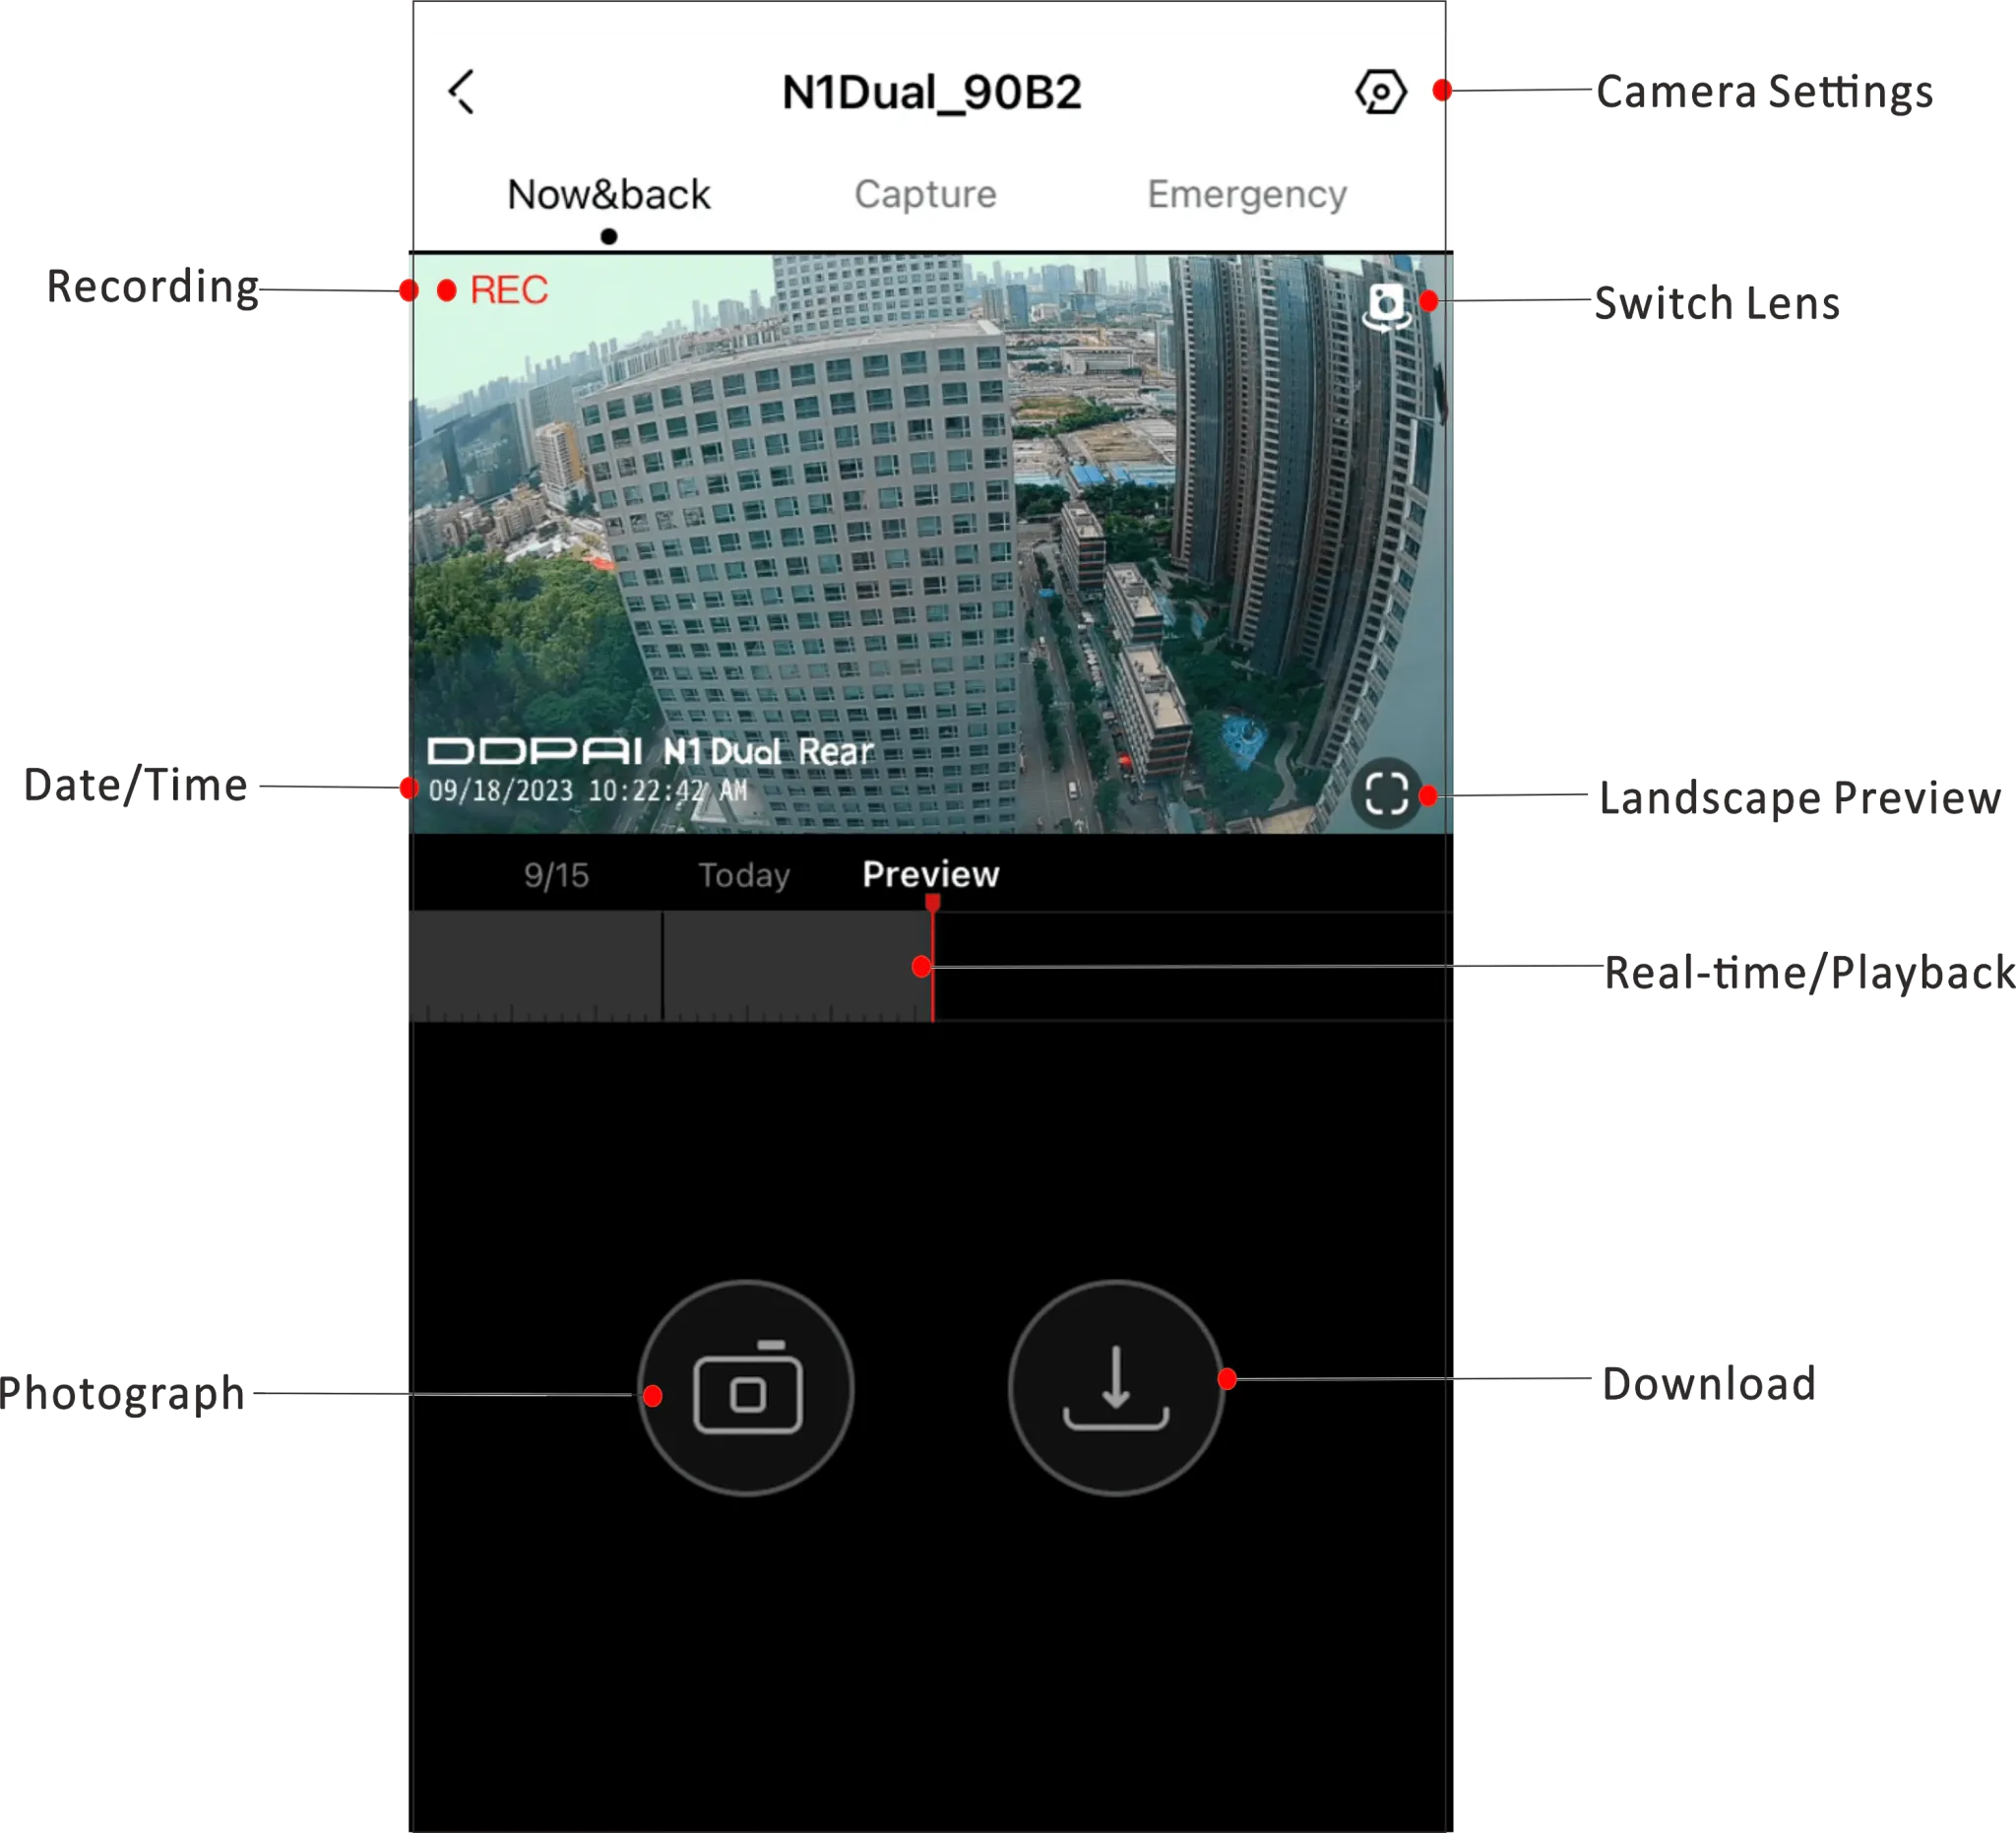
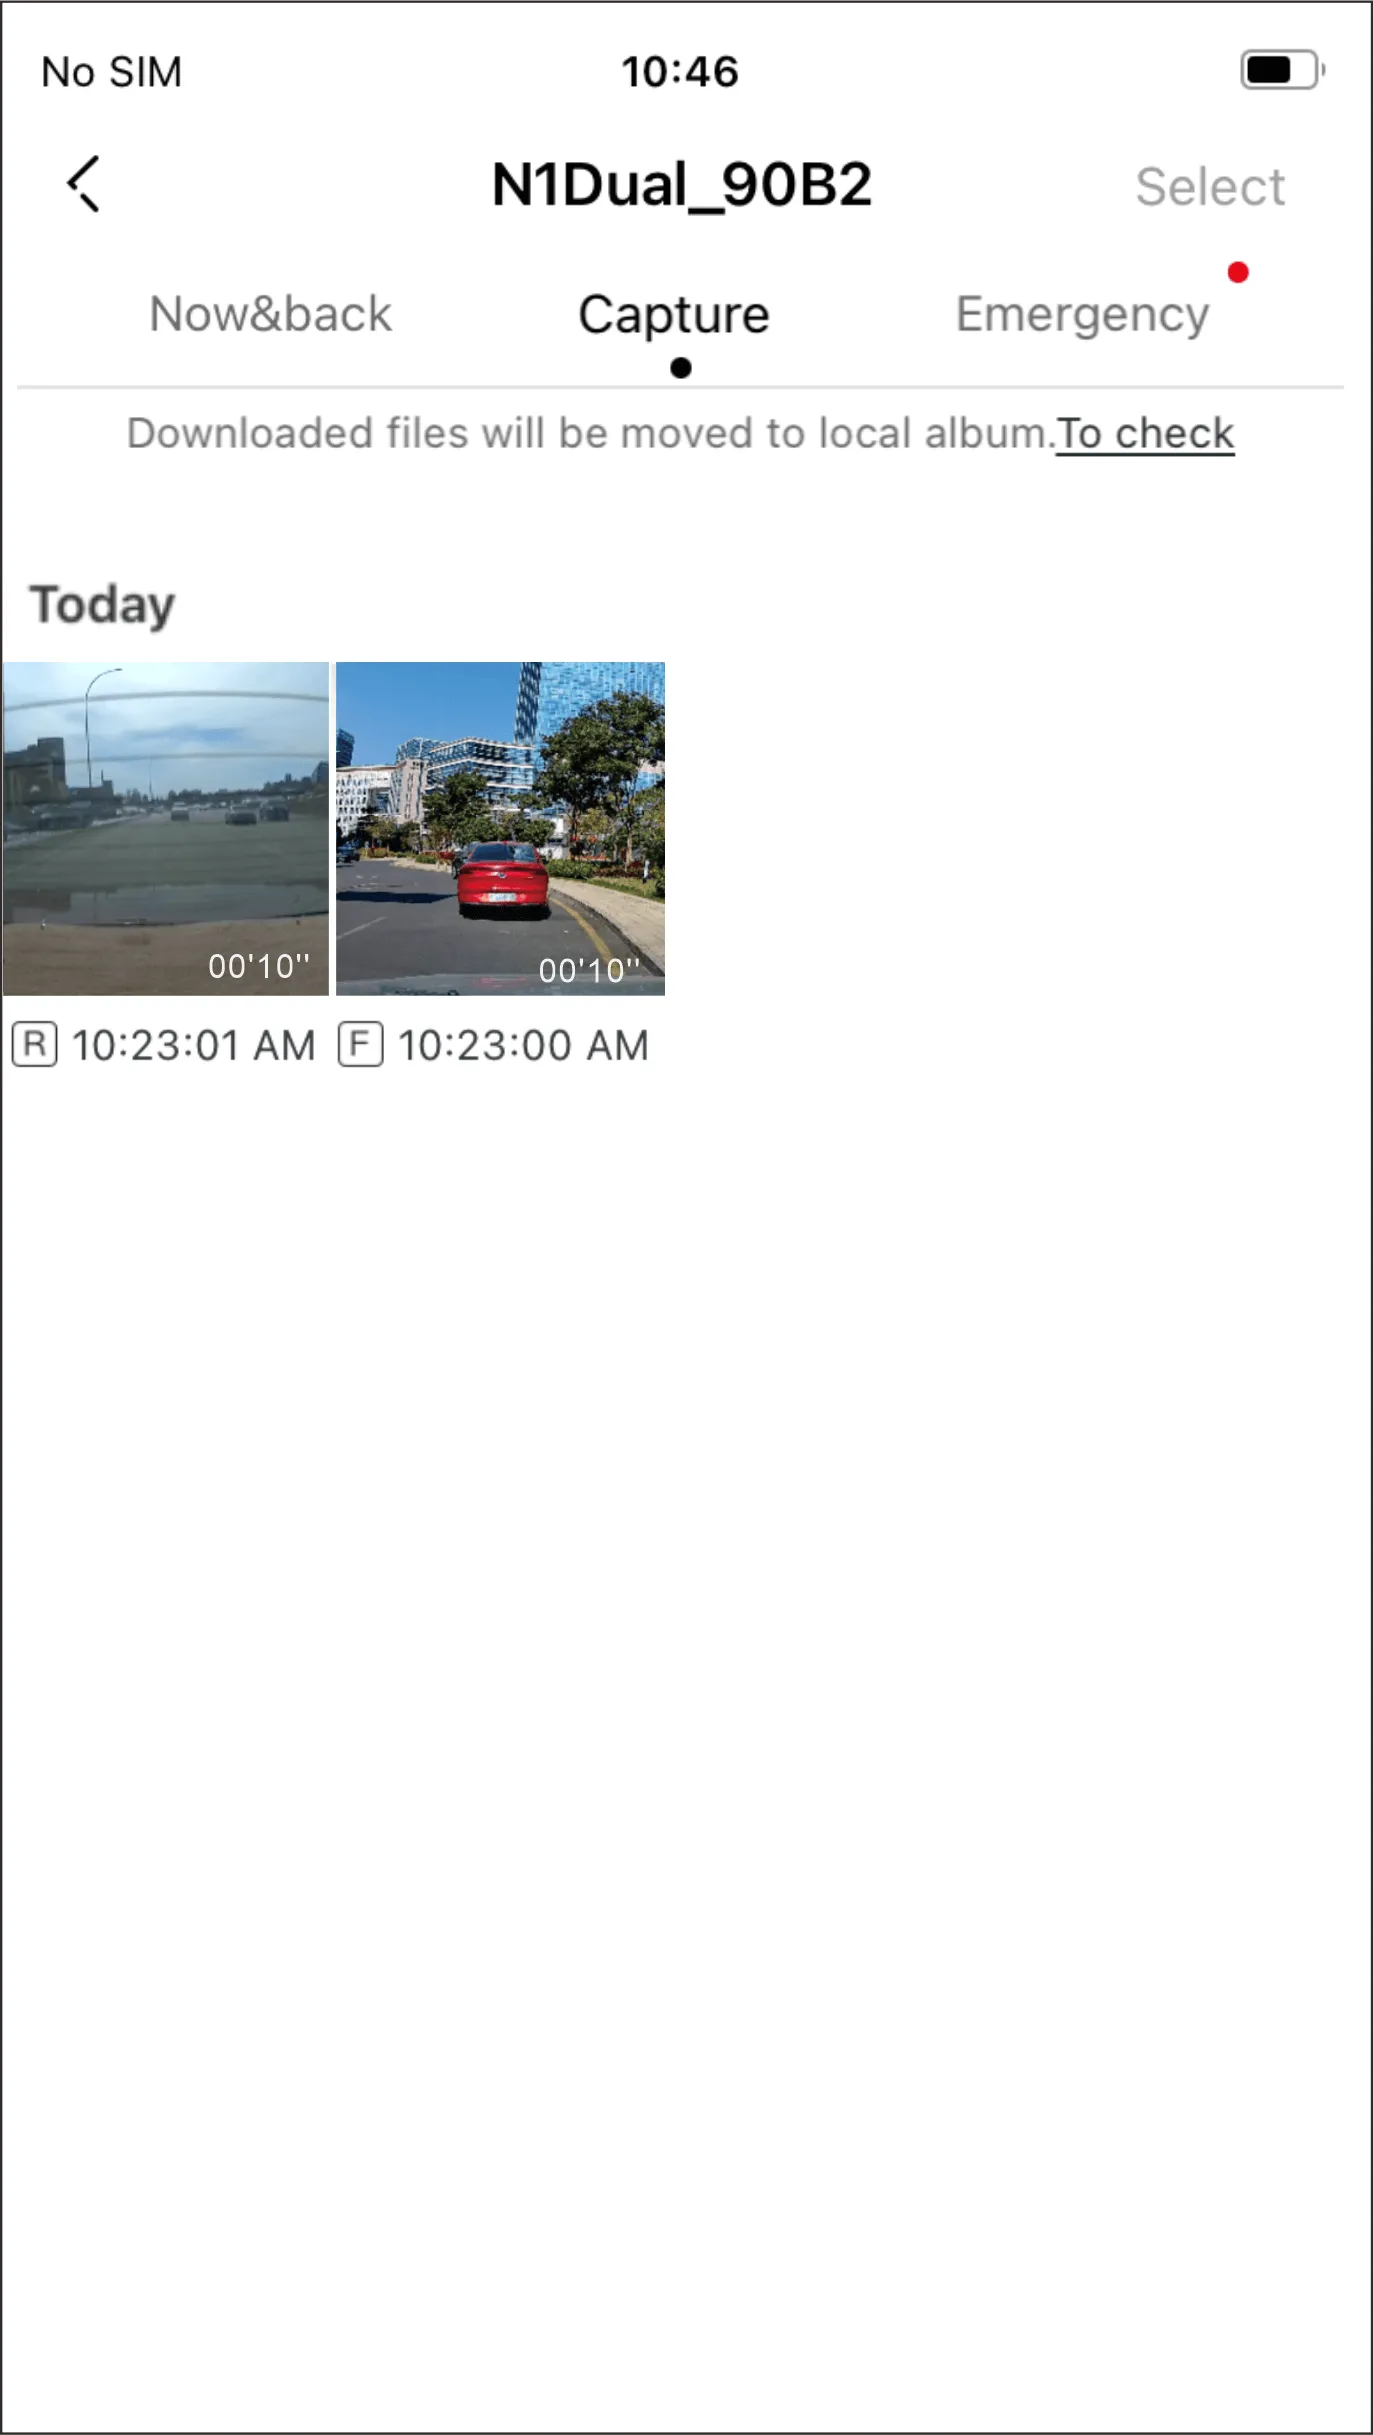
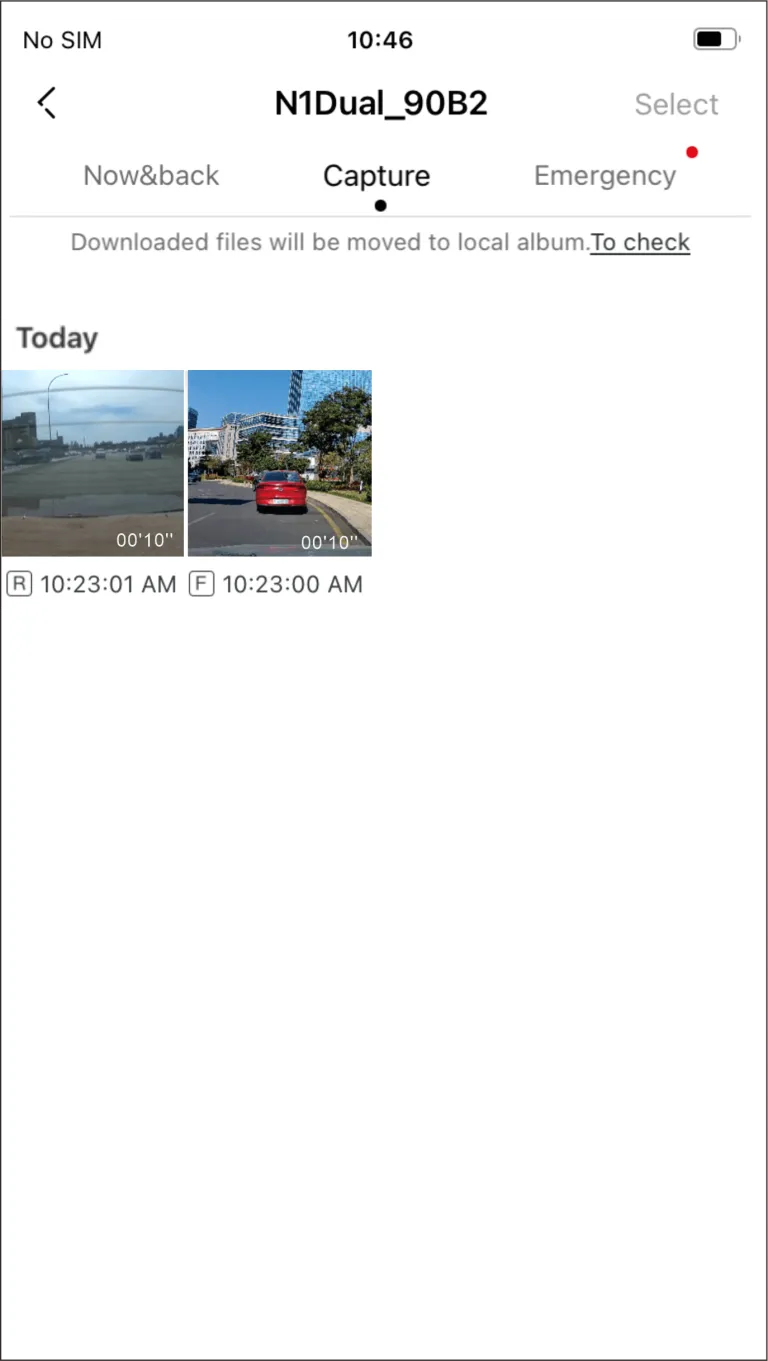
Capture
When you tap on ![]() the Now&back interface, you can view the snapshot photo on this interface.
the Now&back interface, you can view the snapshot photo on this interface.
Emergency
When the device is in operation, a detected collision (emergency situations such as vehicle emergency braking or collision) will trigger taking a photo and an emergency related video, which can be viewed in the “Emergency” interface. See Chapter 5 “Collision Detection & Locked Videos” for details.

System Settings
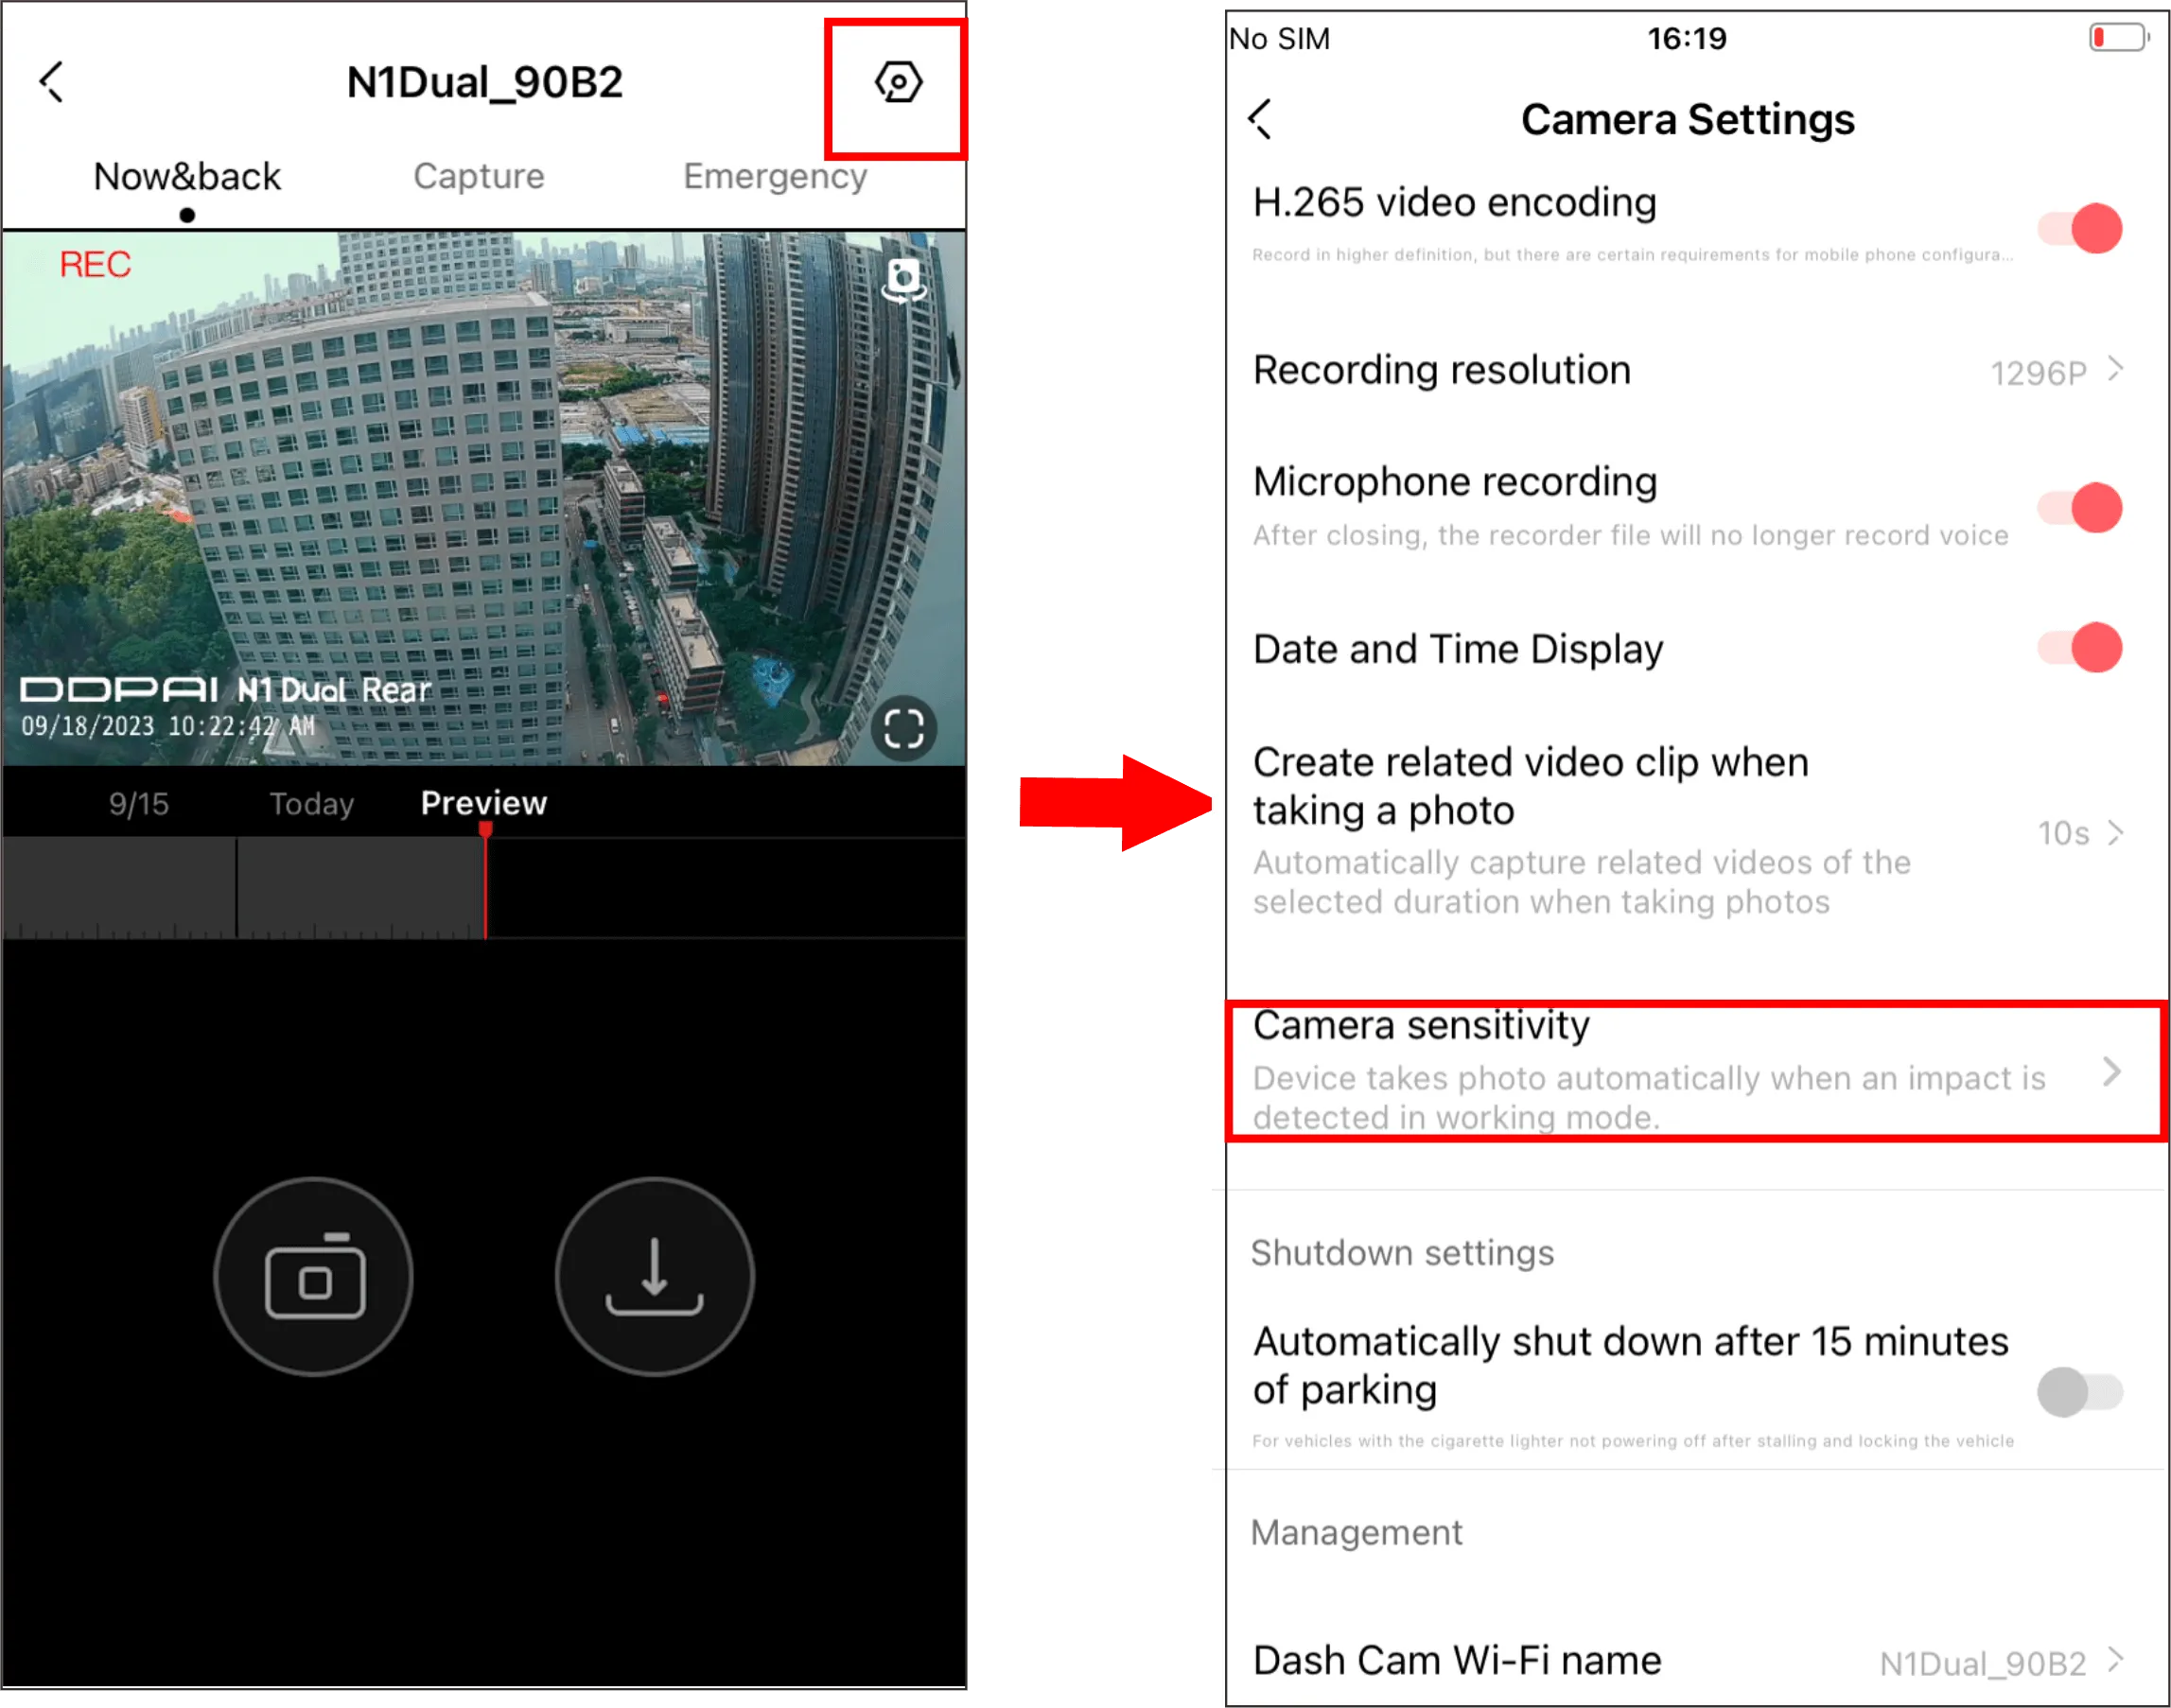
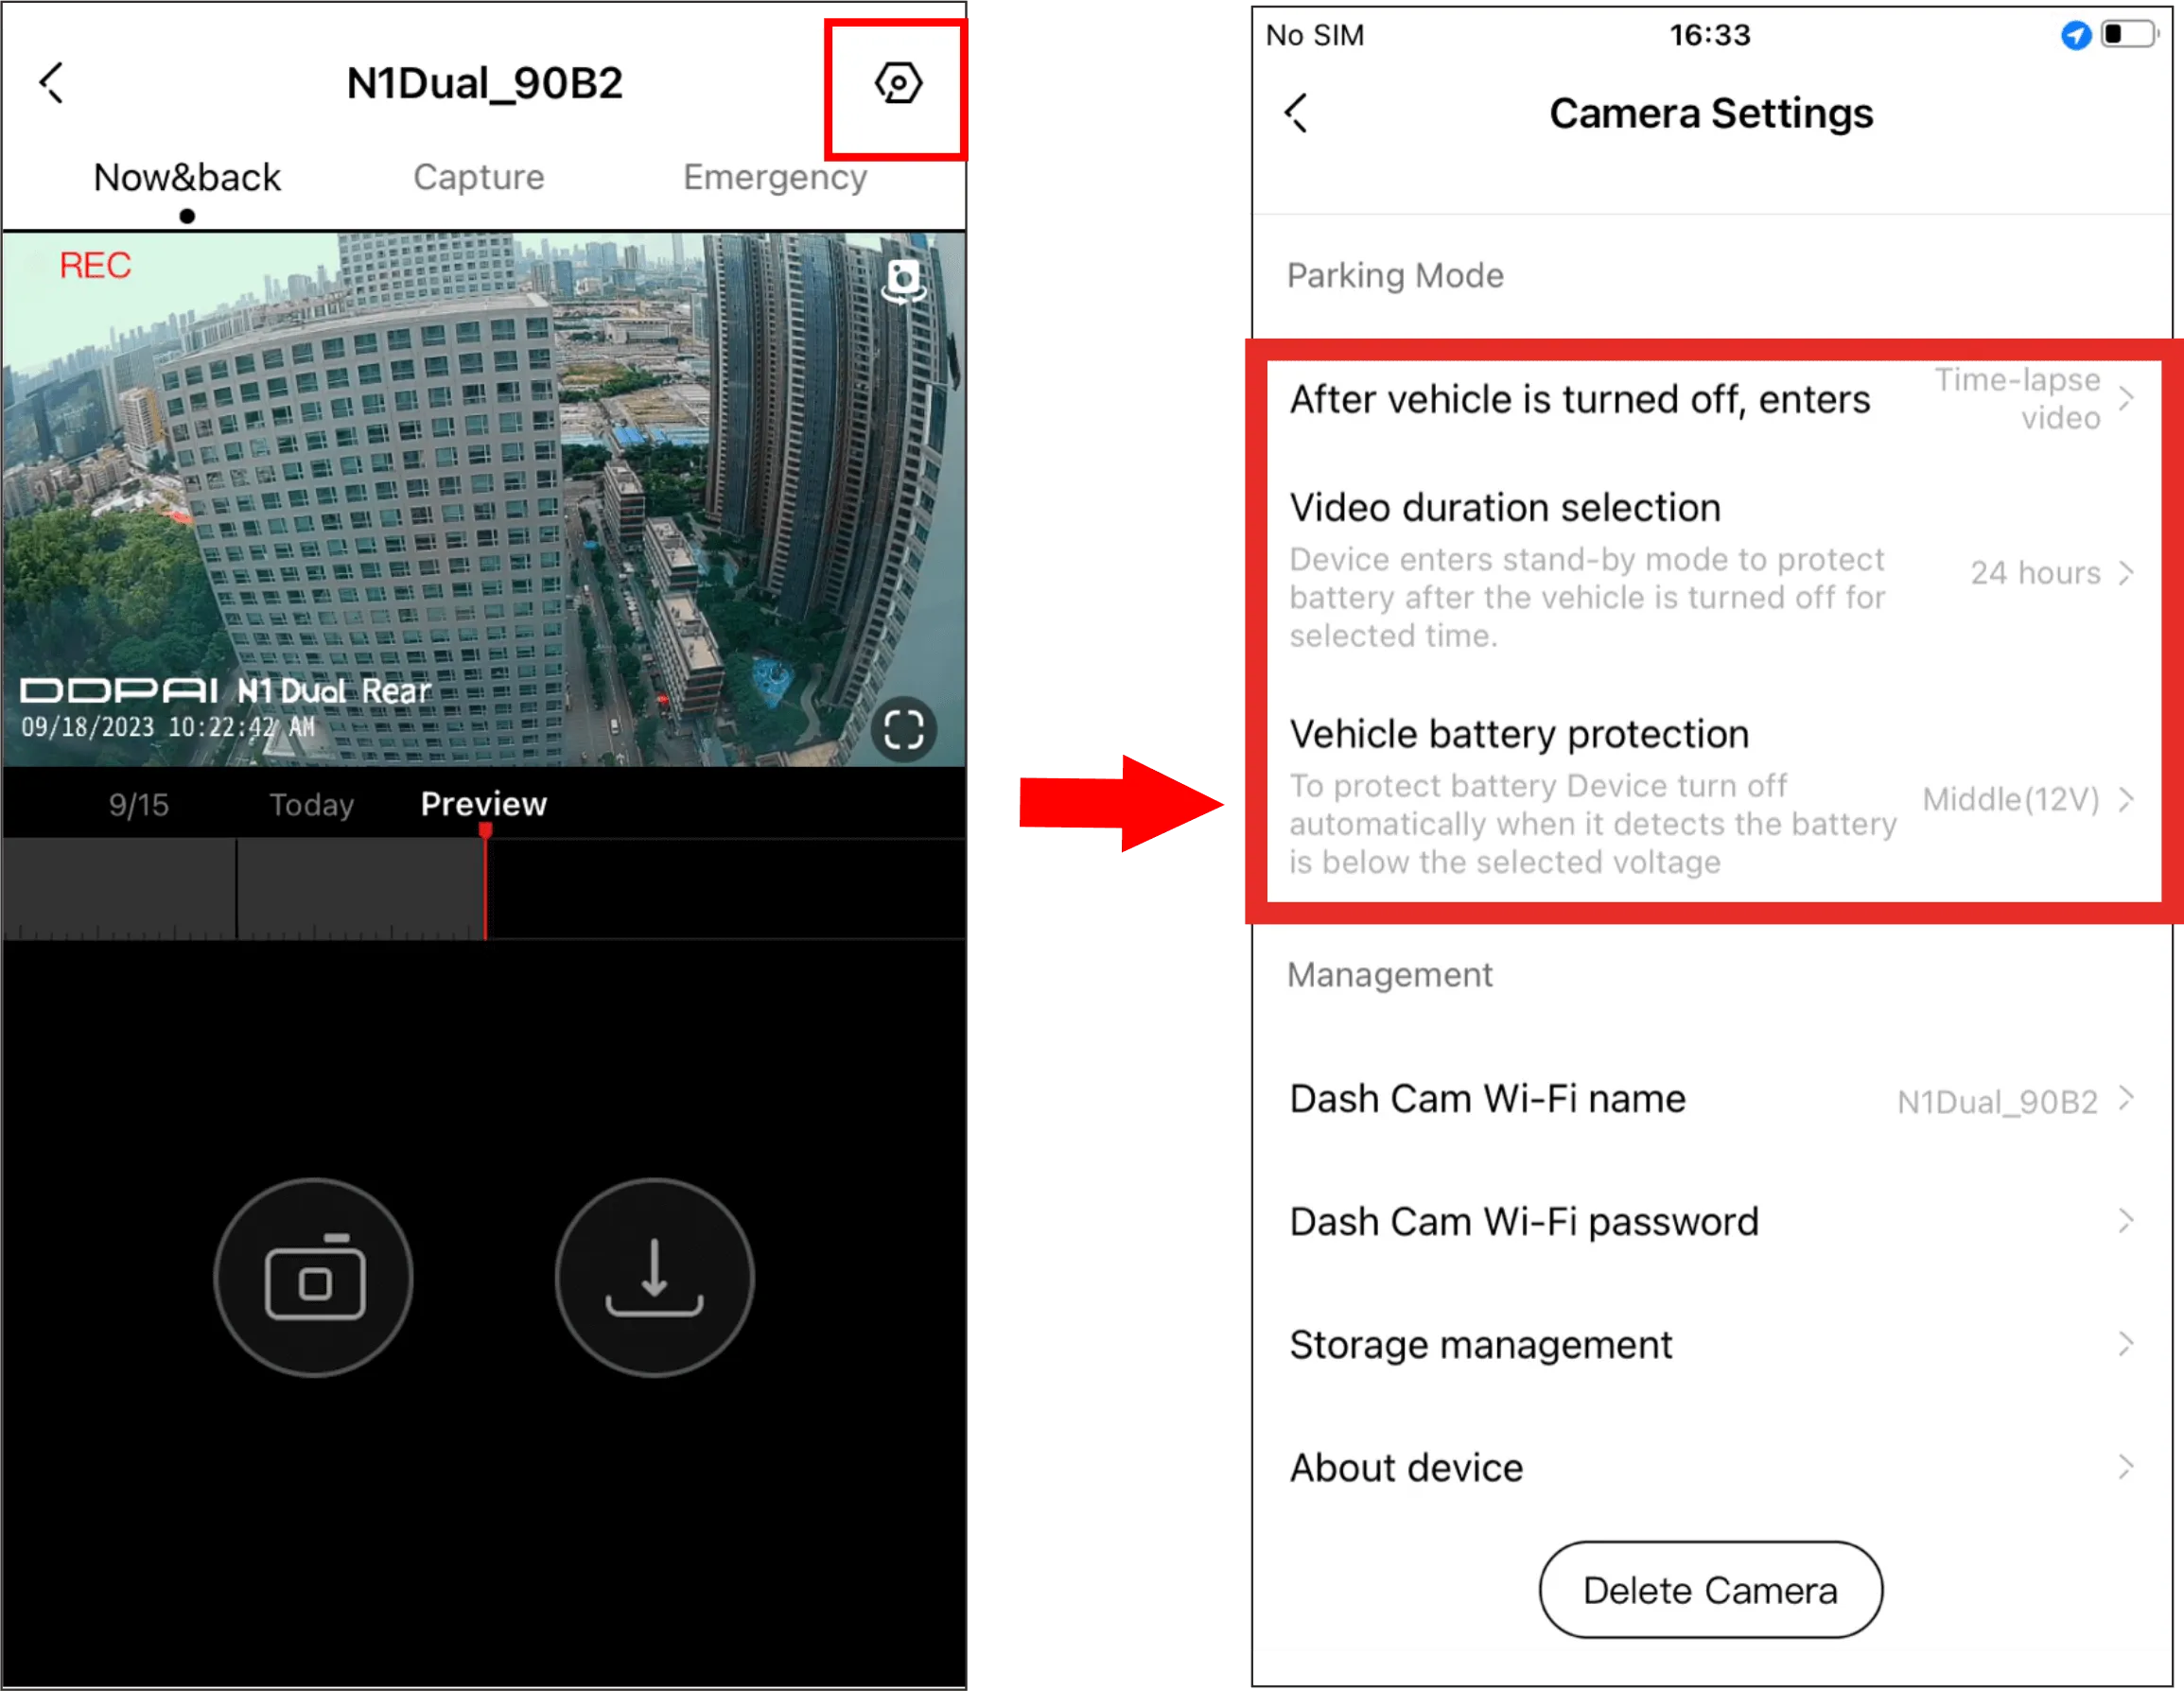
In the “Now&back” interface, click ![]() to enter the Settings page, where you can check the various parameters of the dash cam.
to enter the Settings page, where you can check the various parameters of the dash cam.

● Voice Control
You can set the speaker volume and start-up tone.
| Settings | Details |
| Speaker volume | Adjust the speaker volume |
| Start-up sound | You can select to enable/disable the start-up sound (default: enable) |
● Preview Display
You can enable the installation guide or flip the image of the rear camera vertically or horizontally.
| Settings | Details |
| Recorder installation guide | You can choose to enable/disable the function (default: disable). After the function is enabled, the real-time preview interface displays the installation guide line. |
| Flip the image of the rear camera vertically | You can select to enable/disable the function (default: off) |
| Flip the image of the rear camera horizontally | You can select to enable/disable the function (default: off) |
● Recorder Recording
You can set video encoding, recording resolution, video duration associated with photographing, photographing sensitivity, etc.
| Settings | Details |
| H.264/Ai.265 video encoding | The video is recorded with H.264 encoding by default. You can set Ai.265 encoding through the app, which will improve the picture quality by 50% and requires higher mobile phone performance. If the video freezes during playback, you can turn off this option or preview the video on the computer. |
| Recording resolution | You can select 1296P/(full HD) 1080P, and the default setting is 1296P |
| Microphone recording | YYou can select to enable/disable the function (default: enable) |
| Date and time display | You can select to enable/disable the function (default: enable) |
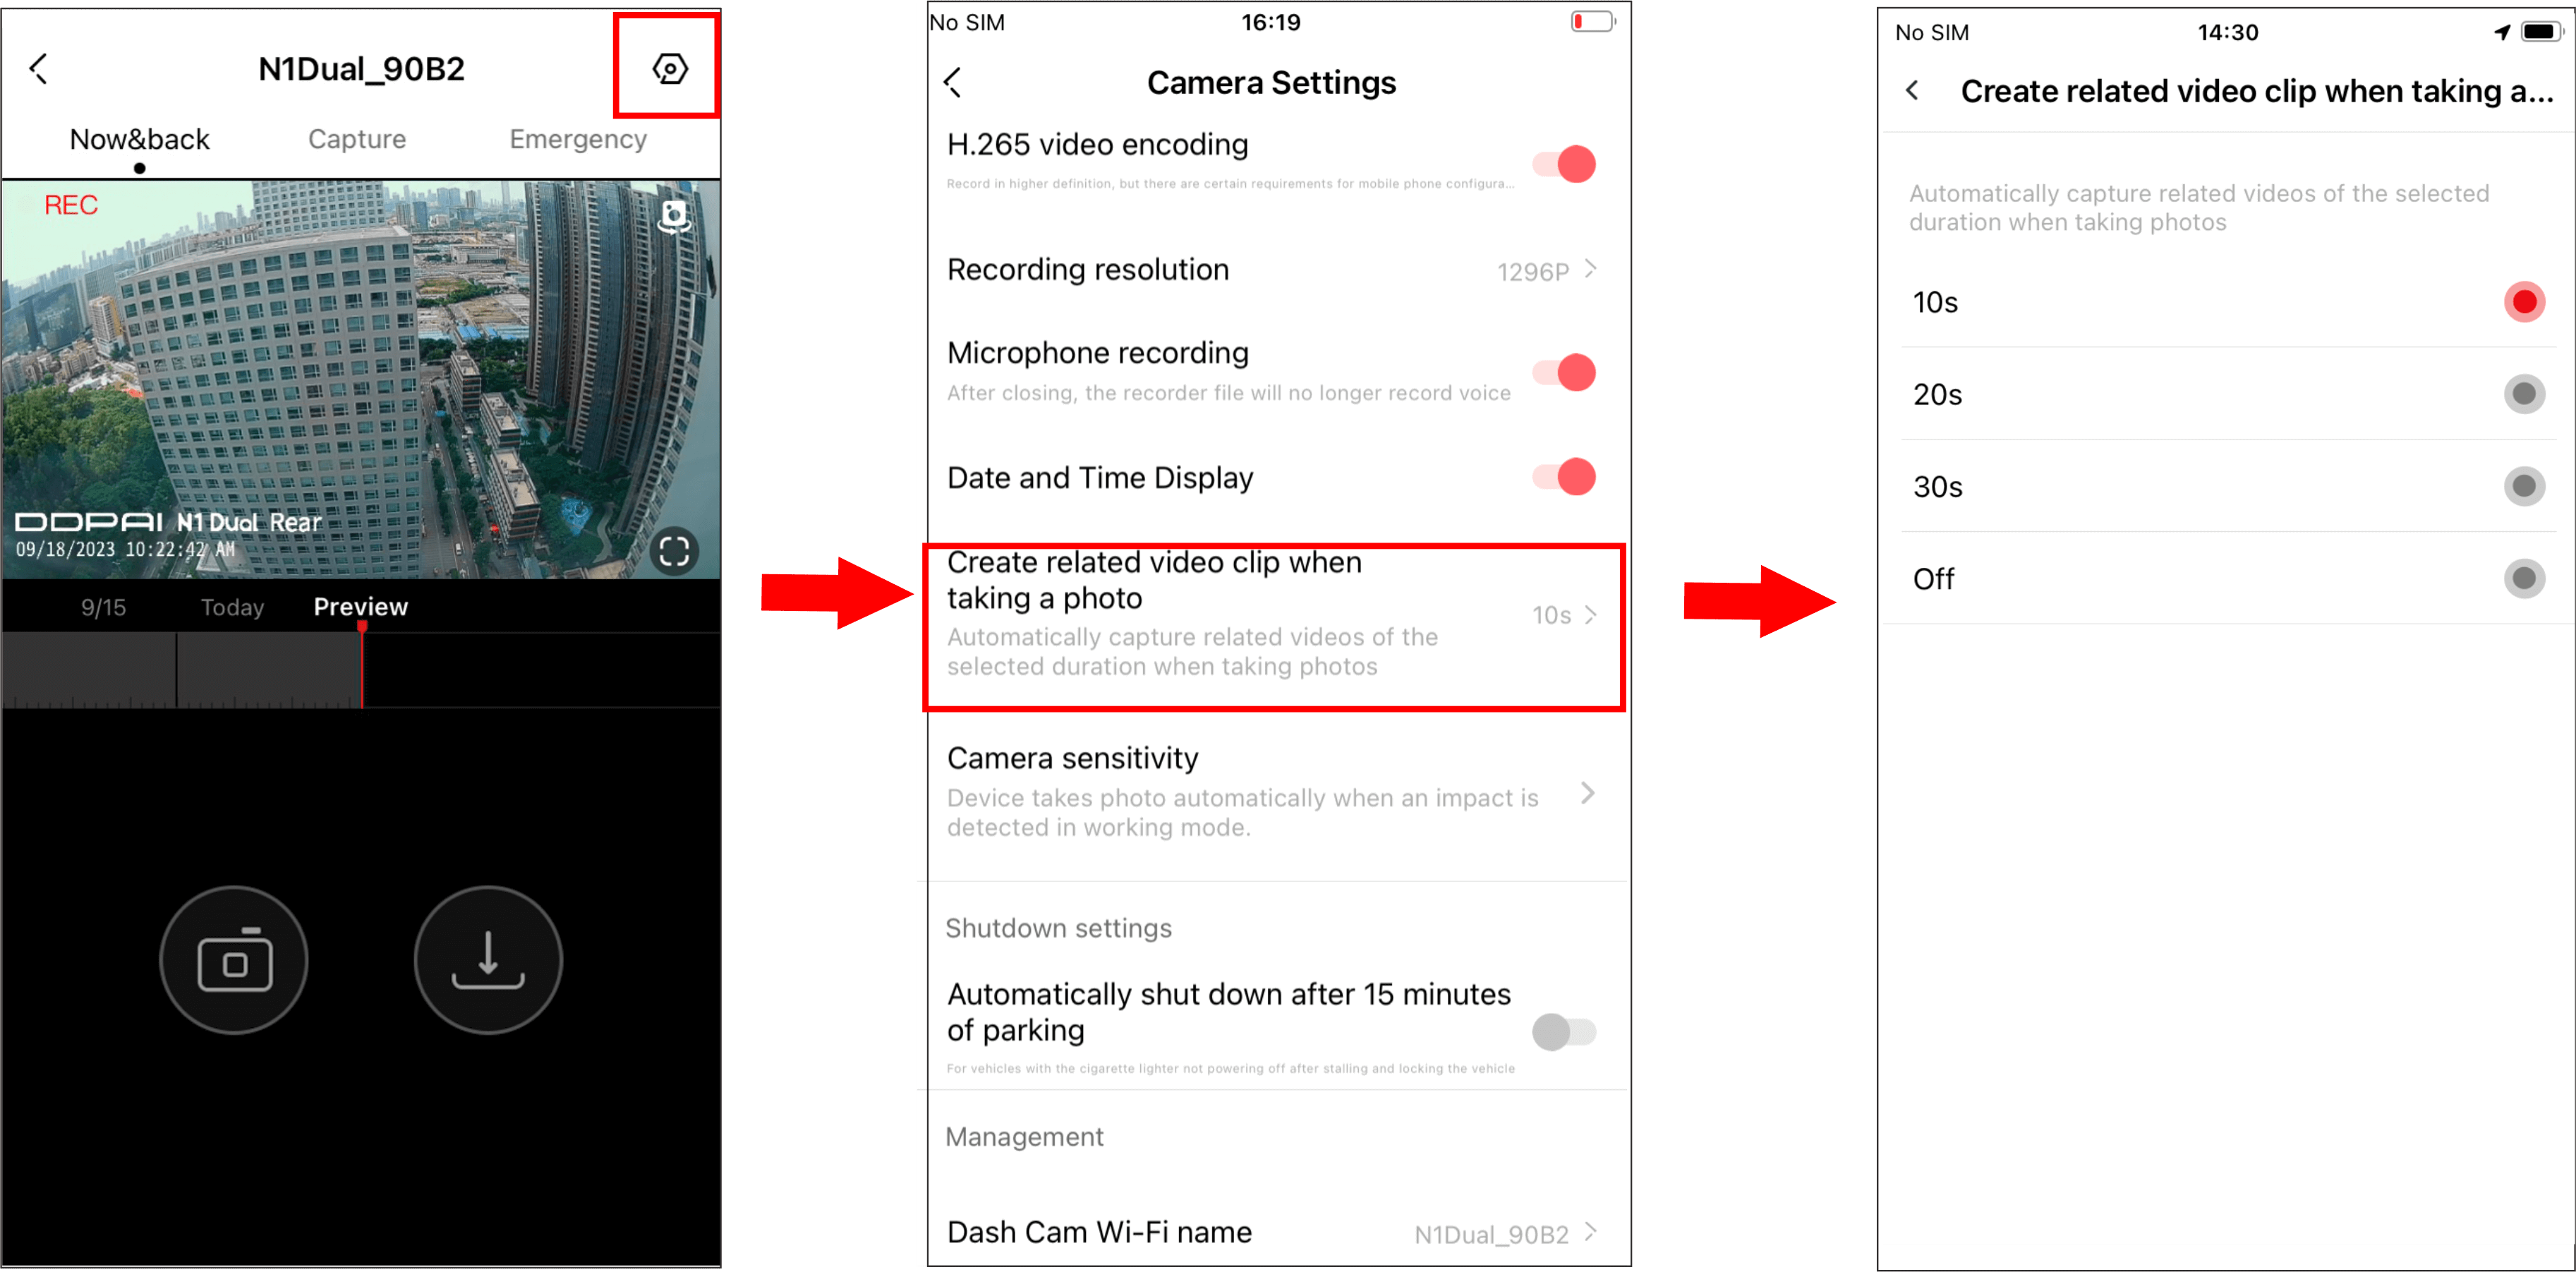
| Create related video clip when taking a photo | When the device is in working condition, an emergency photo and an emergency related video will be automatically generated when a collision is detected. You can set the duration of the emergency related video. For details, see Chapter 5 “Collision Detection & Locked Videos” > “Set the duration of emergency related video |
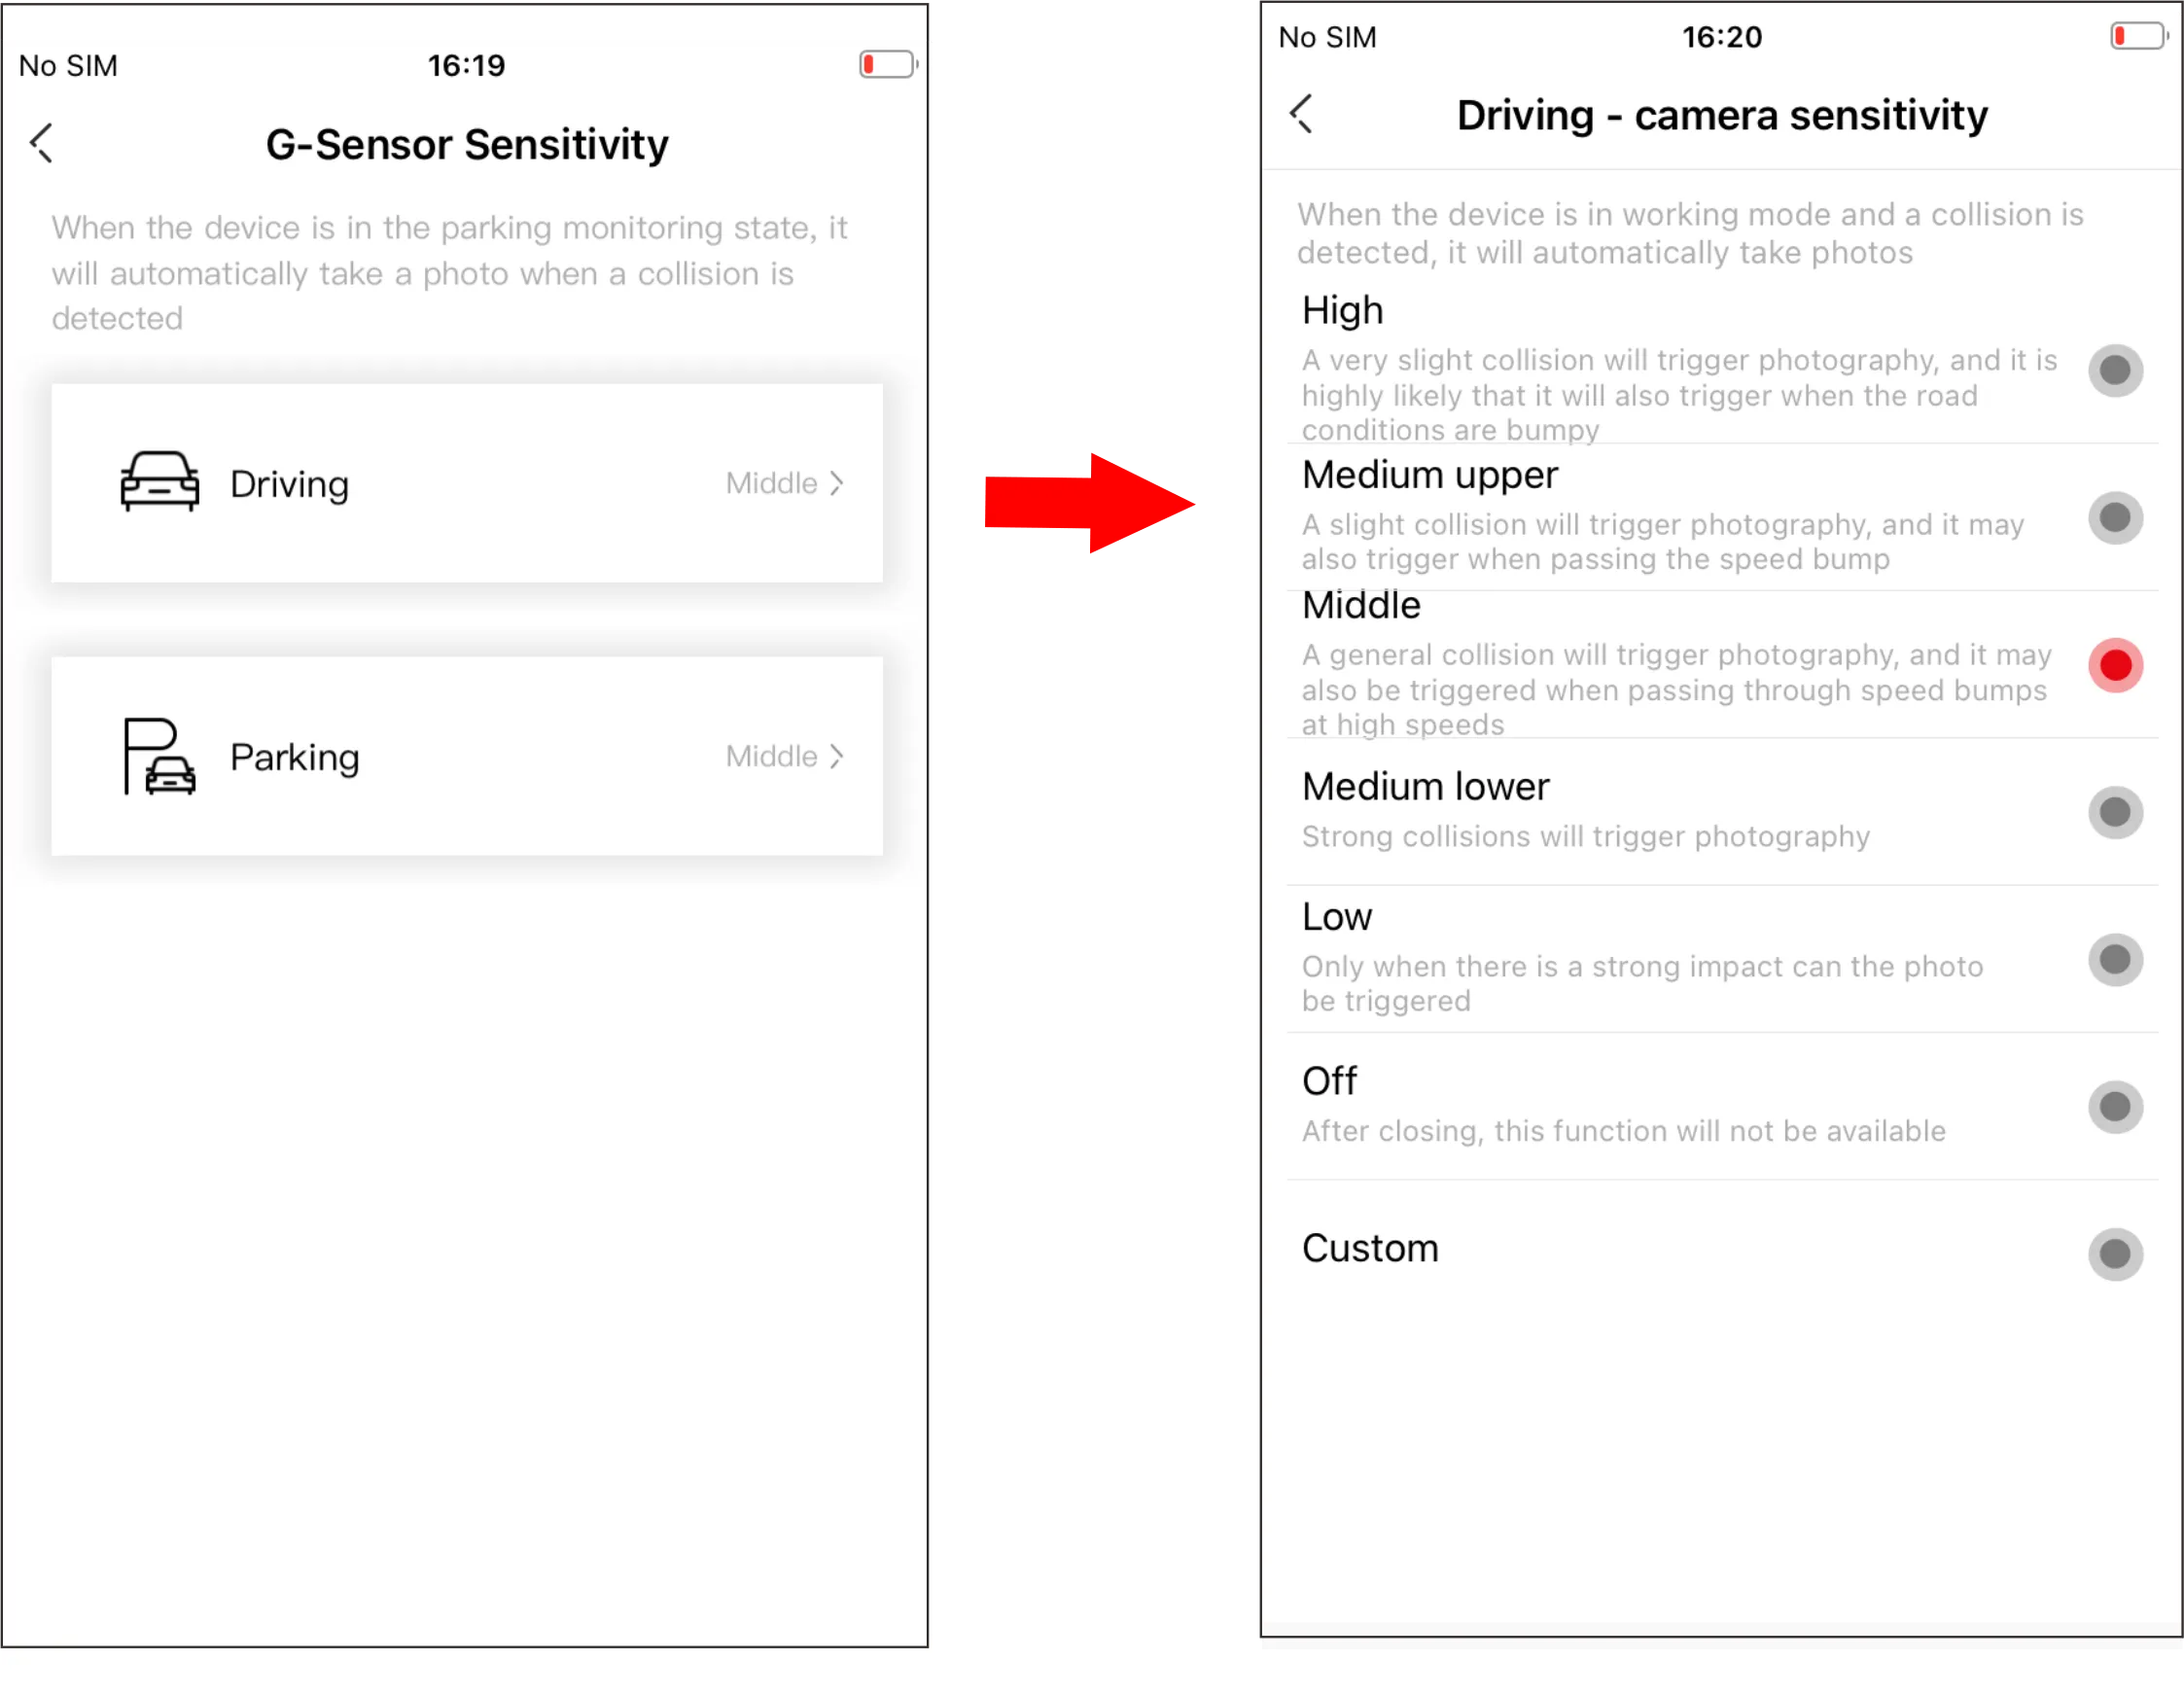
| Camera sensitivity | When the device is in working state, it will automatically take pictures when it detects collision. You can set the sensitivity of taking pictures. The higher the sensitivity is set, the easier it is to trigger taking pictures. If this function is turned off, the collision detection & locked video function will not be available. For details, see Chapter 5 “Collision Detection & Locked Videos” > “Setting Camera Sensitivity” |
● Shutdown Settings
For vehicles where the cigarette lighter is not powered off after the car is shut down and locked, the dash cam will shut down after 15 mins of parking.
| Settings | Details |
| Automatically shutdown after 15 mins of parking | You can select to turn on/off this function (default: off). If this function is turned on, the dash cam will automatically shut down after 15 mins of parking. |
● Parking Monitoring
When you select the intelligent step-down line, you can set the parking mode, parking monitoring duration and vehicle battery protection voltage. See Chapter 5 “Parking Monitoring” for details.

| Settings | Details |
| Parking mode | After the vehicle is turned off, you can choose to enter time-lapse video recording/normal video recording/sleep |
| Video duration selection | Set the duration: 12 hours, 24 hours (default), 48 hours |
| Vehicle battery protection | Set the battery protection voltage: High (12.4 V), middle (12V)(default), low (11.8 V). When the charge of the vehicle battery is lower than the selected voltage, the dash cam will be turned off automatically to prevent the battery from losing power. |
Note: This function needs to be realized by optional step-down line.
Management
You can set the Wi-Fi password or name, format your TF card, or view information such as device model No., firmware version, etc.
| Settings | Details |
| Dash Cam Wi-Fi Name | You can set the Wi-Fi name |
| Dash Cam Wi-Fi Password | You can set Wi-Fi password |
| Storage management | You can check the storage capacity, and choose to format the TF card (note: formatting will cause the device data to be cleared, please operate with caution) |
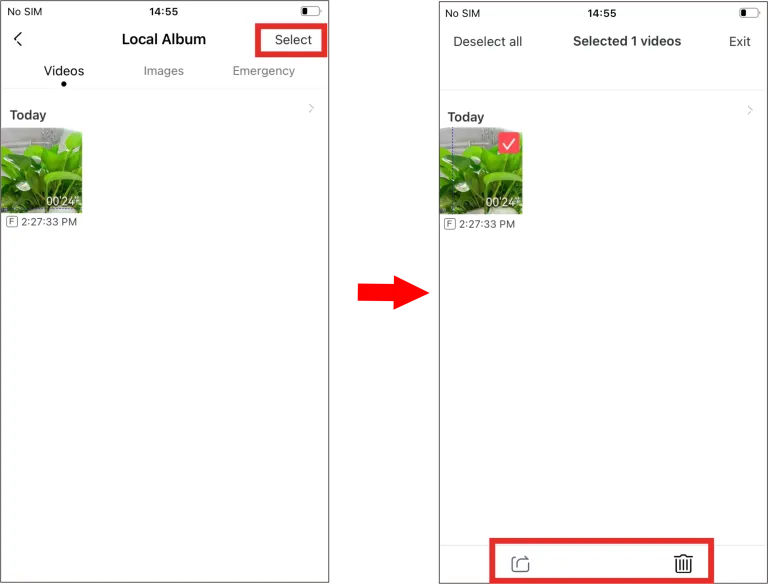
Video Function

Photographing Function

Parking Monitoring
Collision Detection & Locked Videos