 Skip to content
 DDPAI » Product Manuals » N5 Dual User Manual
DDPAI N5 Dual
User Manual
Product Introduction
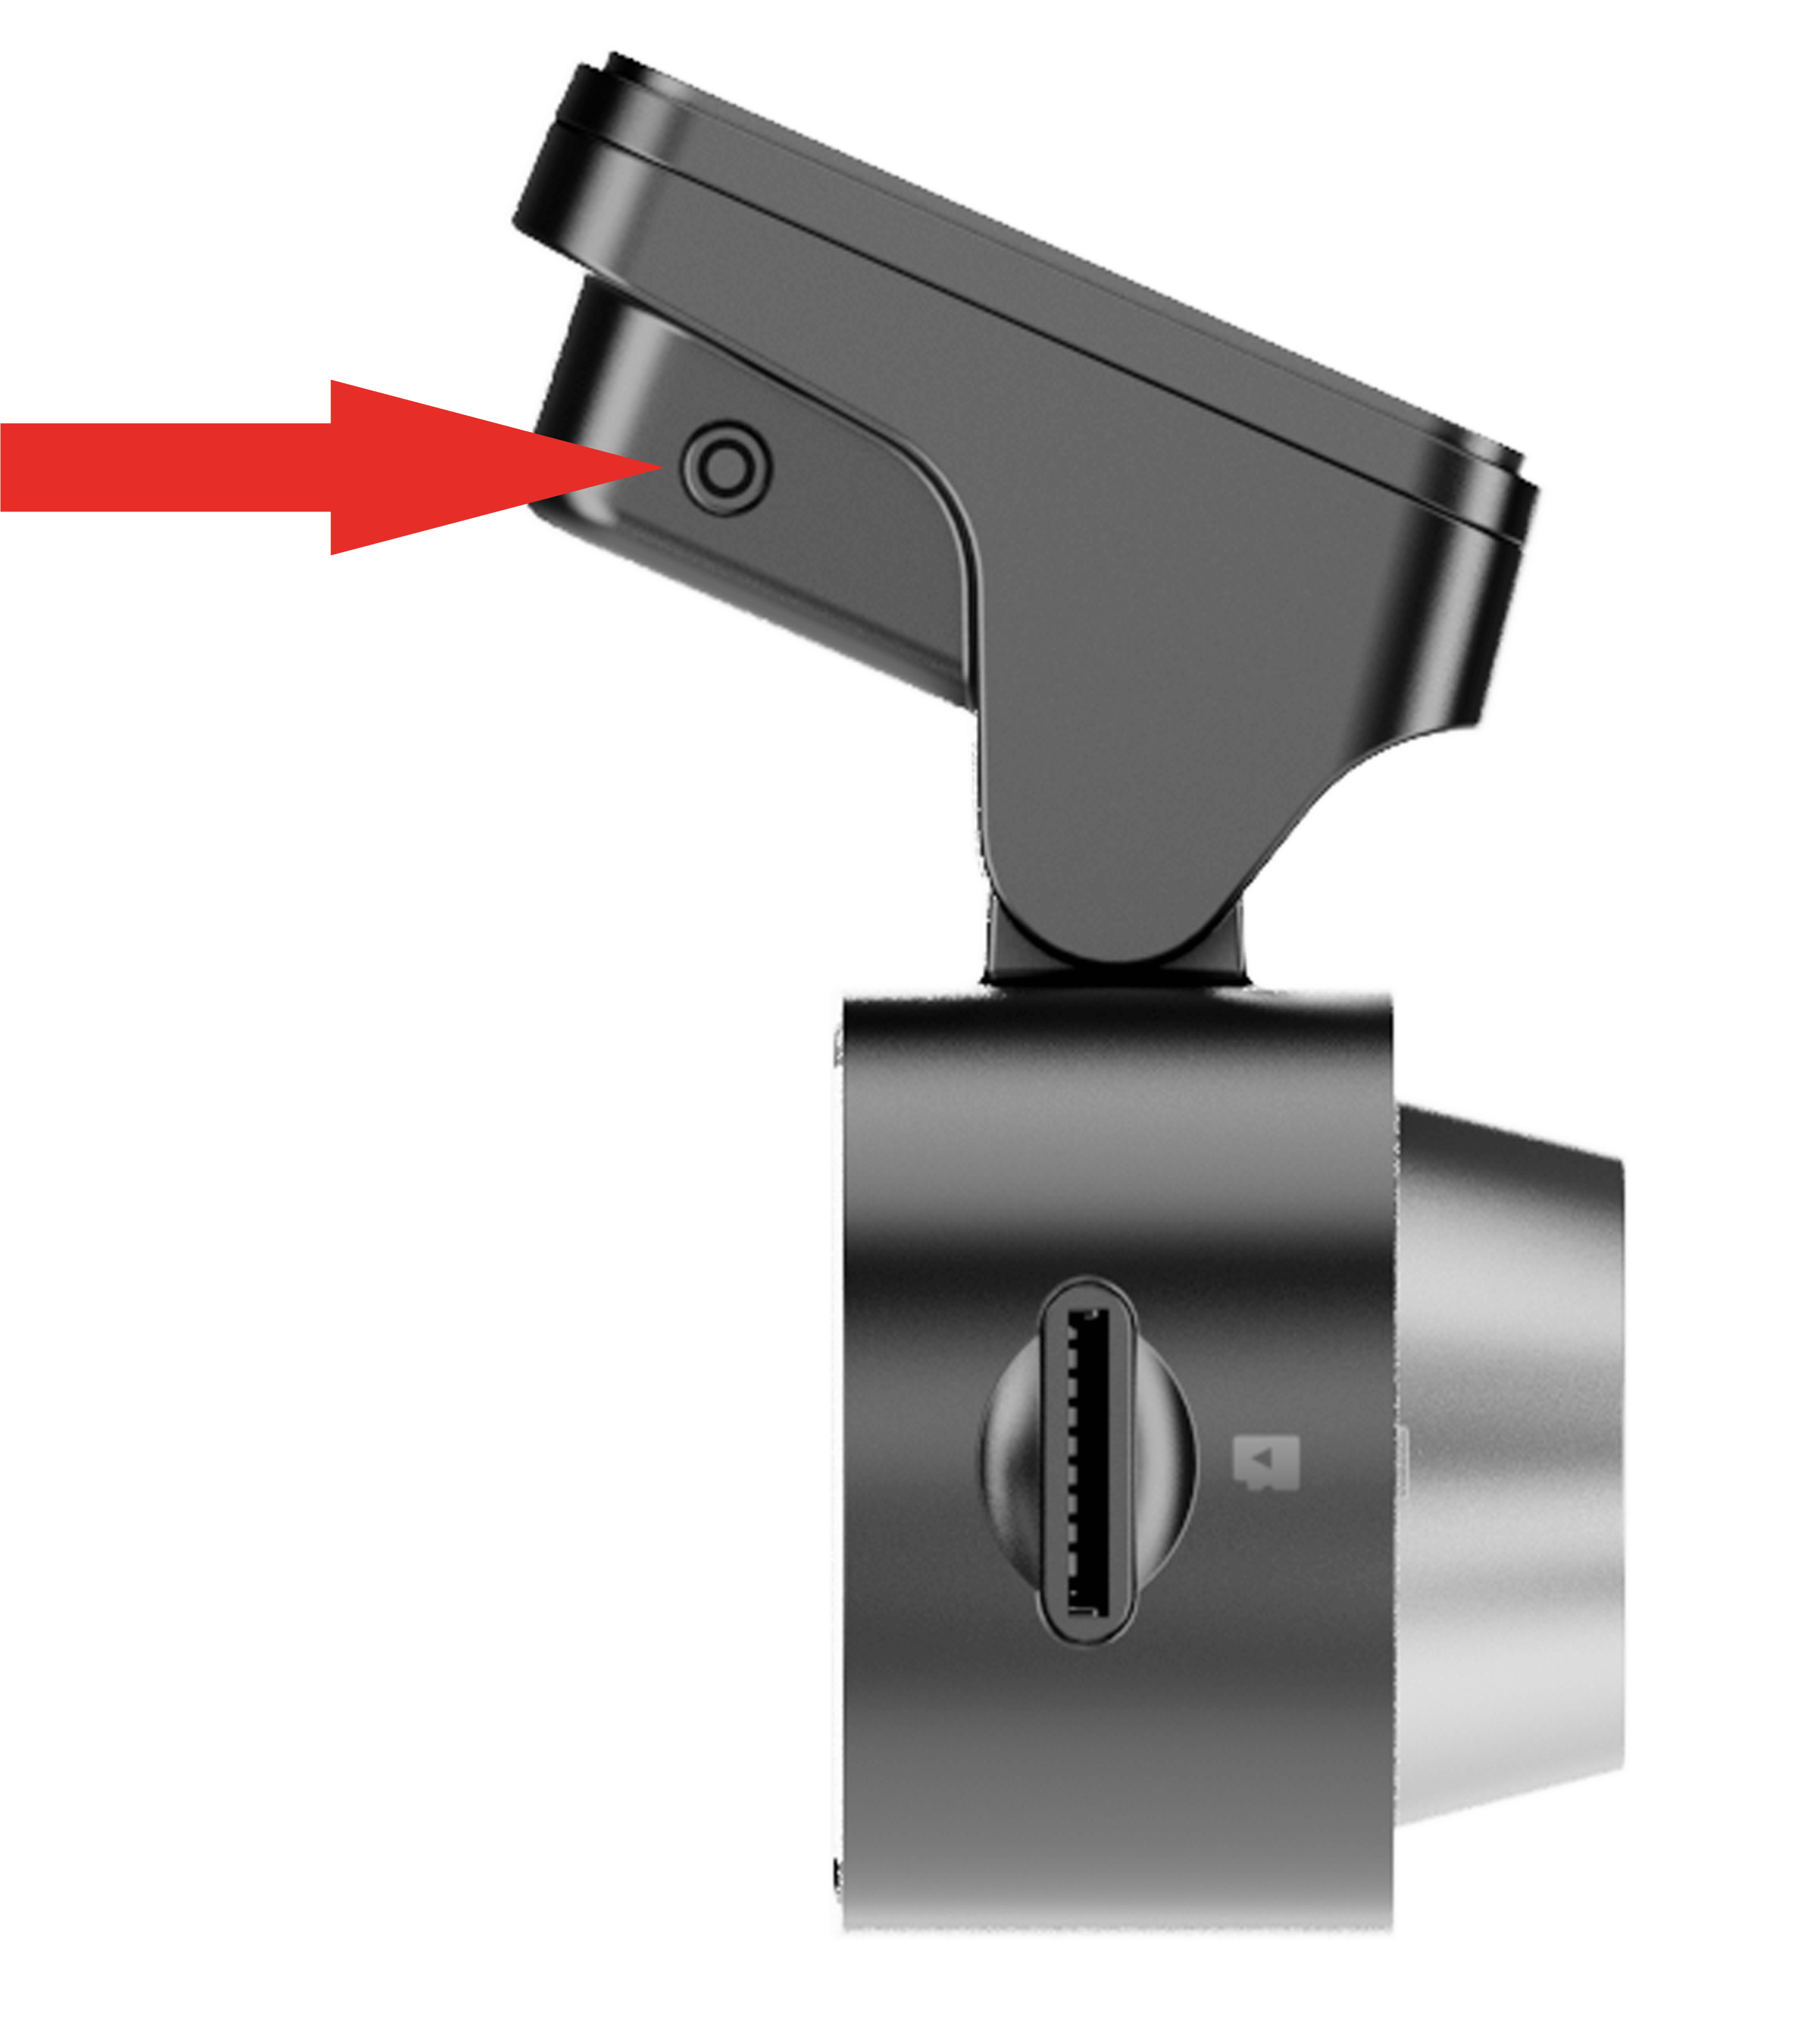
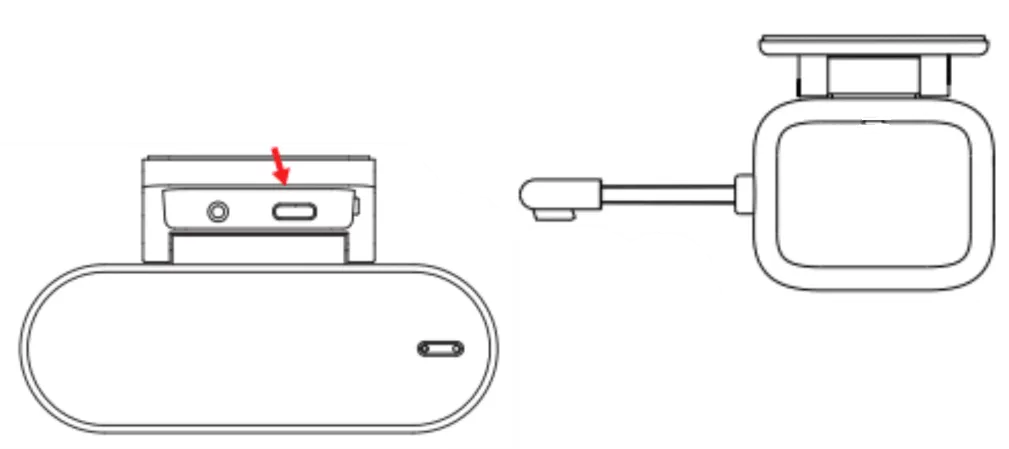
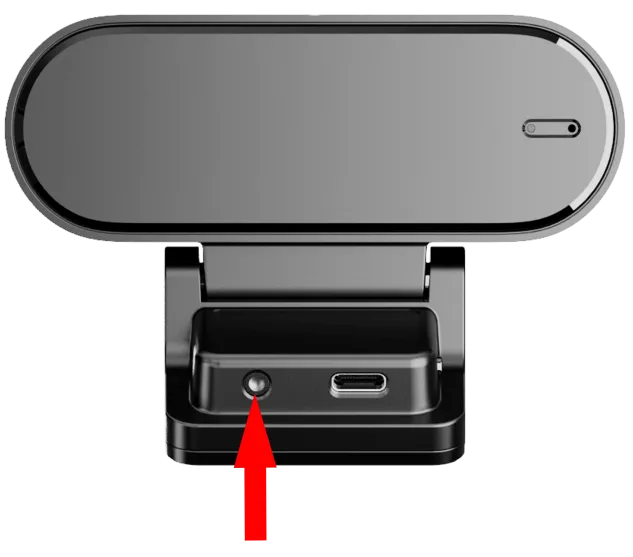
Appearance
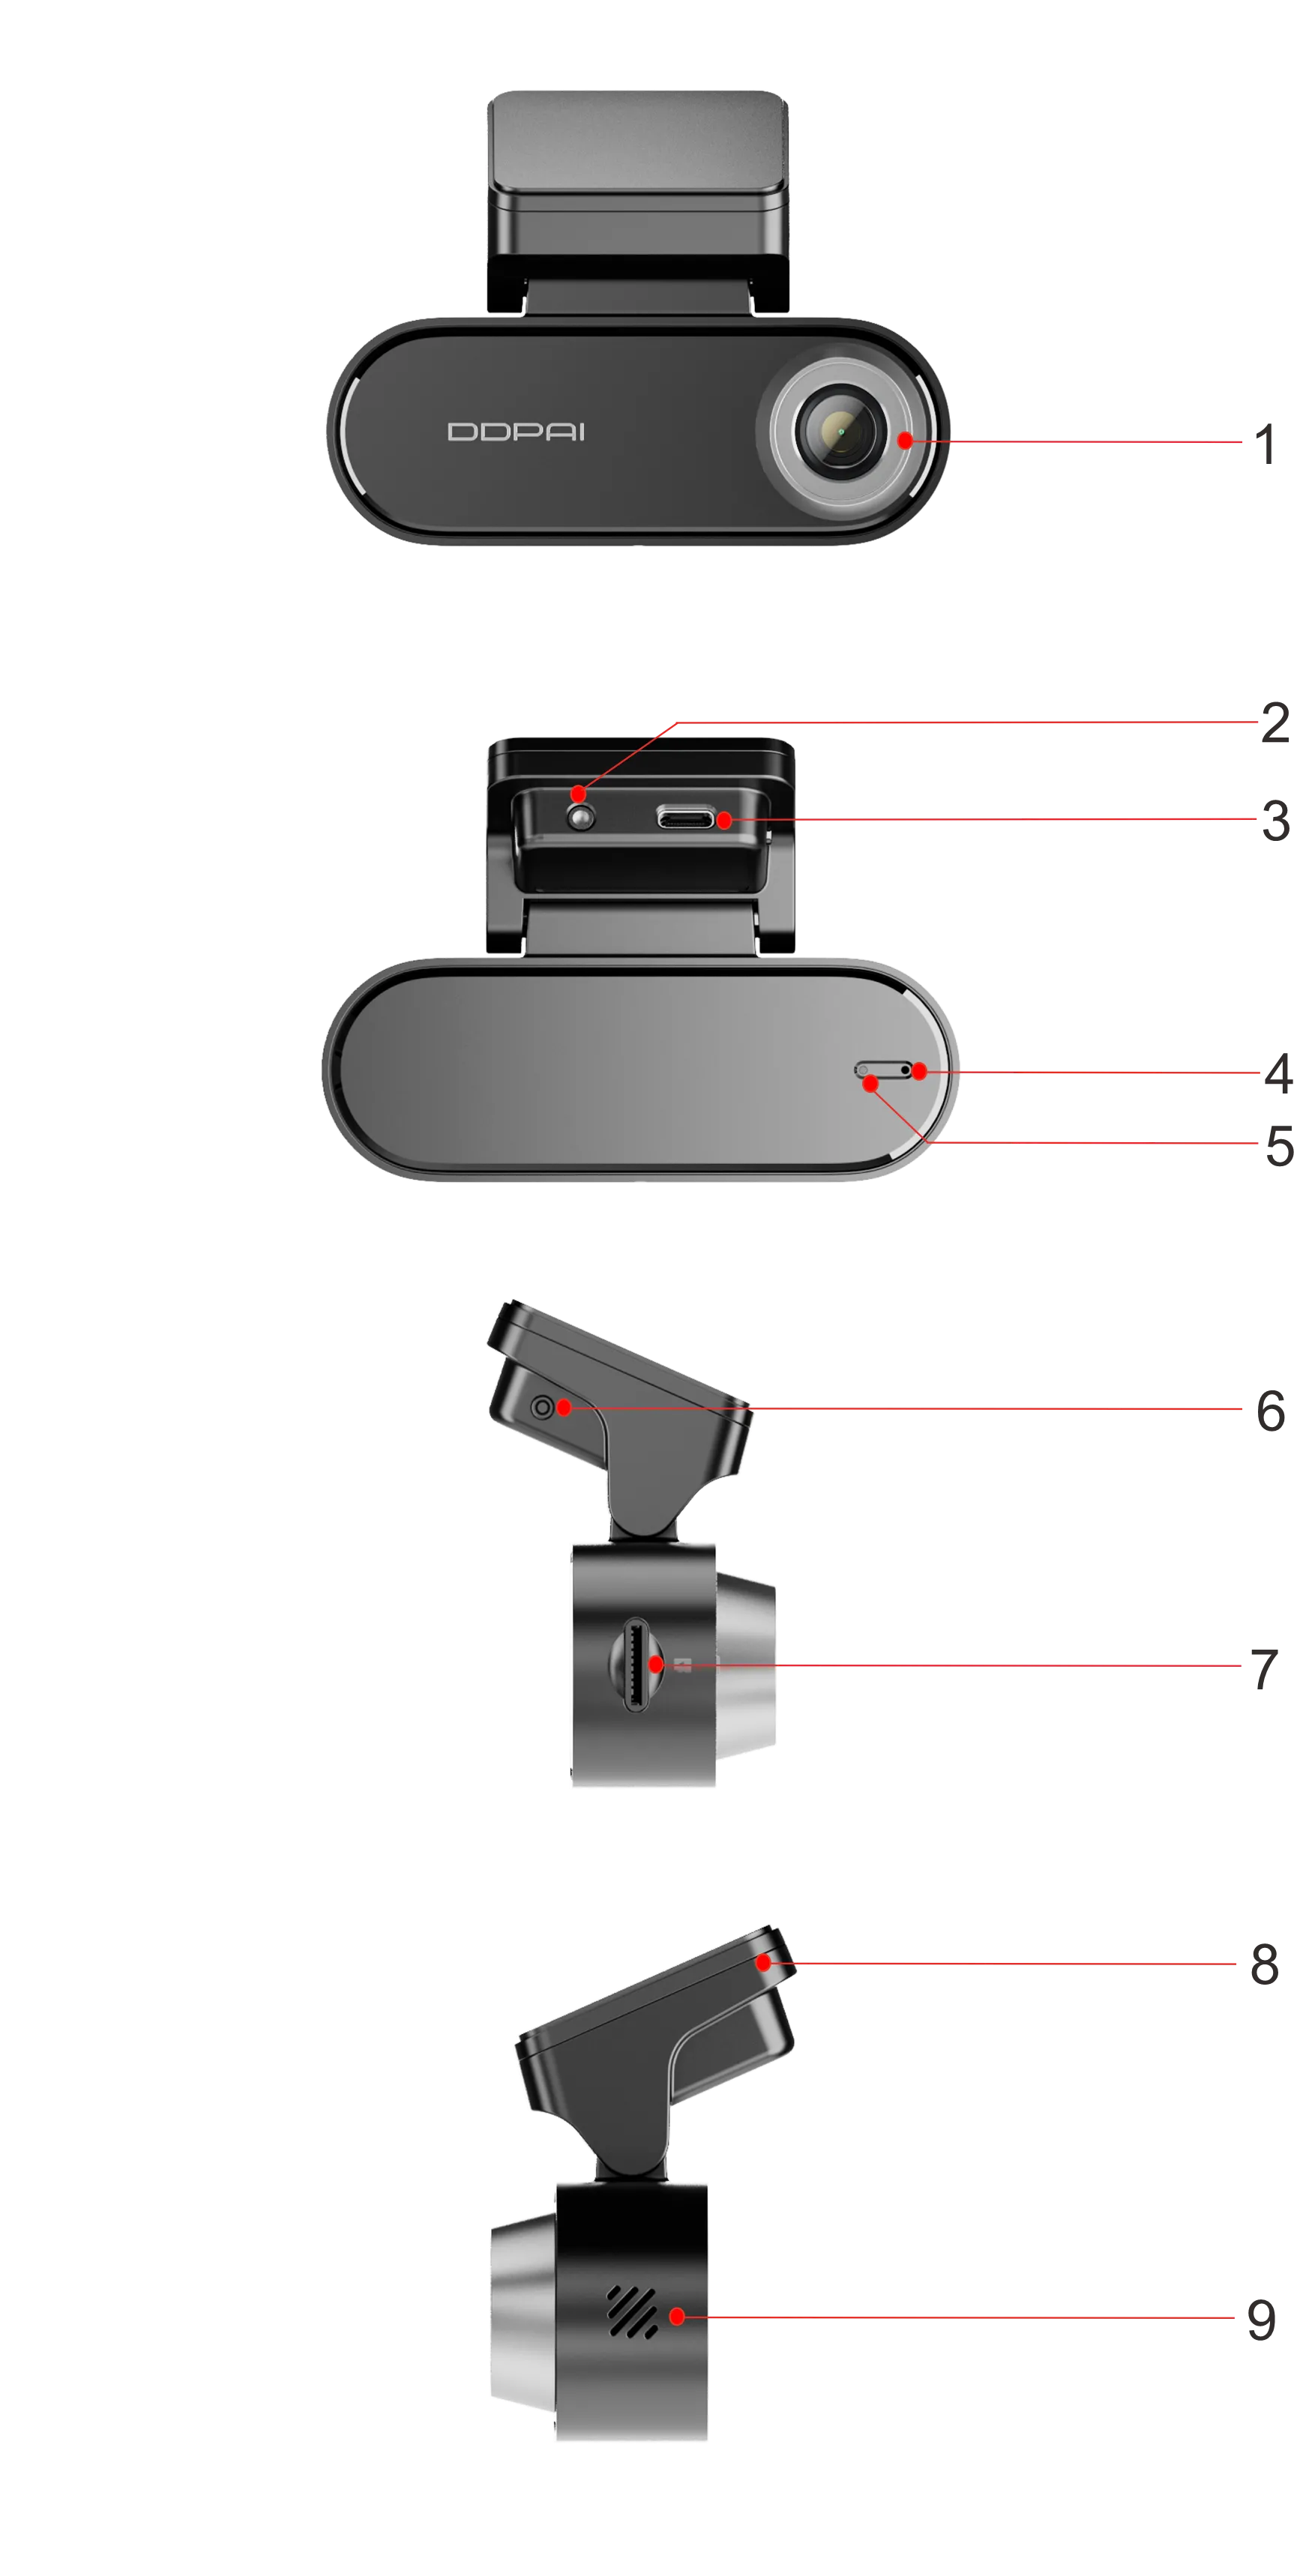
| No. | Component |
| 1 | Lens |
| 2 | Rear Camera Port |
| 3 | USB Type-C Port |
| 4 | MIC |
| 5 | Indicator |
| 6 | Function Button (To reset or authorize) |
| 7 | Memory Card Slot |
| 8 | Mounting Bracket |
| 9 | Speaker |
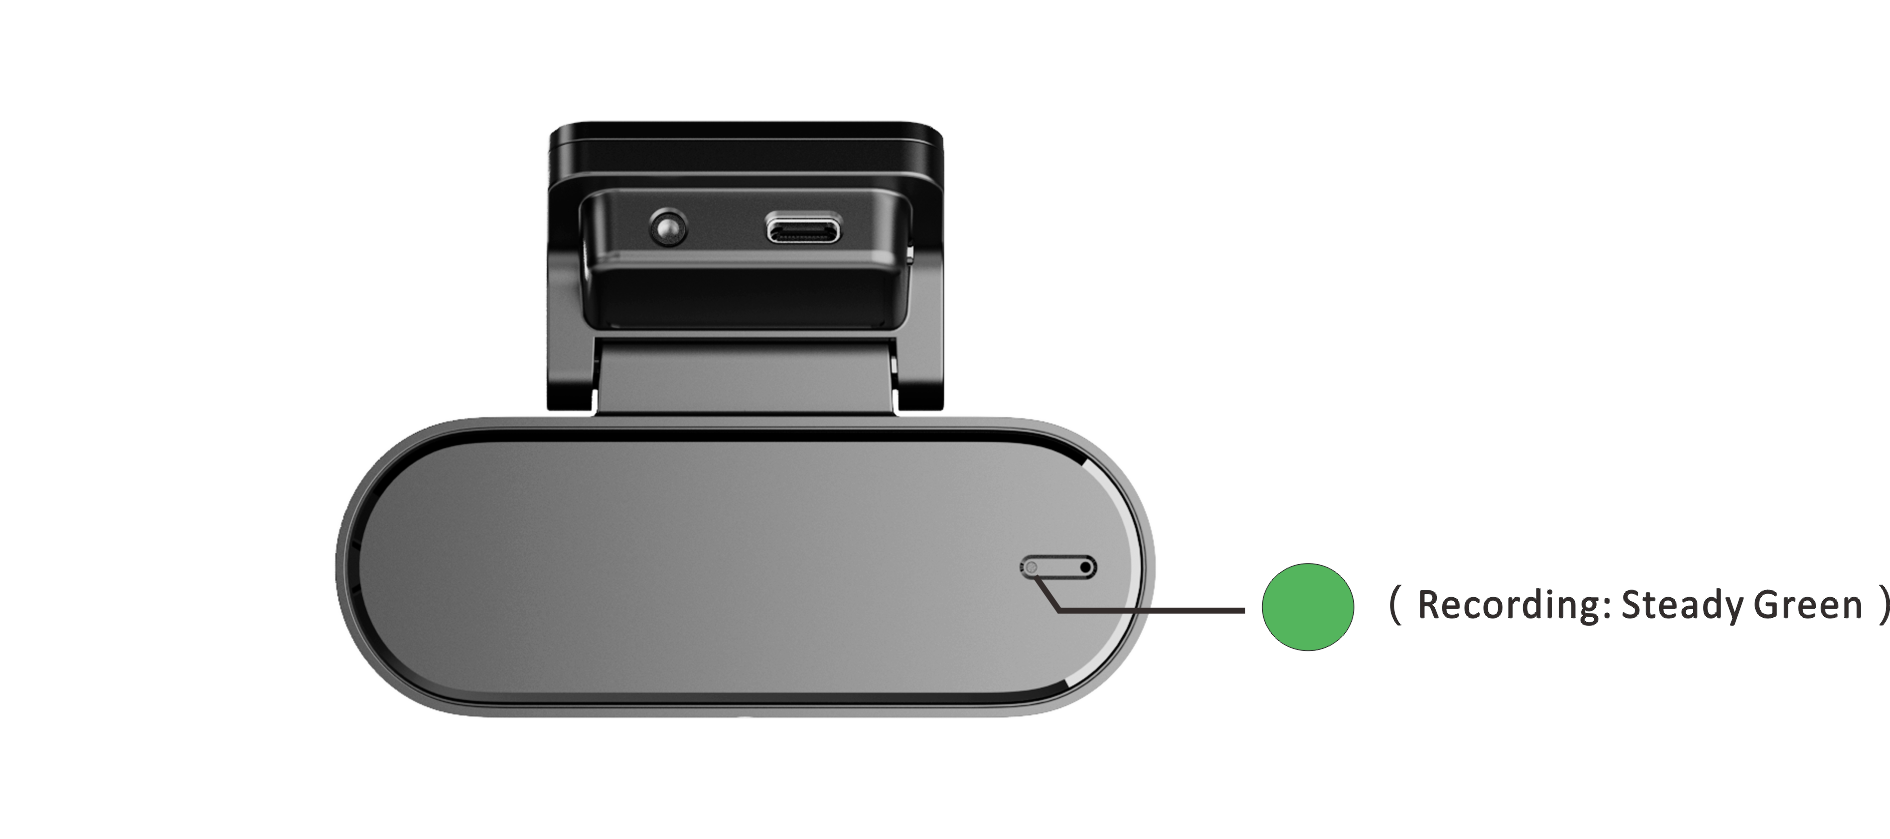
Indicator Guide
| Indicator | System Status |
| Steady Green | Recording |
| Steady Red | Not Recording / Abnormal Lens |
| Steady Purple | Parking Monitoring |
| Steady Blue | Upgrading |
| Flashes Green | Emergency Event |
| Flashes Blue | Bluetooth Authorization |
Specifications
| Model | N5 Dual |
| Input | 5V⎓2A |
| Storage | External: Support Micro-SD card (Up to 512GB, UHS-3 or higher speed) |
| Built-in storage: 32GB EMMC | |
| Resolution | Front Camera: 4K 3840*2160 @25fps |
| Rear Camera: 1920*1080 @25fps | |
| Aperture | F1.8 |
| Field of View (FOV) | Front: 140° |
| Encoding Technology | Support AI.265 / H.264 encoding |
| RAM | 4Gb |
| Wi-Fi | 5GHz |
| Super Capacitor | Supported |
| Bluetooth | BT4.2 |
| Dimensions | 102 x 21.9 x 36mm |
| Working Temperature | -4℉ to 158℉ (-20℃ to 70℃) |
| Storage Temperature | -40℉ to 185℉ (-40℃ to 85℃) |
Activating Your N5 Dual
Downloading DDPAI App
● As the app is constantly upgraded, the actual operation may be slightly different from the following description. Please connect your device to a phone according to the prompts in the DDPAI App.
Please scan the QR code below or search for “DDPai” in Google Play Store (Android) or App Store (iOS) to download the DDPAI App.

Connecting N5 Dual with Smart Phone
● As the app is constantly upgraded, the actual operation may be slightly different from the following description. Please connect your device to a phone according to the prompts in the DDPAI App.
● Bluetooth Connection
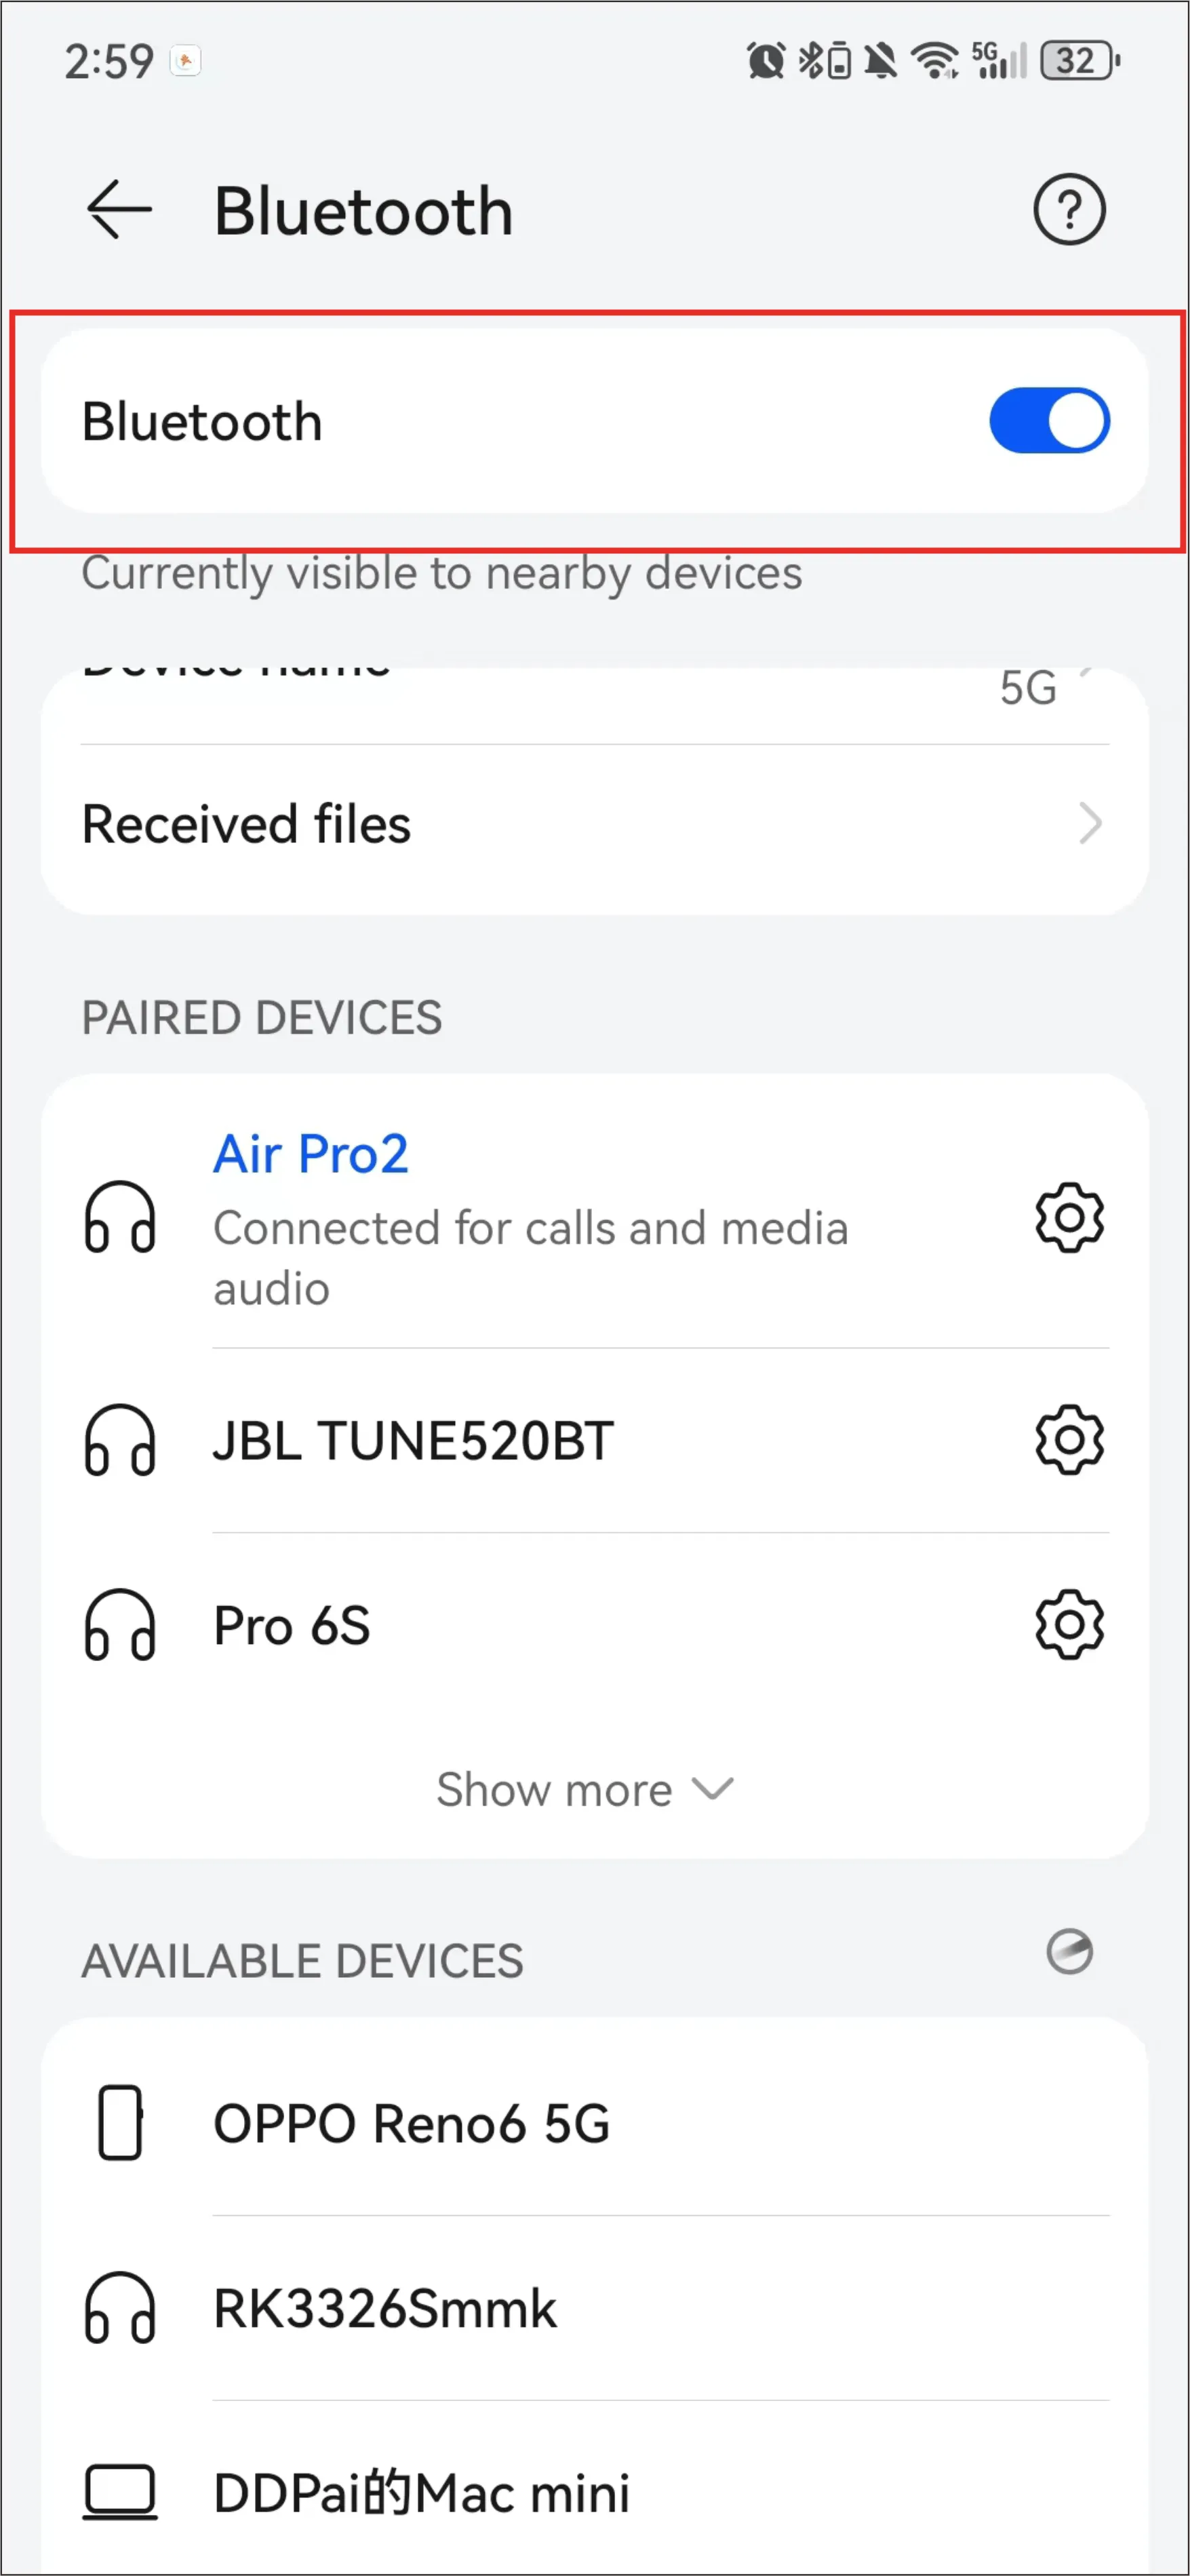
For the first time of use, please connect the N5 Dual to your mobile phone through the Bluetooth.
Step 1: Power on the Dash Cam. Turn on the Bluetooth of your mobile phone.
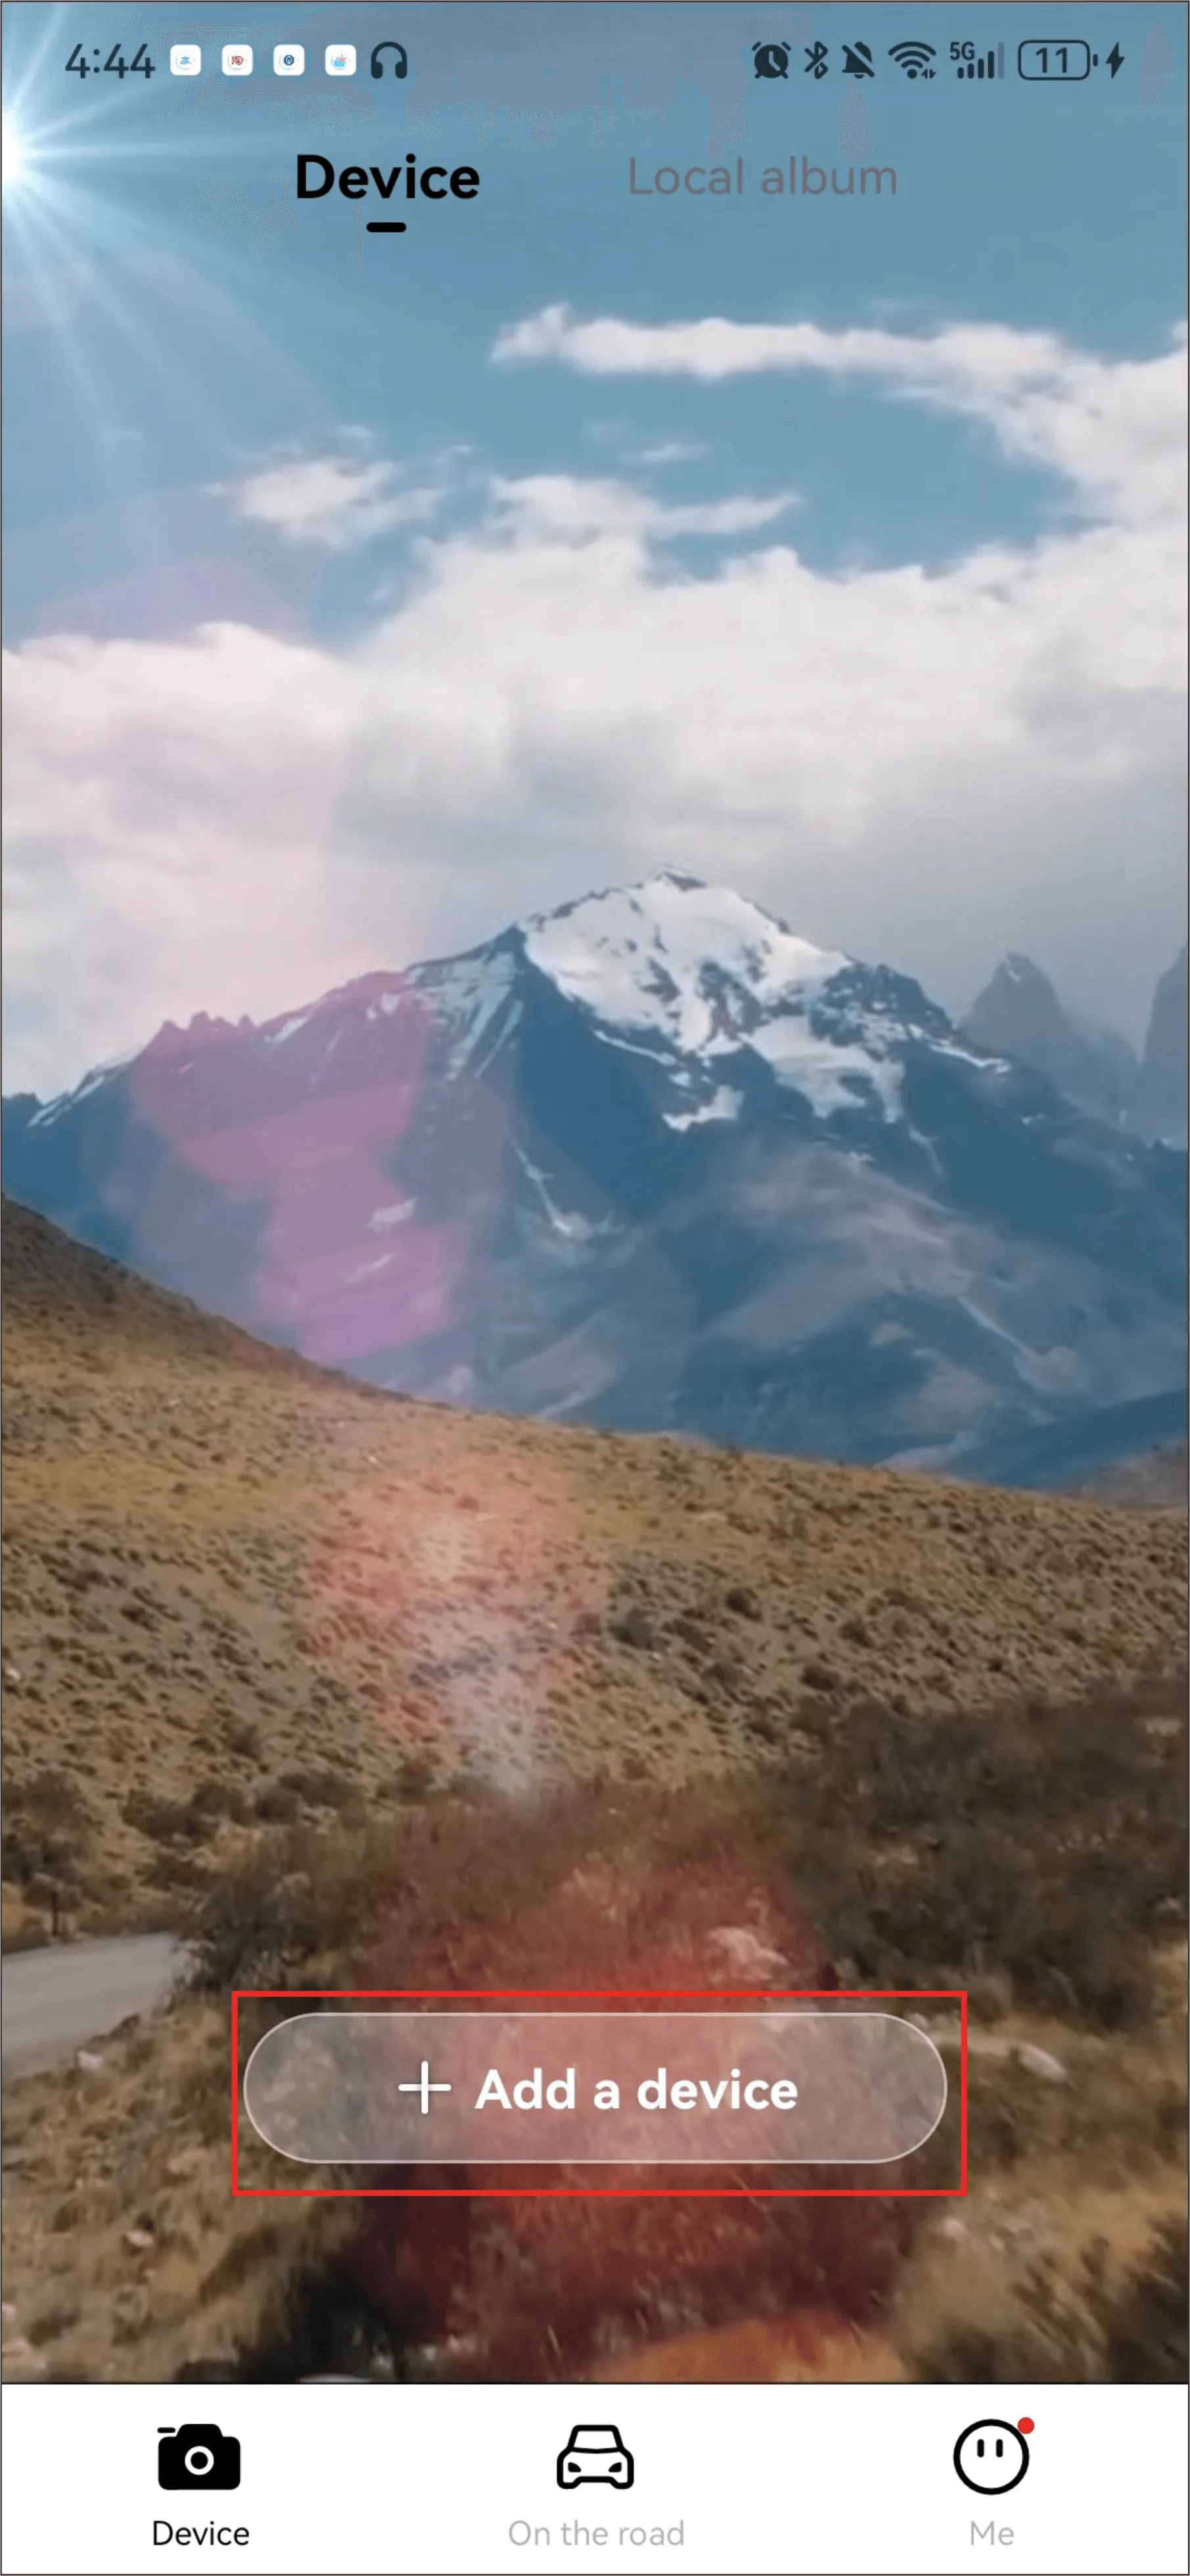
Step 2: Launch the DDPAI App, tap “Device”> “+ Add a device”.
Step 3: Select the current device name (DDP0FXXXX) in the detected Bluetooth device list.
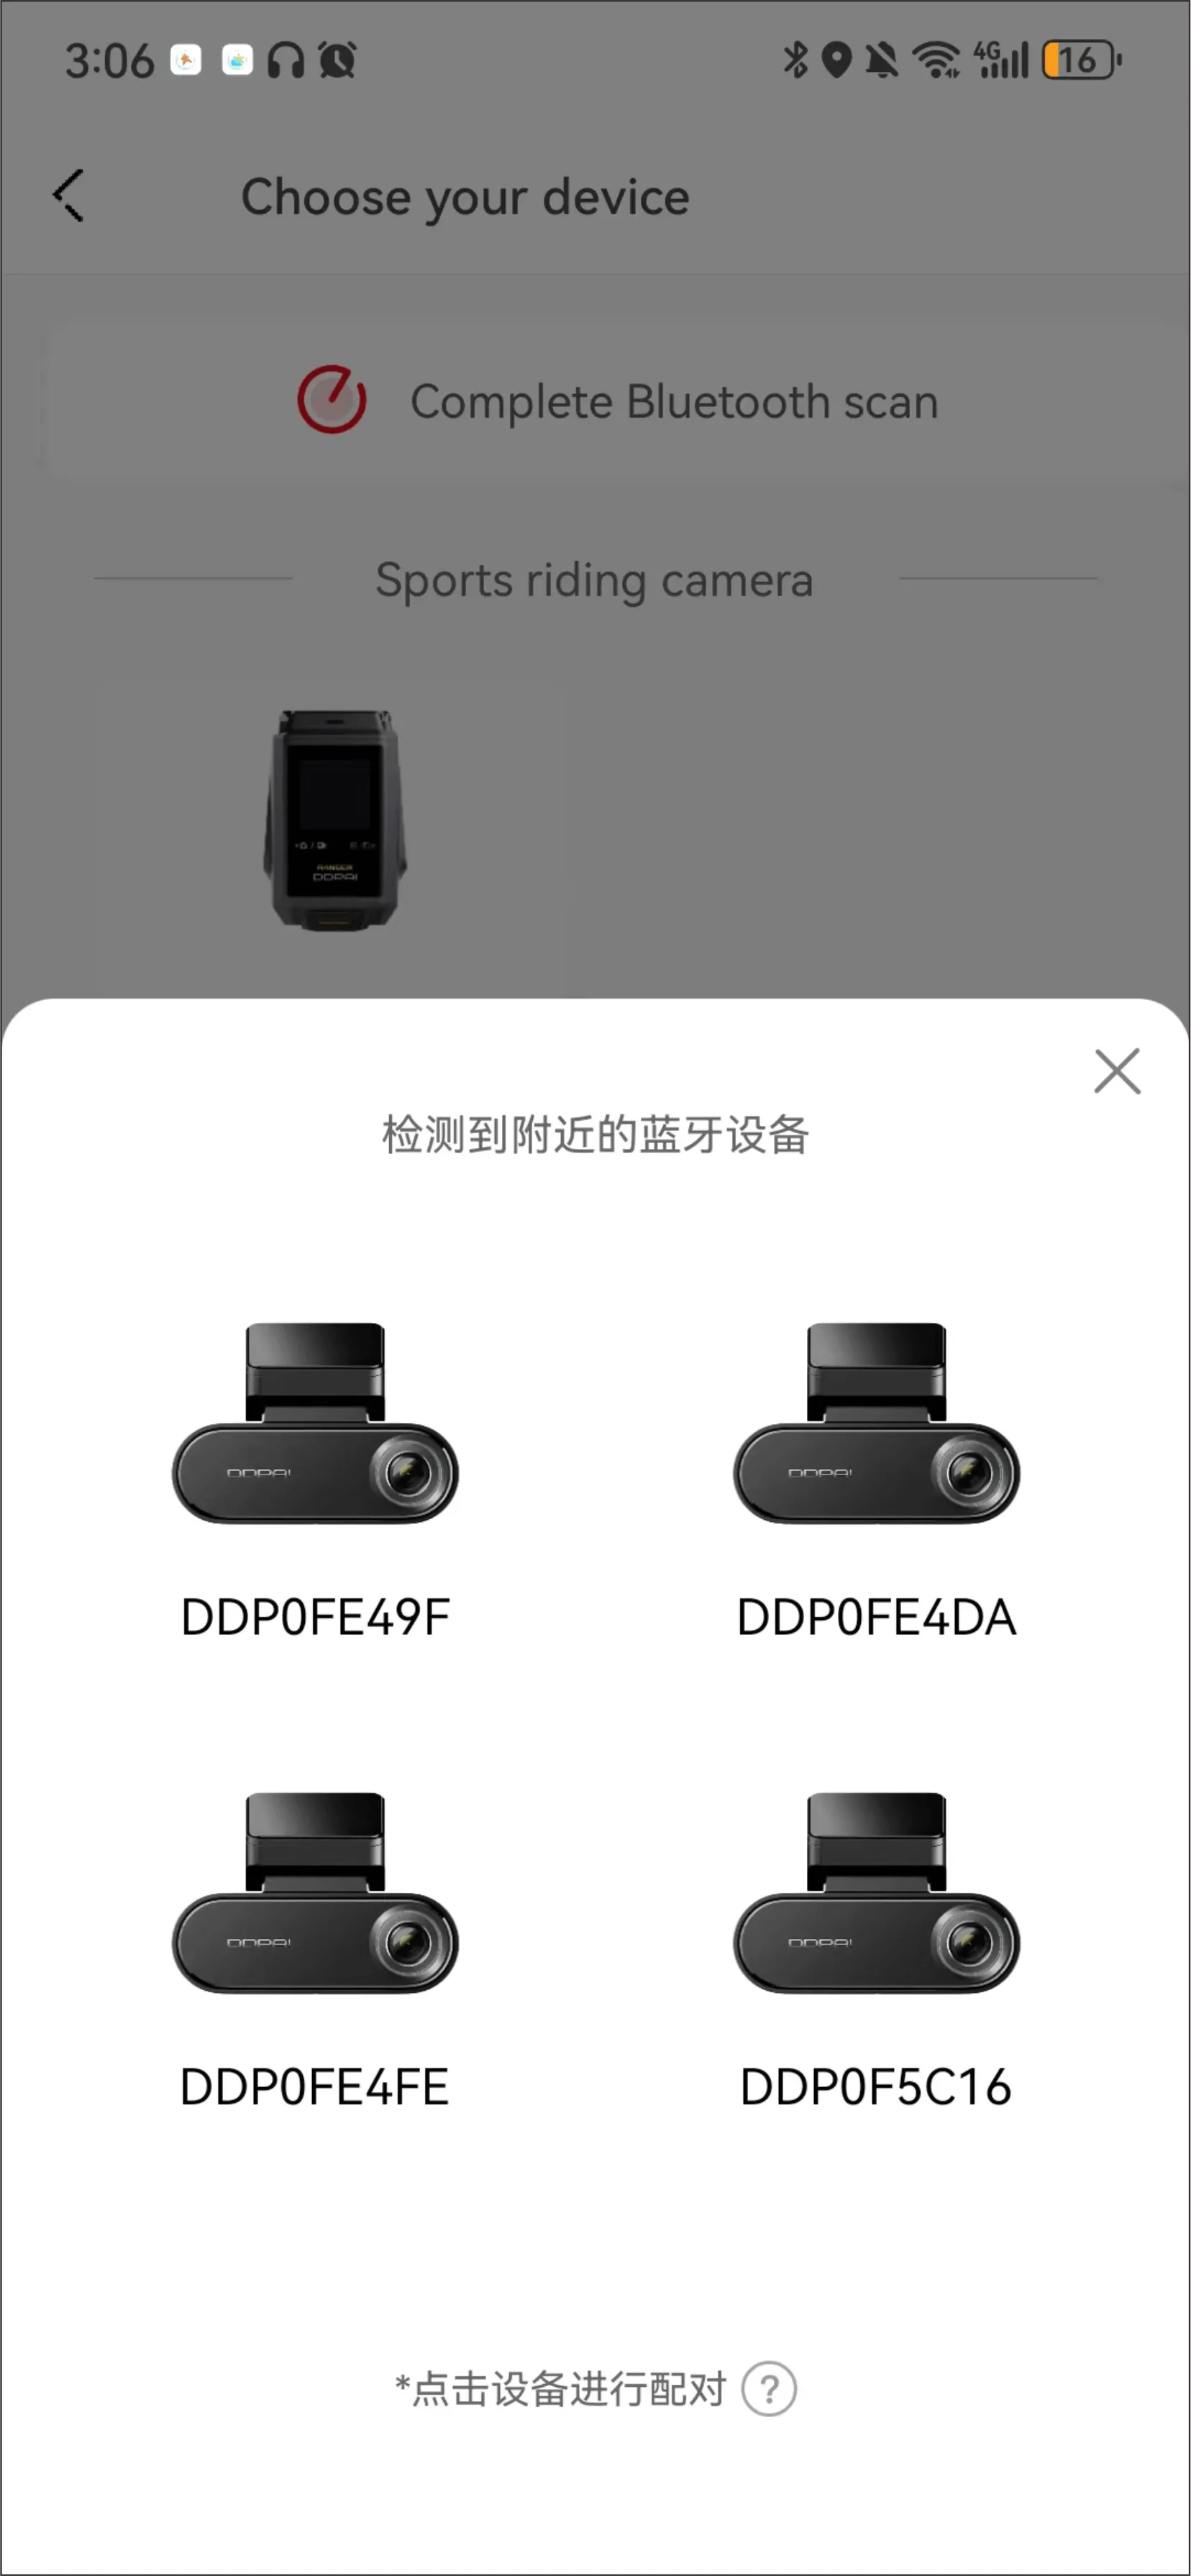
Step 4: Press the function button on the Dash Cam to authorize.
Step 5: When the Dash Cam is successfully connected to your mobile phone, it starts recording and the indicator stays green (Please check the indicator of your Dash Cam).
● The Dash Cam can only be connected to one mobile phone via Bluetooth at a time.
● When it is not the first time to connect, there is no need to confirm authorization through the function button on the device, and automatic connection can be achieved. But when the Dash Cam has been connected to other mobile phones or restored to factory settings, you need to follow the steps for first connection to reconnect the Dash Cam.
● When other mobile phones want to connect to the Dash Cam, please turn off the Bluetooth of the original mobile phone, delete the device on the app, or reset the device to allow another mobile phone to connect the Dash Cam via Bluetooth.
● Wi-Fi Connection
Step 1: Tap “Go to connection” > “WLAN”
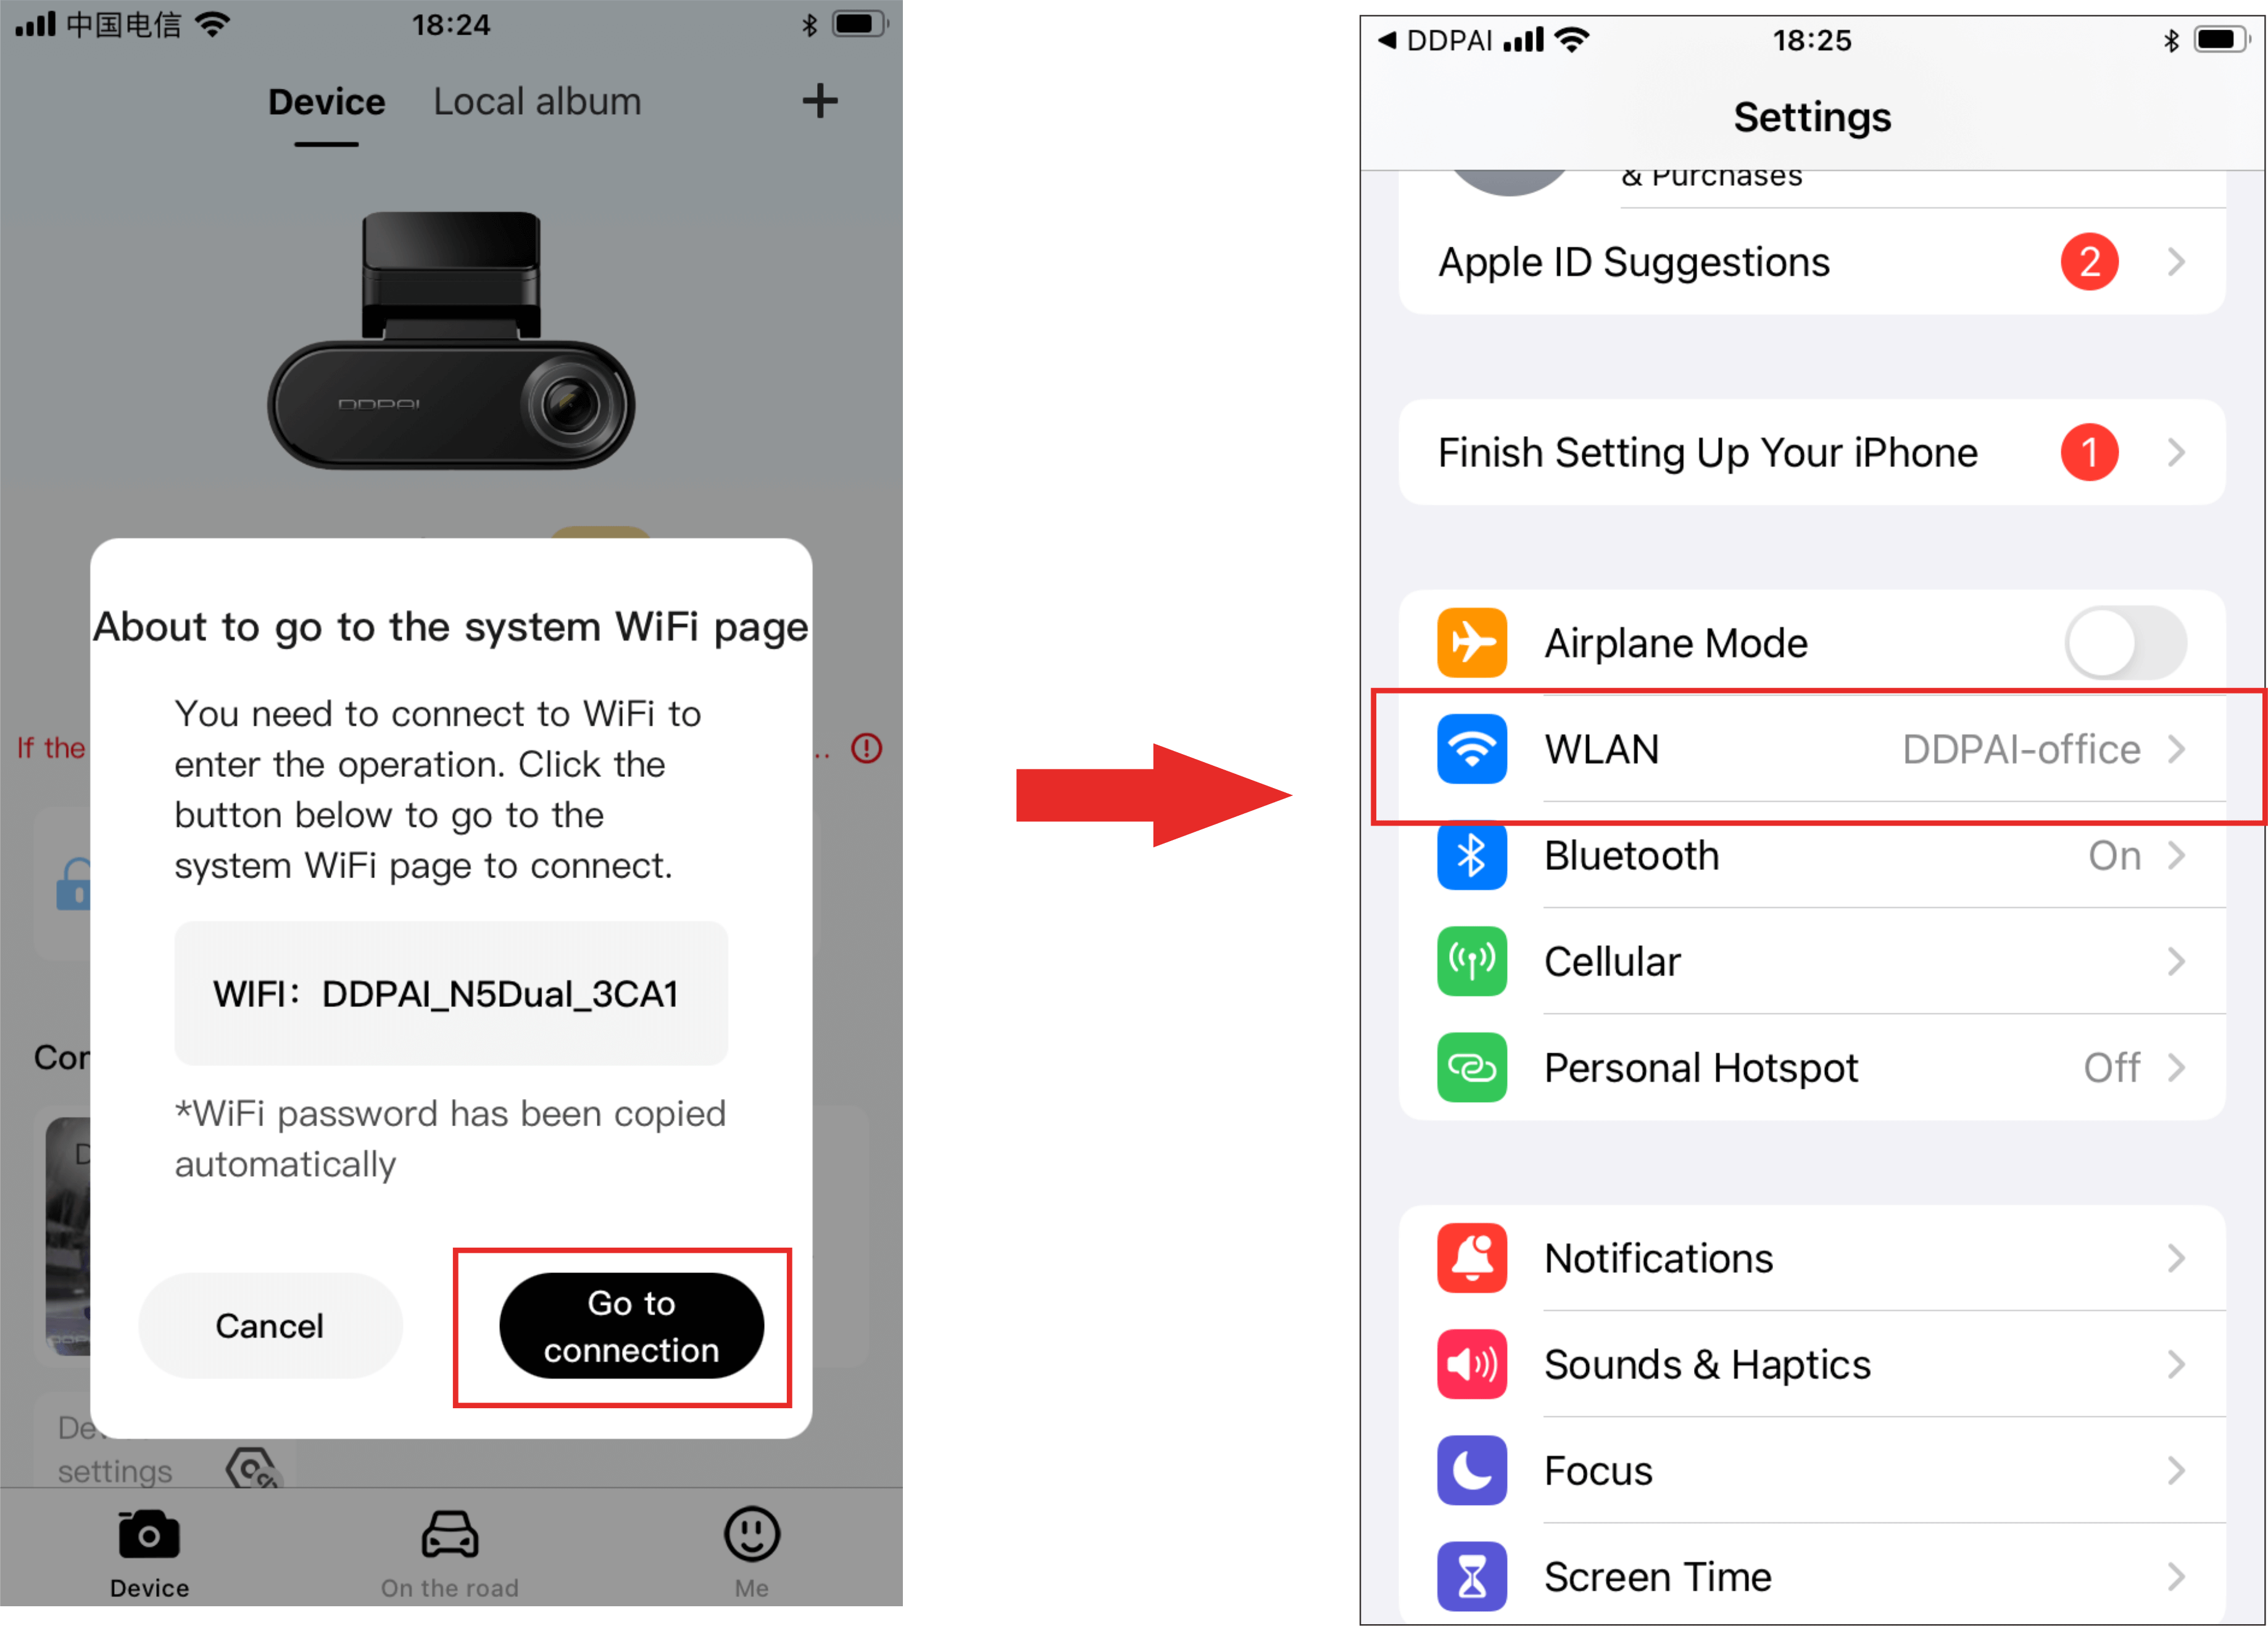
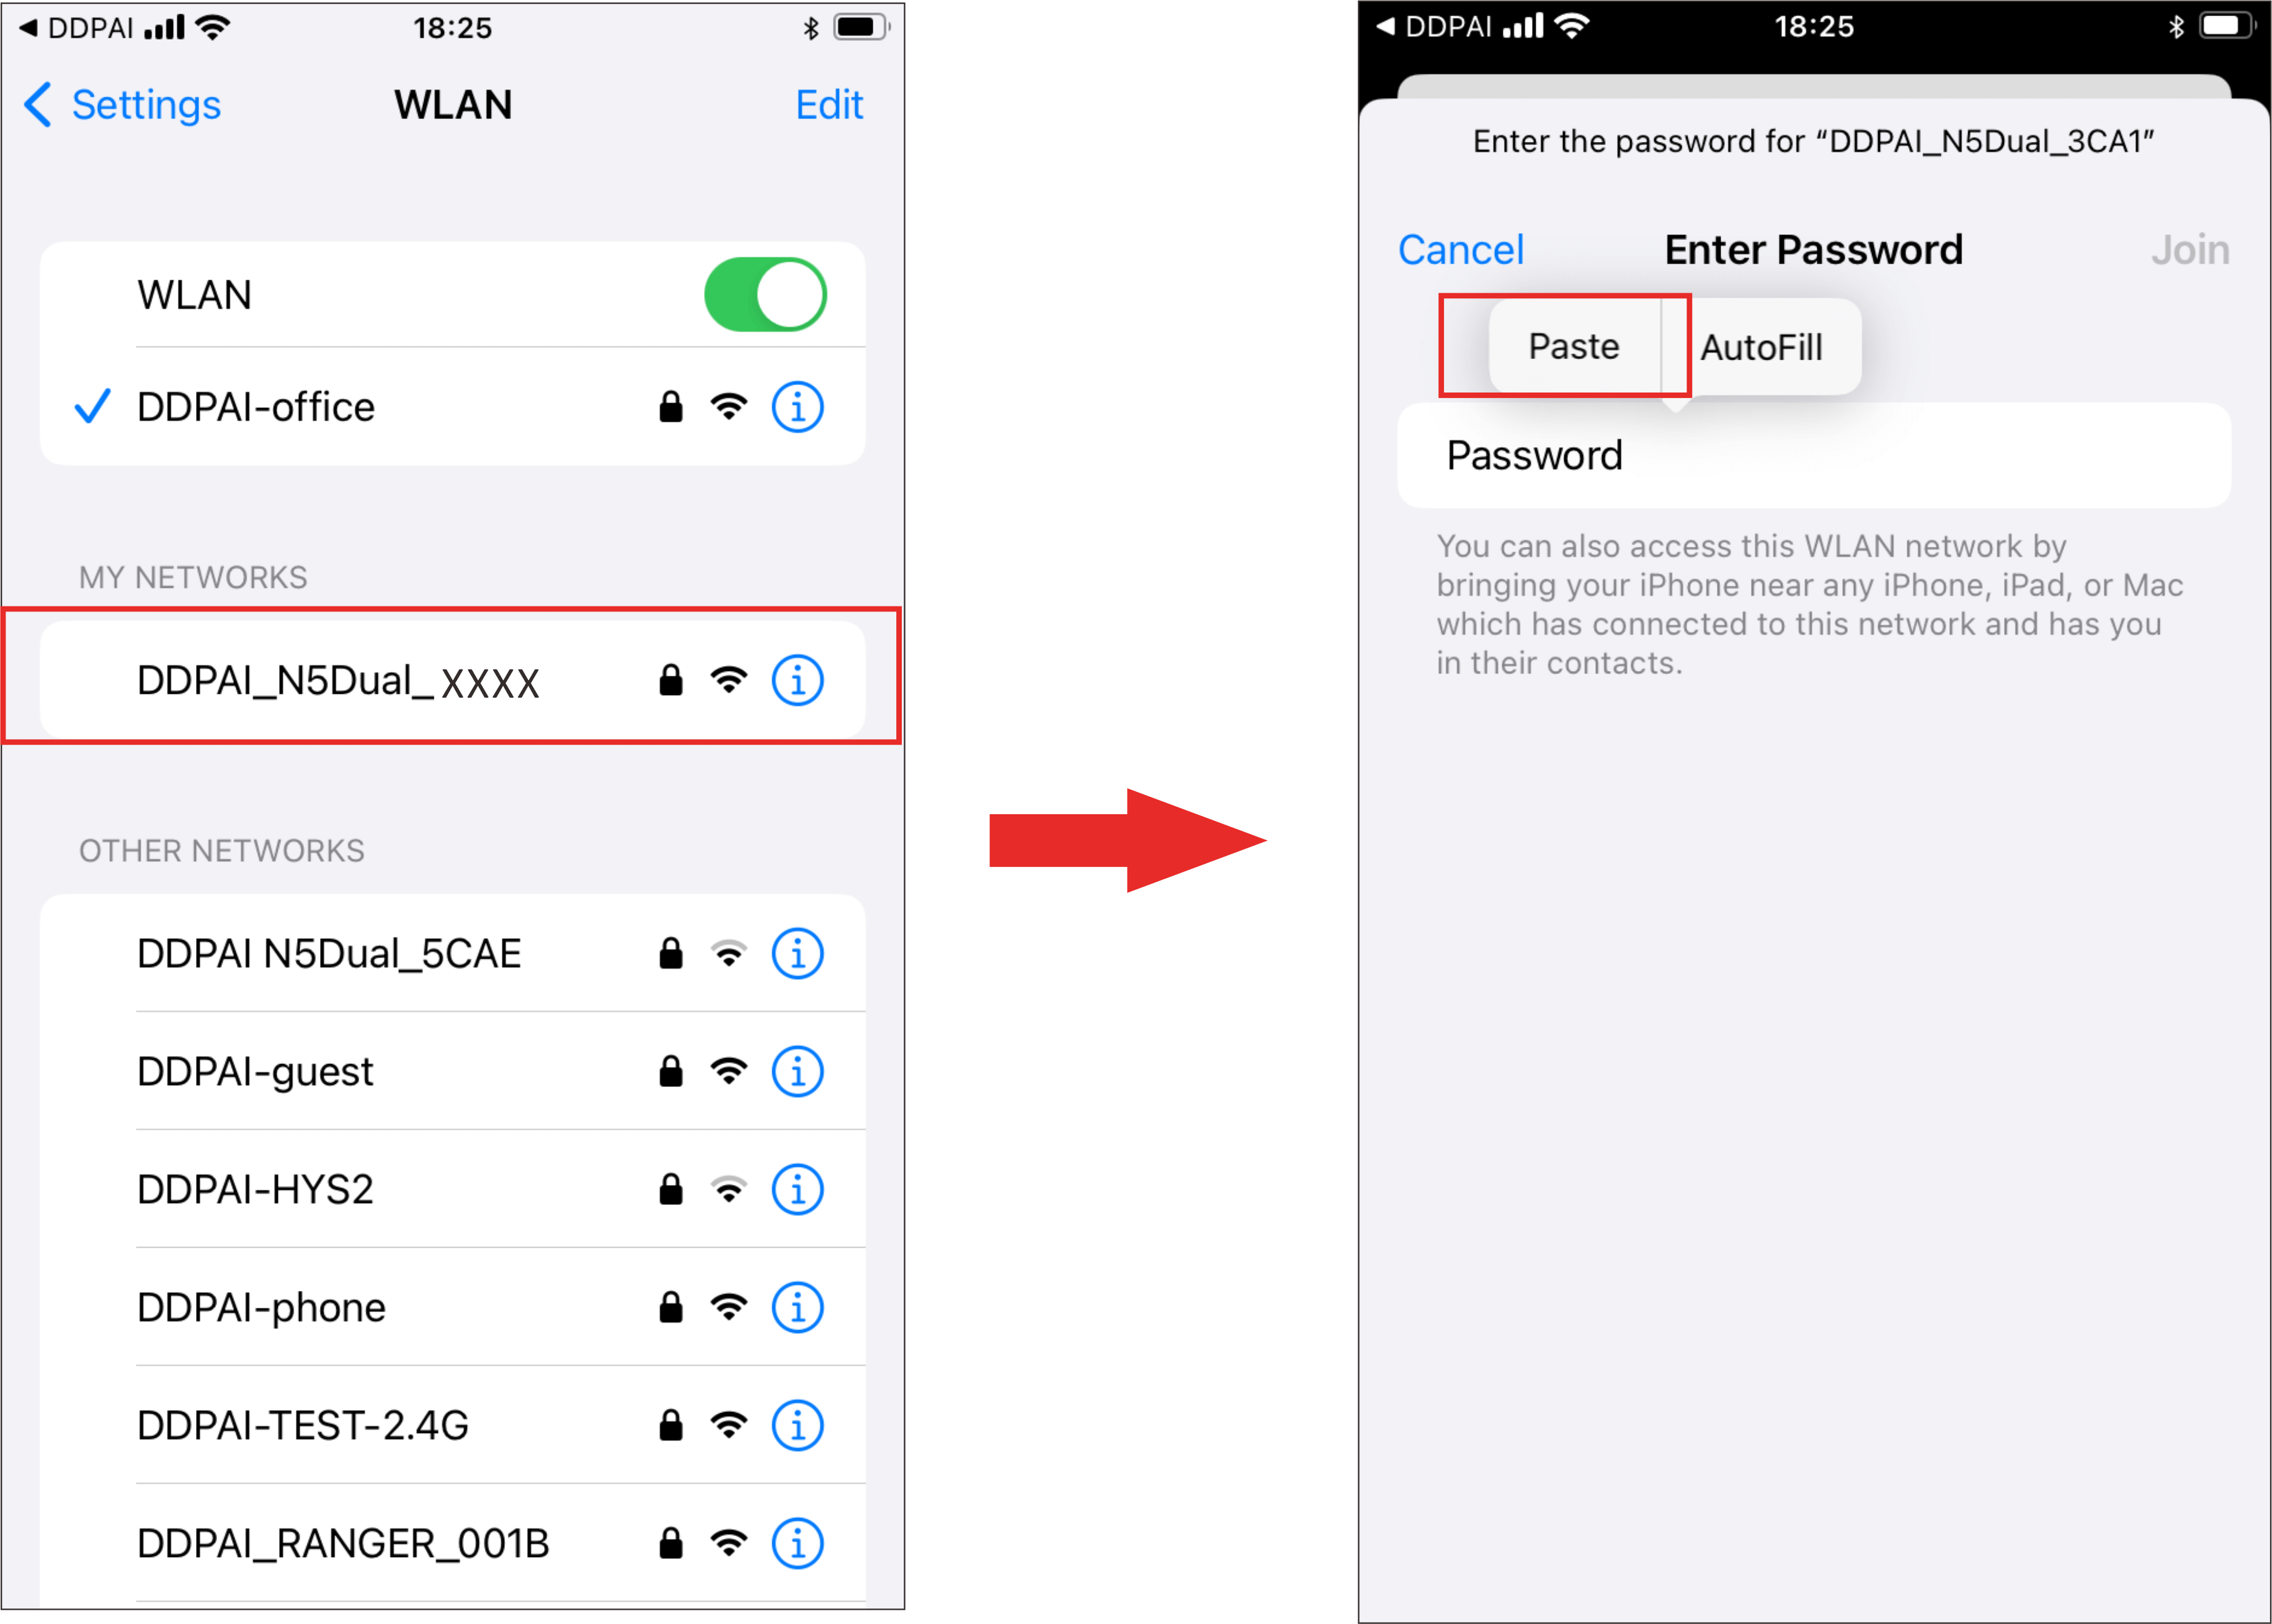
Step 2: Select the current device “DDPAI_N5Dual_XXXX”. Paste the password directly into the edit box and tap “Join”.
① Open the DDPAI App, enter the “Device” page, tap “+ Add a device“, enter the “Choose your device” interface, and then tap “Device without Screen“.
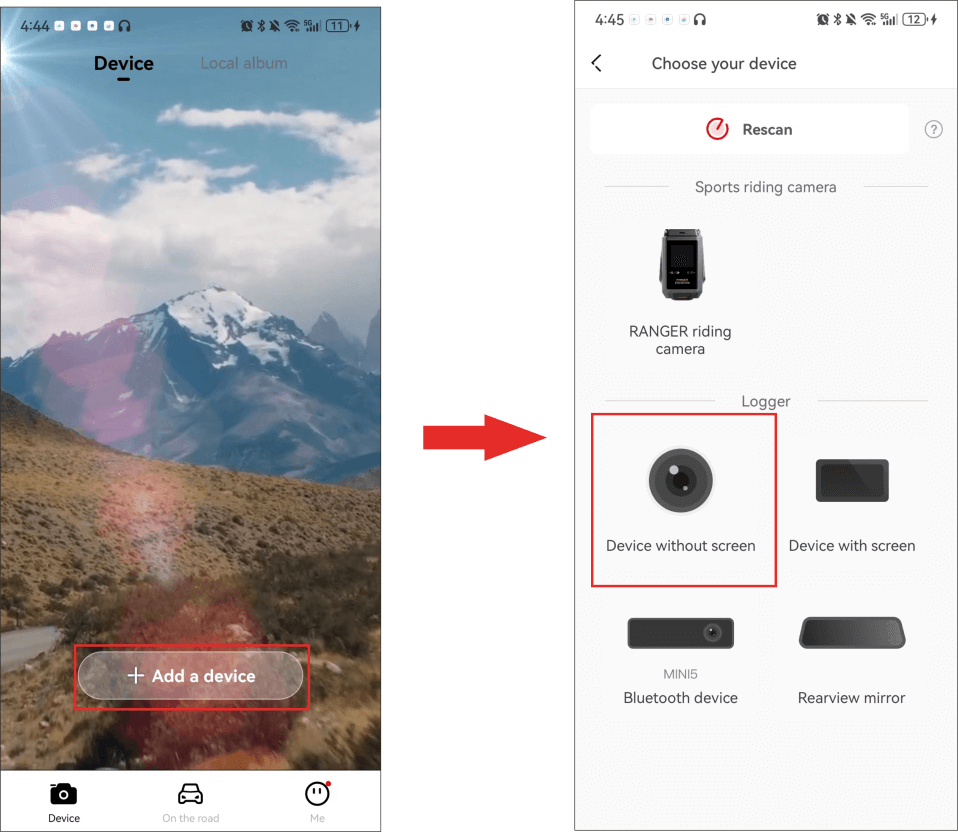
② Tap “Next” > “Connect to Wi-Fi” in turn, and the detected Wi-Fi of the Dash Cam (such as DDPAI N5Dual_XXXX) will be displayed.
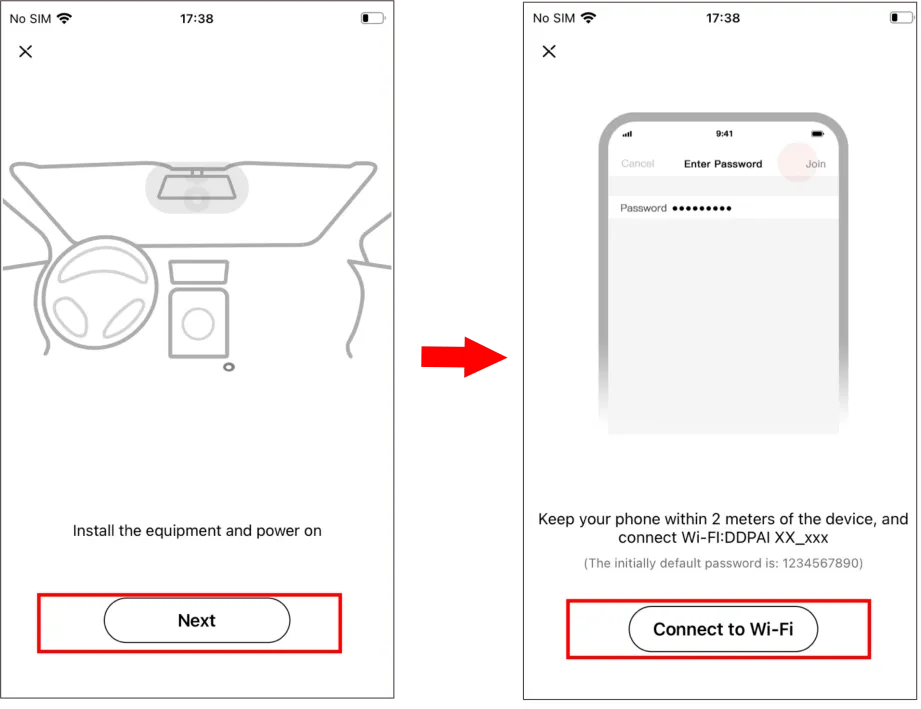
③ Connect your phone to the built-in Wi-Fi “DDPAI N5Dual_XXXX” of the Dash Cam, and the default password is 1234567890.
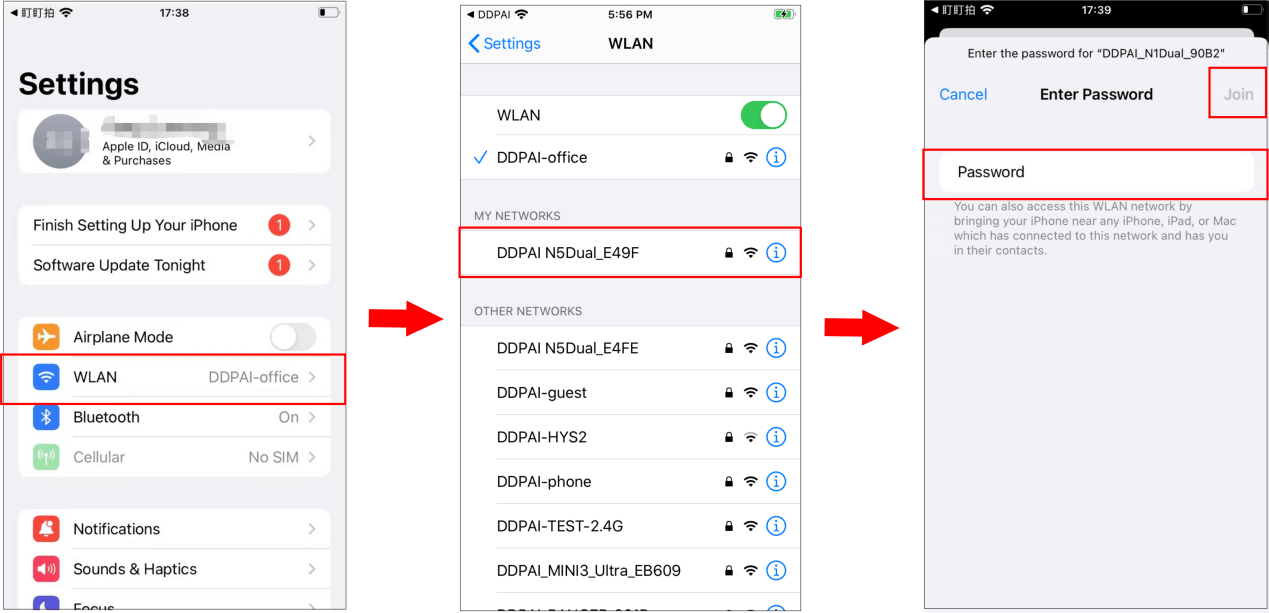
● For iPhone:
When you enter the“Settings”interface, select “WLAN” > “DDPAI N5Dual_XXXX”, enter the initial password (1234567890), and tap Join.
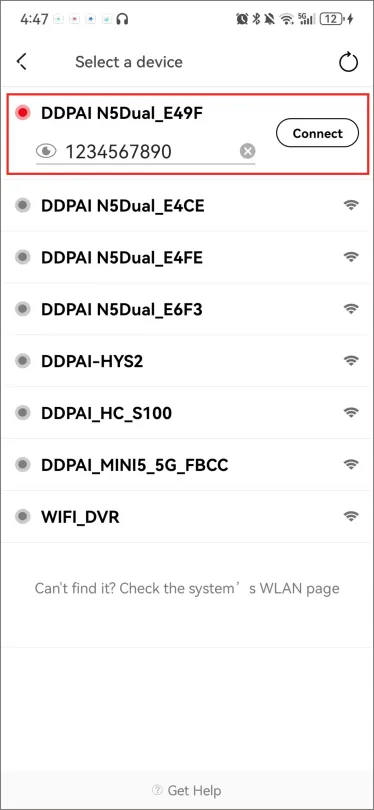
● For Android phones:
In the Wi-Fi list, select “DDPAI N5Dual_XXXX“, enter the initial password(1234567890), and tap Connect.
④ After successful connection, you can directly enter the “Device” interface of DDPAI App.
Installation Instructions
Memory Card Installation
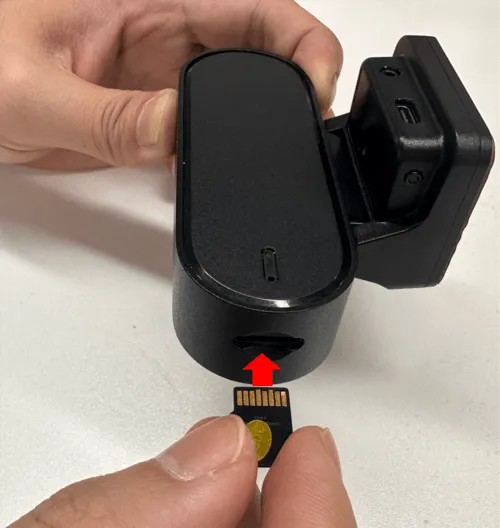
Install the SD Card
Please make sure the Dash Cam is turned off first. Make sure the lens of the Dash Cam is facing down, the chip of the memory card is facing up. Then insert the memory card half way in (refer to the silkscreen printed pattern beside the memory card slot) and use the finger nail or a paper clip to push the card all the way inward until it clicks and locks in place.
Remove the SD Card
To remove the SD card, gently push its edge inward until it clicks, and then pops out, then simply pull it out of the slot.
● Before first time use, please format the memory card to prevent any errors and for smooth operation.
● Do not remove the SD card while the camera is turned on.
Dash Cam Installation
The wiring and power-taking installation method of the Dash Cam include the following three types:
▶ Cigarette Lighter Power Supply
Insert the car charger into the cigarette lighter, and connect the car charger and the Dash Cam through the power cord. Most of the power cord will be embedded in the plastic guard plate of the car, and a small part will be exposed in the car. This wiring method is simple and easy to operate.
Step 1: Wipe the front windshield
Wipe the front windshield with a clean soft cloth to ensure that the bracket can stick firmly.
Step 2: Power on the Dash Cam
After inserting the car charger into the cigarette lighter, connect the Dash Cam to the car charger using the included Type-C power cord.
After the car starts, the Dash Cam will automatically start when it is powered on, and the start-up prompt tone “Hello, DDPAI” will be issued, and the Dash Cam will start recording at this time.
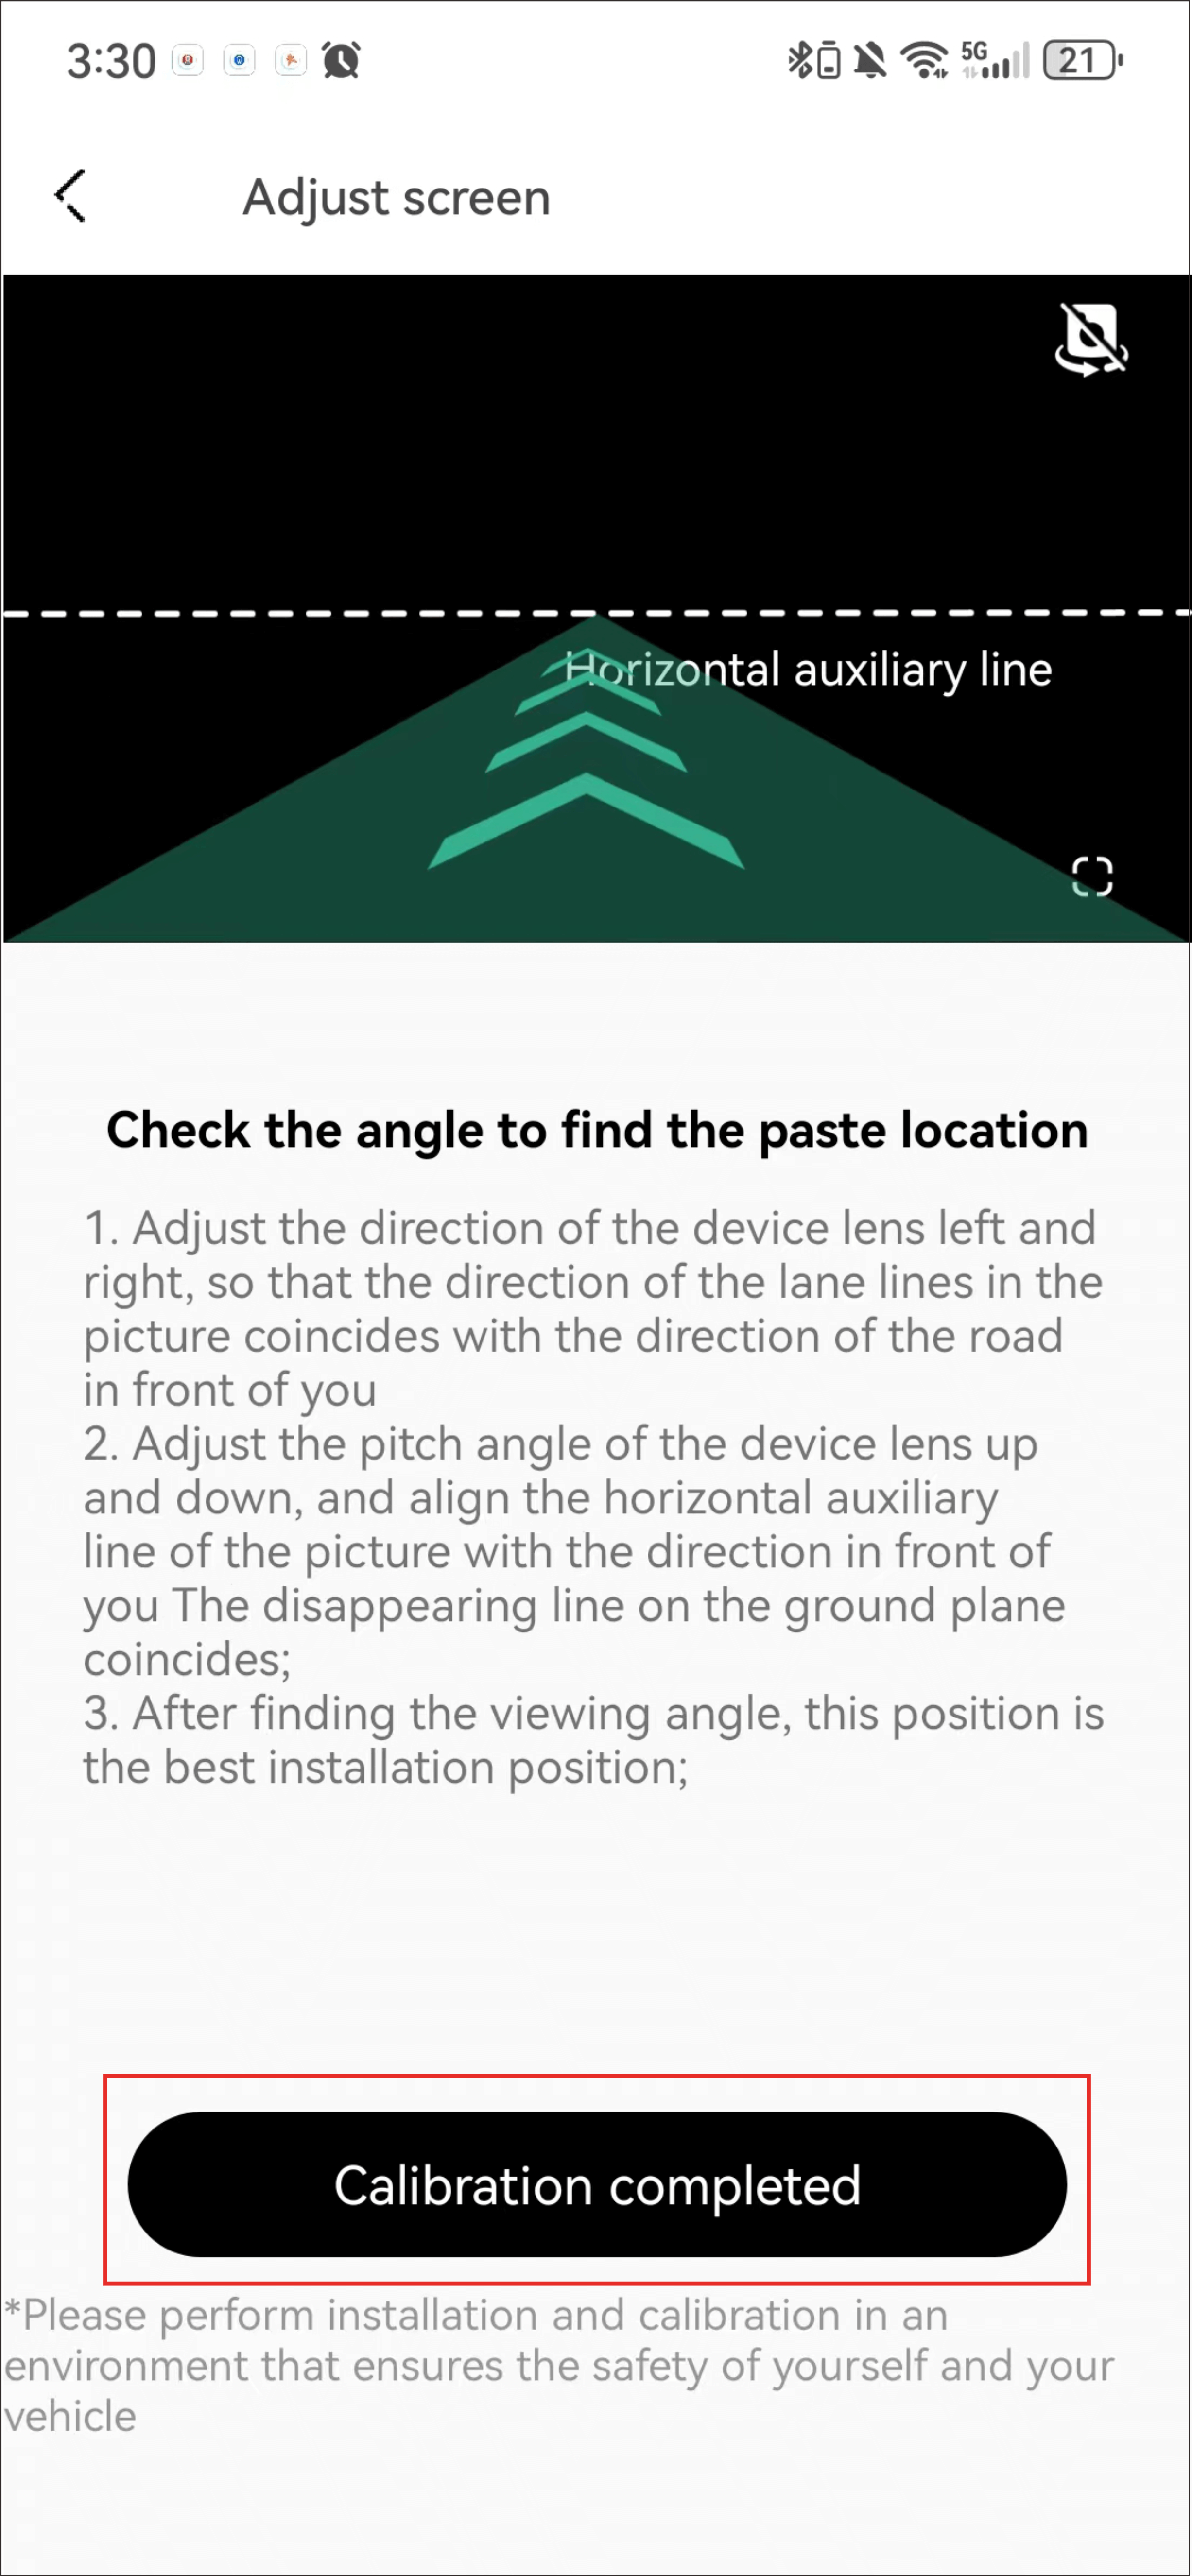
Step 3: Determine the installation position of the Dash Cam and adjust the lens angle
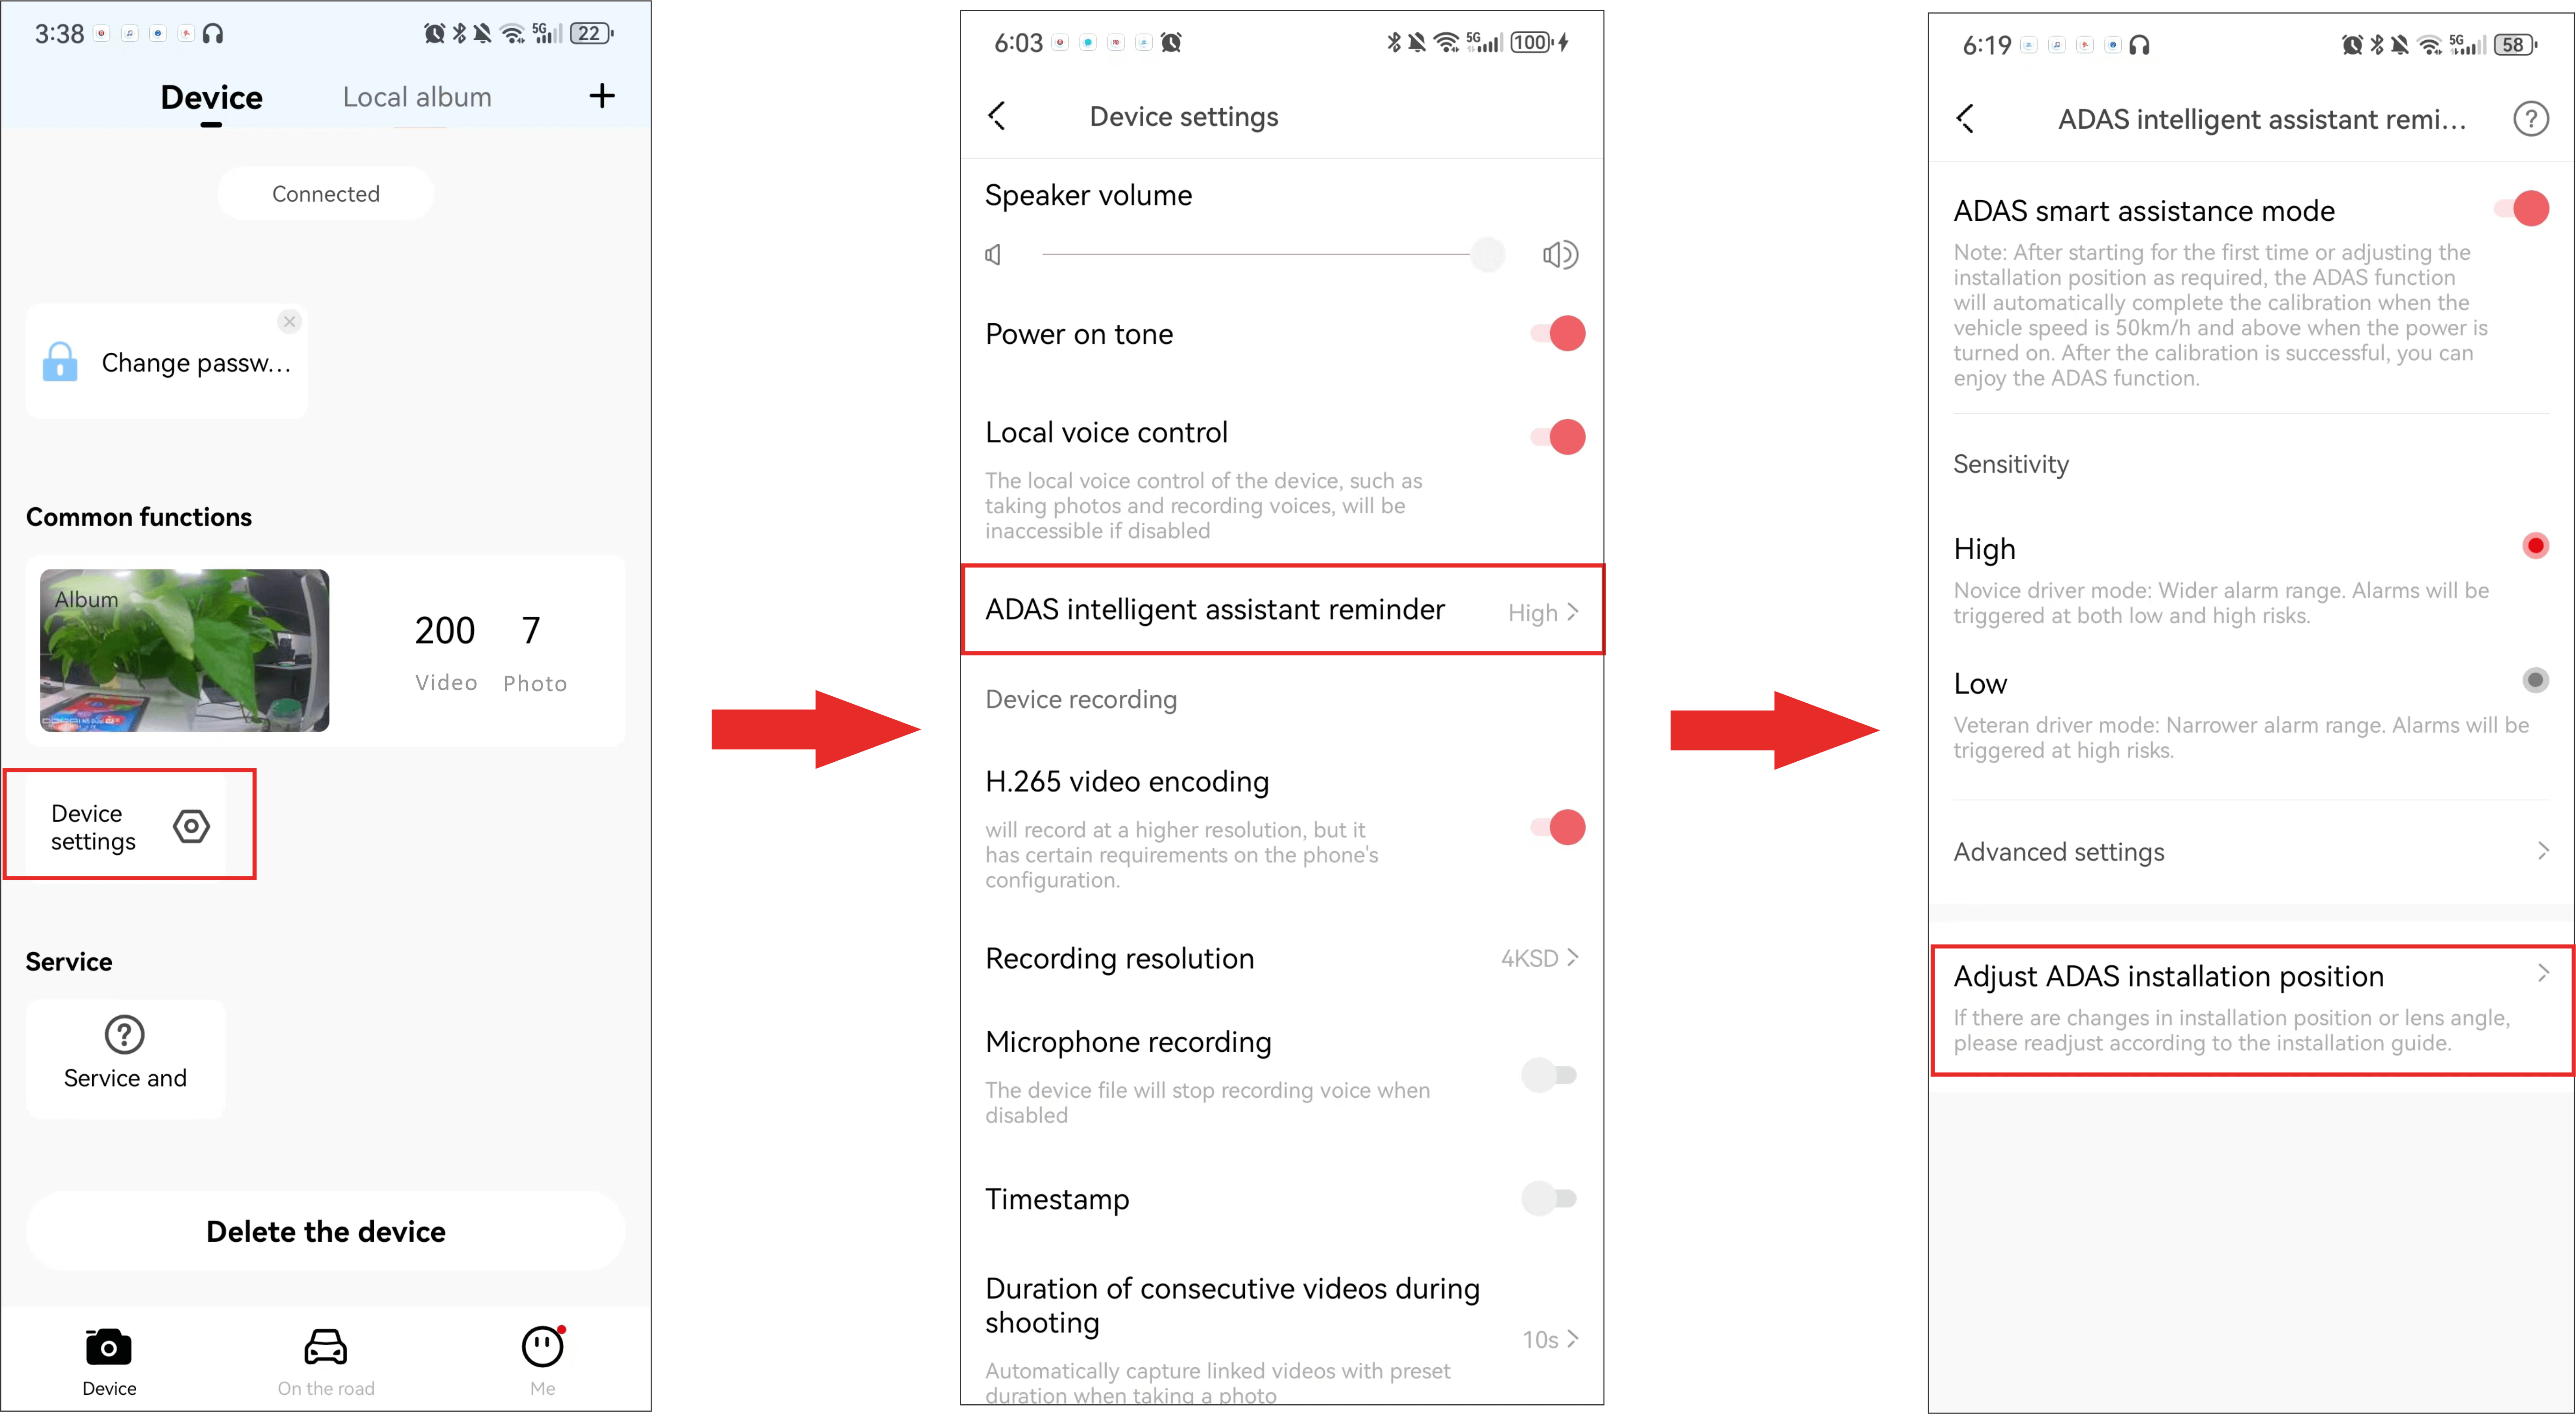
① After connecting the DDPAI App to the Dash Cam, launch the app, tap“Device Settings”> “ADAS intelligent assistance reminder”> “Adjust ADAS Installation position”.

② Select “Go to live preview”>“Enter live preview”to enter the calibration interface. Then you will see the on-screen instructions to assist with installation, according which the installation position of the N5 Dual is located.

● Vertically: Moving the N5 Dual side to side with the help of the vertical guideline on the middle of the screen, keep adjusting until to the middle of the vehicle’s front end align to this vertical guideline.
● Horizontally: Rotating the camera up and down with the help of the horizontal guideline on the middle of the screen, keep adjusting until the ground-level horizon outside vanishes from the scope of this horizontal guideline.
③ After completing the installation, tap “Calibration completed”.
Step 5: Stabilize the Dash Cam
① After determining the installation position of the Dash Cam, attach the electrostatic sticker to the installation position.
② Peel off the film of the 3M sticker on the bracket, and stick the bracket to the center of the electrostatic sticker.
Step 6: Wiring
As shown in the following figure, please place the power cord from the cigarette lighter receptacle to the fixed position of the Dash Cam, and hide the power cord in the plastic guard plate of the car by using the crowbar.
▶ Connect the fuse box (step-down line is required)
This wiring method ensures neatness and beauty in the car and realize parking monitoring function at the same time. But the wiring operation is complicated. In order to avoid vehicle damage caused by misoperation, please complete the installation at a professional automobile service shop.
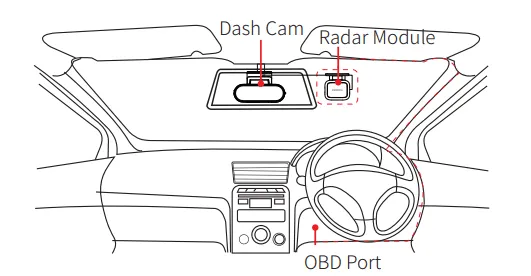
▶ Connect the OBD Interface (OBD power cable is required)
This wiring method is easy for operation and can also realize the parking monitoring function.
Step 1: Plug the Type-C connector of the OBD power cable into the Type-C port of the Dash Cam.
Step 2: Connect the other end of the OBD power cable to the OBD port of the vehicle.
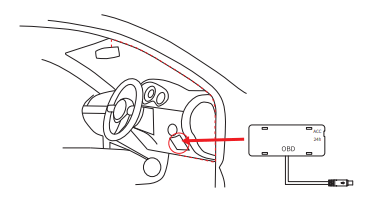
● The location of the OBD interface is different in different models. The above figure is for reference only.
Rear Camera Installation
1. Clean the rear windshield (the approximate installation position of the rear camera Is shown in the figure below).
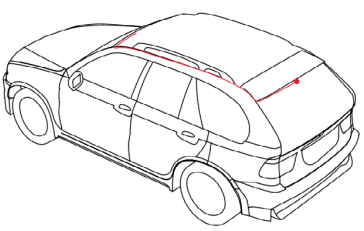
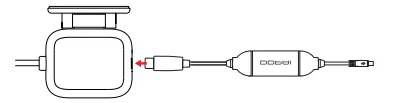
2. Connect the rear camera to the power cable (rear).
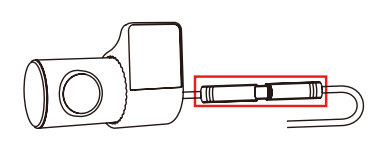
3. Insert the rear power cable fully into the N5 Dual headphone jack.
4. Route the rear power cable from the Dash Cam to the rear camera, cable routing is shown in the figure above.
5. Remove the red backing film of the adhesive sticker, and adjust the field of view of the rear camera, then fix the rear camera to the inner wall of the rear windshield.
Note:
Make sure to install the rear camera in the direction indicated on the sticker and make sure the lens is facing the rear windshield.

Radar Module Installation (Optional Accessory)
Step 1: Plug the Type-C connector of the OBD power cable into the Type-C port of the radar module.
Step 2: Connect the other end of the OBD power cable to the OBD port of the vehicle.
Step 3: Plug the Type-C connector of the radar cable into the Type-C port of the Dash Cam.
Step 4: Attach the electrostatic sticker to the recommended area as shown in the figure below. Remove the protective film from the radar, attach the adhesive side to the windshield close to the Dash Cam (make sure the indicator of the radar module is facing the windshield).
● Do NOT place the radar behind the rearview mirror. Because rearview mirror obstruction may affect radar performance.
● The default low-voltage protection value is 12V. When the car battery voltage is lower than the set value, the power-off protection will be activated to ensure that the car battery does not lose power during parking monitoring.
● The step-down line supplies power from 12V to 5V and has a built-in high-precision voltage detection chip to output a more stable voltage.
● The OBD power cable is ONLY compatible with DDPAI Dash Cam.
● The OBD power cable only obtains power from the OBD port and will not cause safety hazards to the car.
● Please use and store the OBD power cable within the specified temperature range (Working temperature: -20℃ to 70℃, storage temperature: -30℃ to 85℃).
Interface Introduction
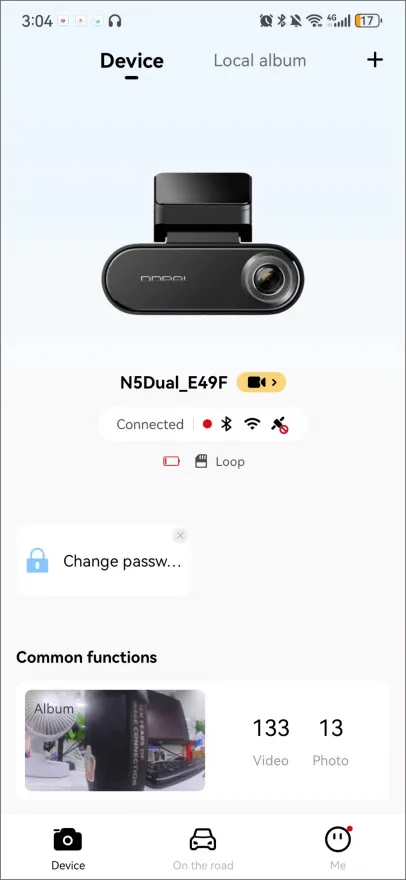
"Device" Interface
After the app is successfully connected, the “Device” interface will be displayed. On this interface, you can enter the preview interface, check the device album, set up the device, etc.
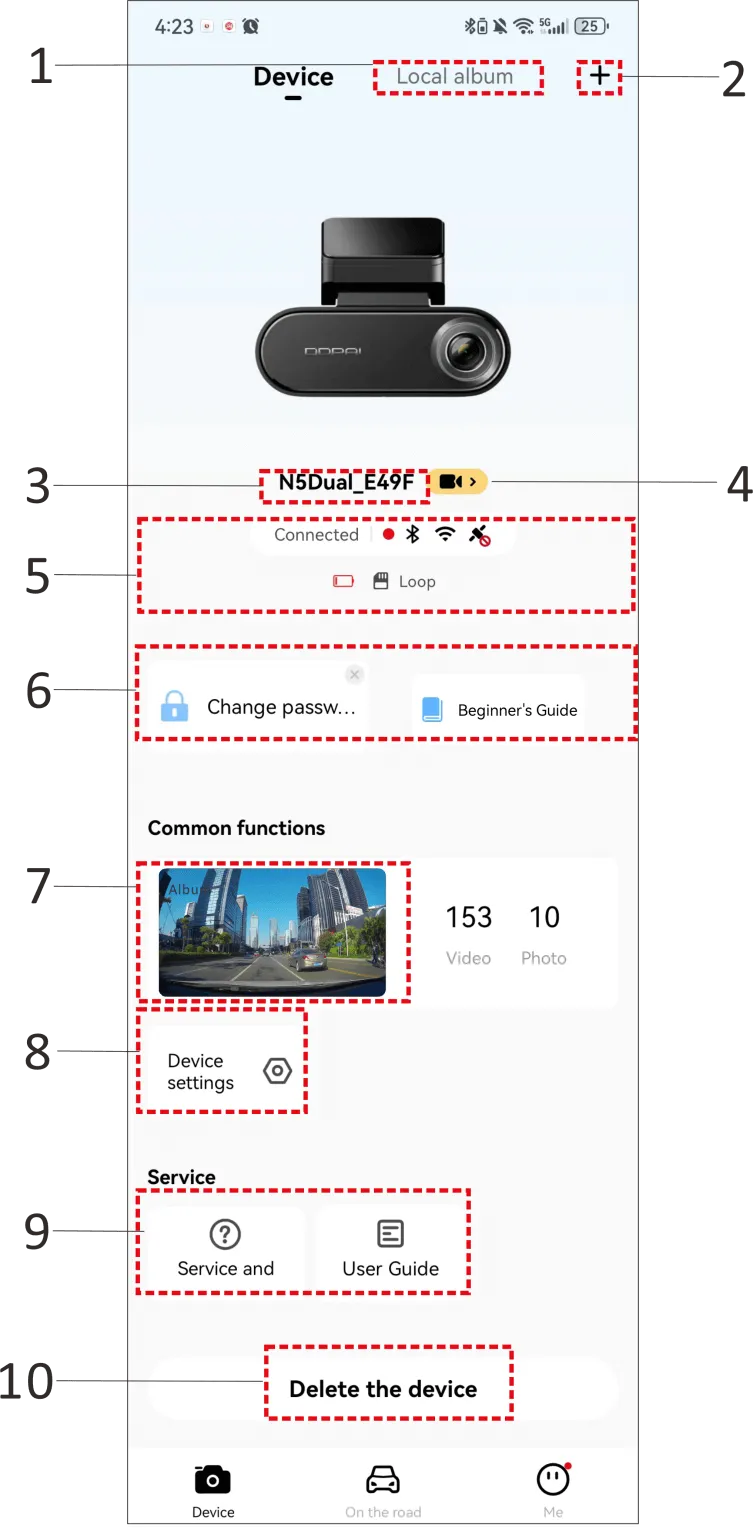
- Local Album: Tap to view the file downloaded locally.
- Tap to select a device for pairing.
- Product Model
- Tap to enter the preview interface.
- Status Area: Contains connection status and status information of the device after connection.
- Prompt Area: Contains firmware version update prompts, beginner’s guide, event push and other prompt information.
- Device Album
- Device Settings: Tap to set up the Dash Cam.
- Service Area: You can report any problems you encounter while using the product and refer to the user manual.
- qDelete Device: If you select to delete the device, the connection with the device will be disconnected and the device information will be deleted.
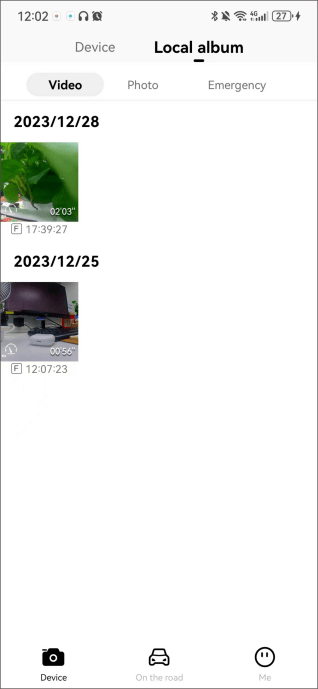
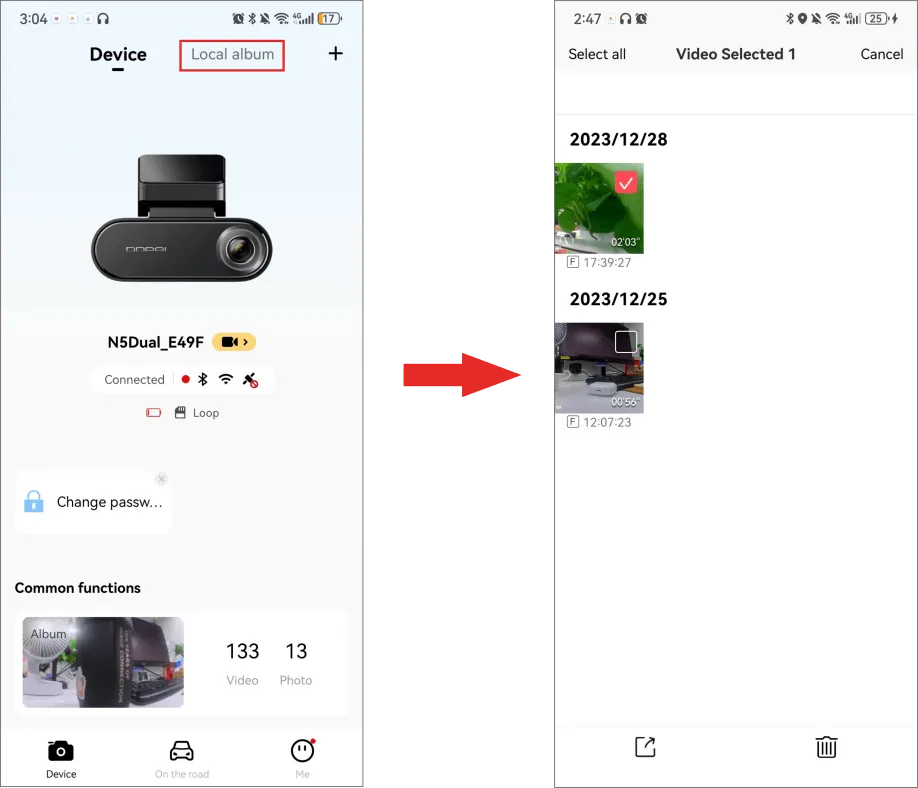
"Local Album" Interface
Tap “Local Album” on the “Device” interface and you can view the downloaded files in the local album, including videos, photos, and emergency files (photos & short videos).
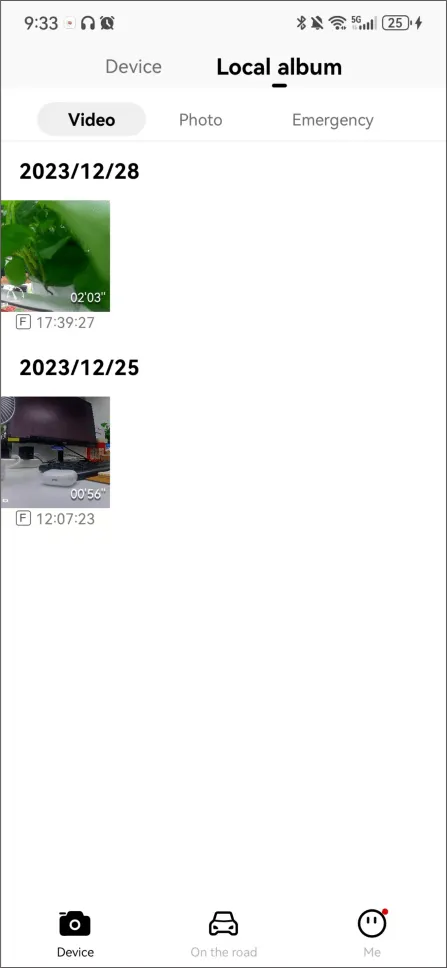
Video
In the “Video” tab, you can view the all the downloaded videos. Time-lapse video files will be marked with “S”, and AI recognition files will be marked with “AI”.
Photo
In the “Photo” tab, you can view the all the downloaded photos.
Emergency
When the device is in operation, a detected collision (emergency situations such as vehicle emergency braking or collision) will trigger taking a photo and an emergency related video, which can be viewed in the “Emergency” tab. See Chapter 5 Collision Detection & Locked Videos for details.
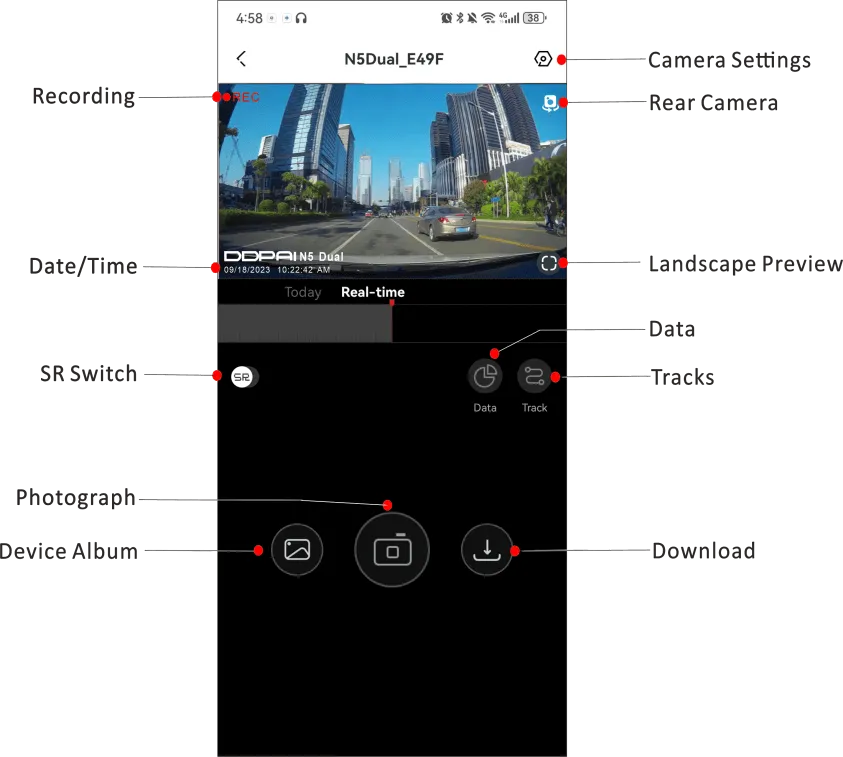
Preview Interface
When you tap on the area outlined by the dotted line (refer the figure below), you can enter the preview interface directly. On this interface, you can preview live video, turn the SR switch, view the tracks, playback video, take pictures, download video files, set up the device, etc.

Device Album
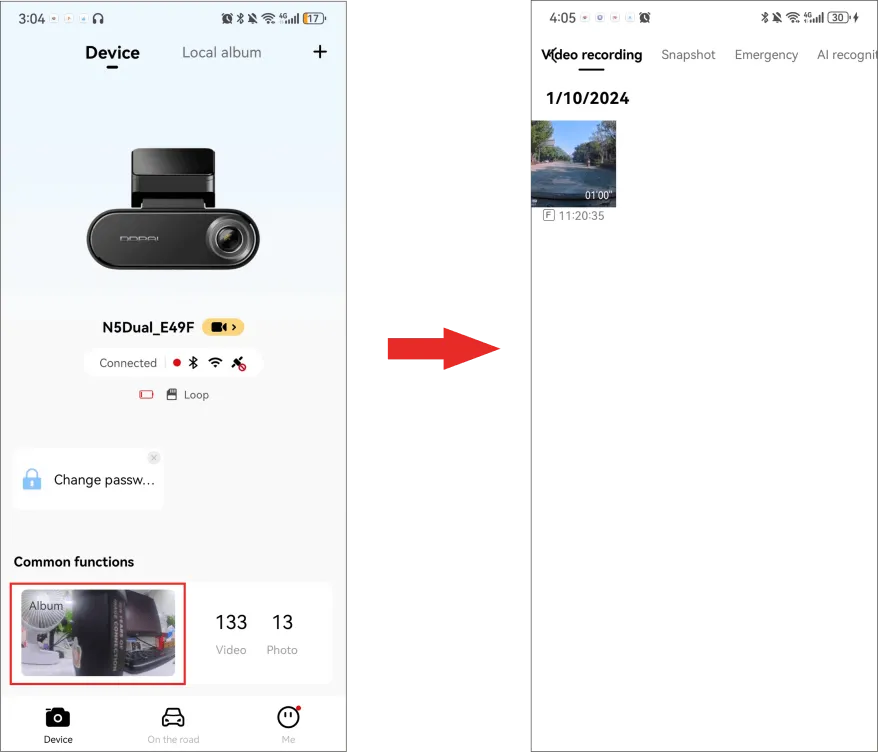
Launch the DDPAI App, go to “Device” > “ Device Album”, you can view all the files recorded by the Dash Cam. You can also download/delete these files, hold the file you want to download/delete to enter the selection state.
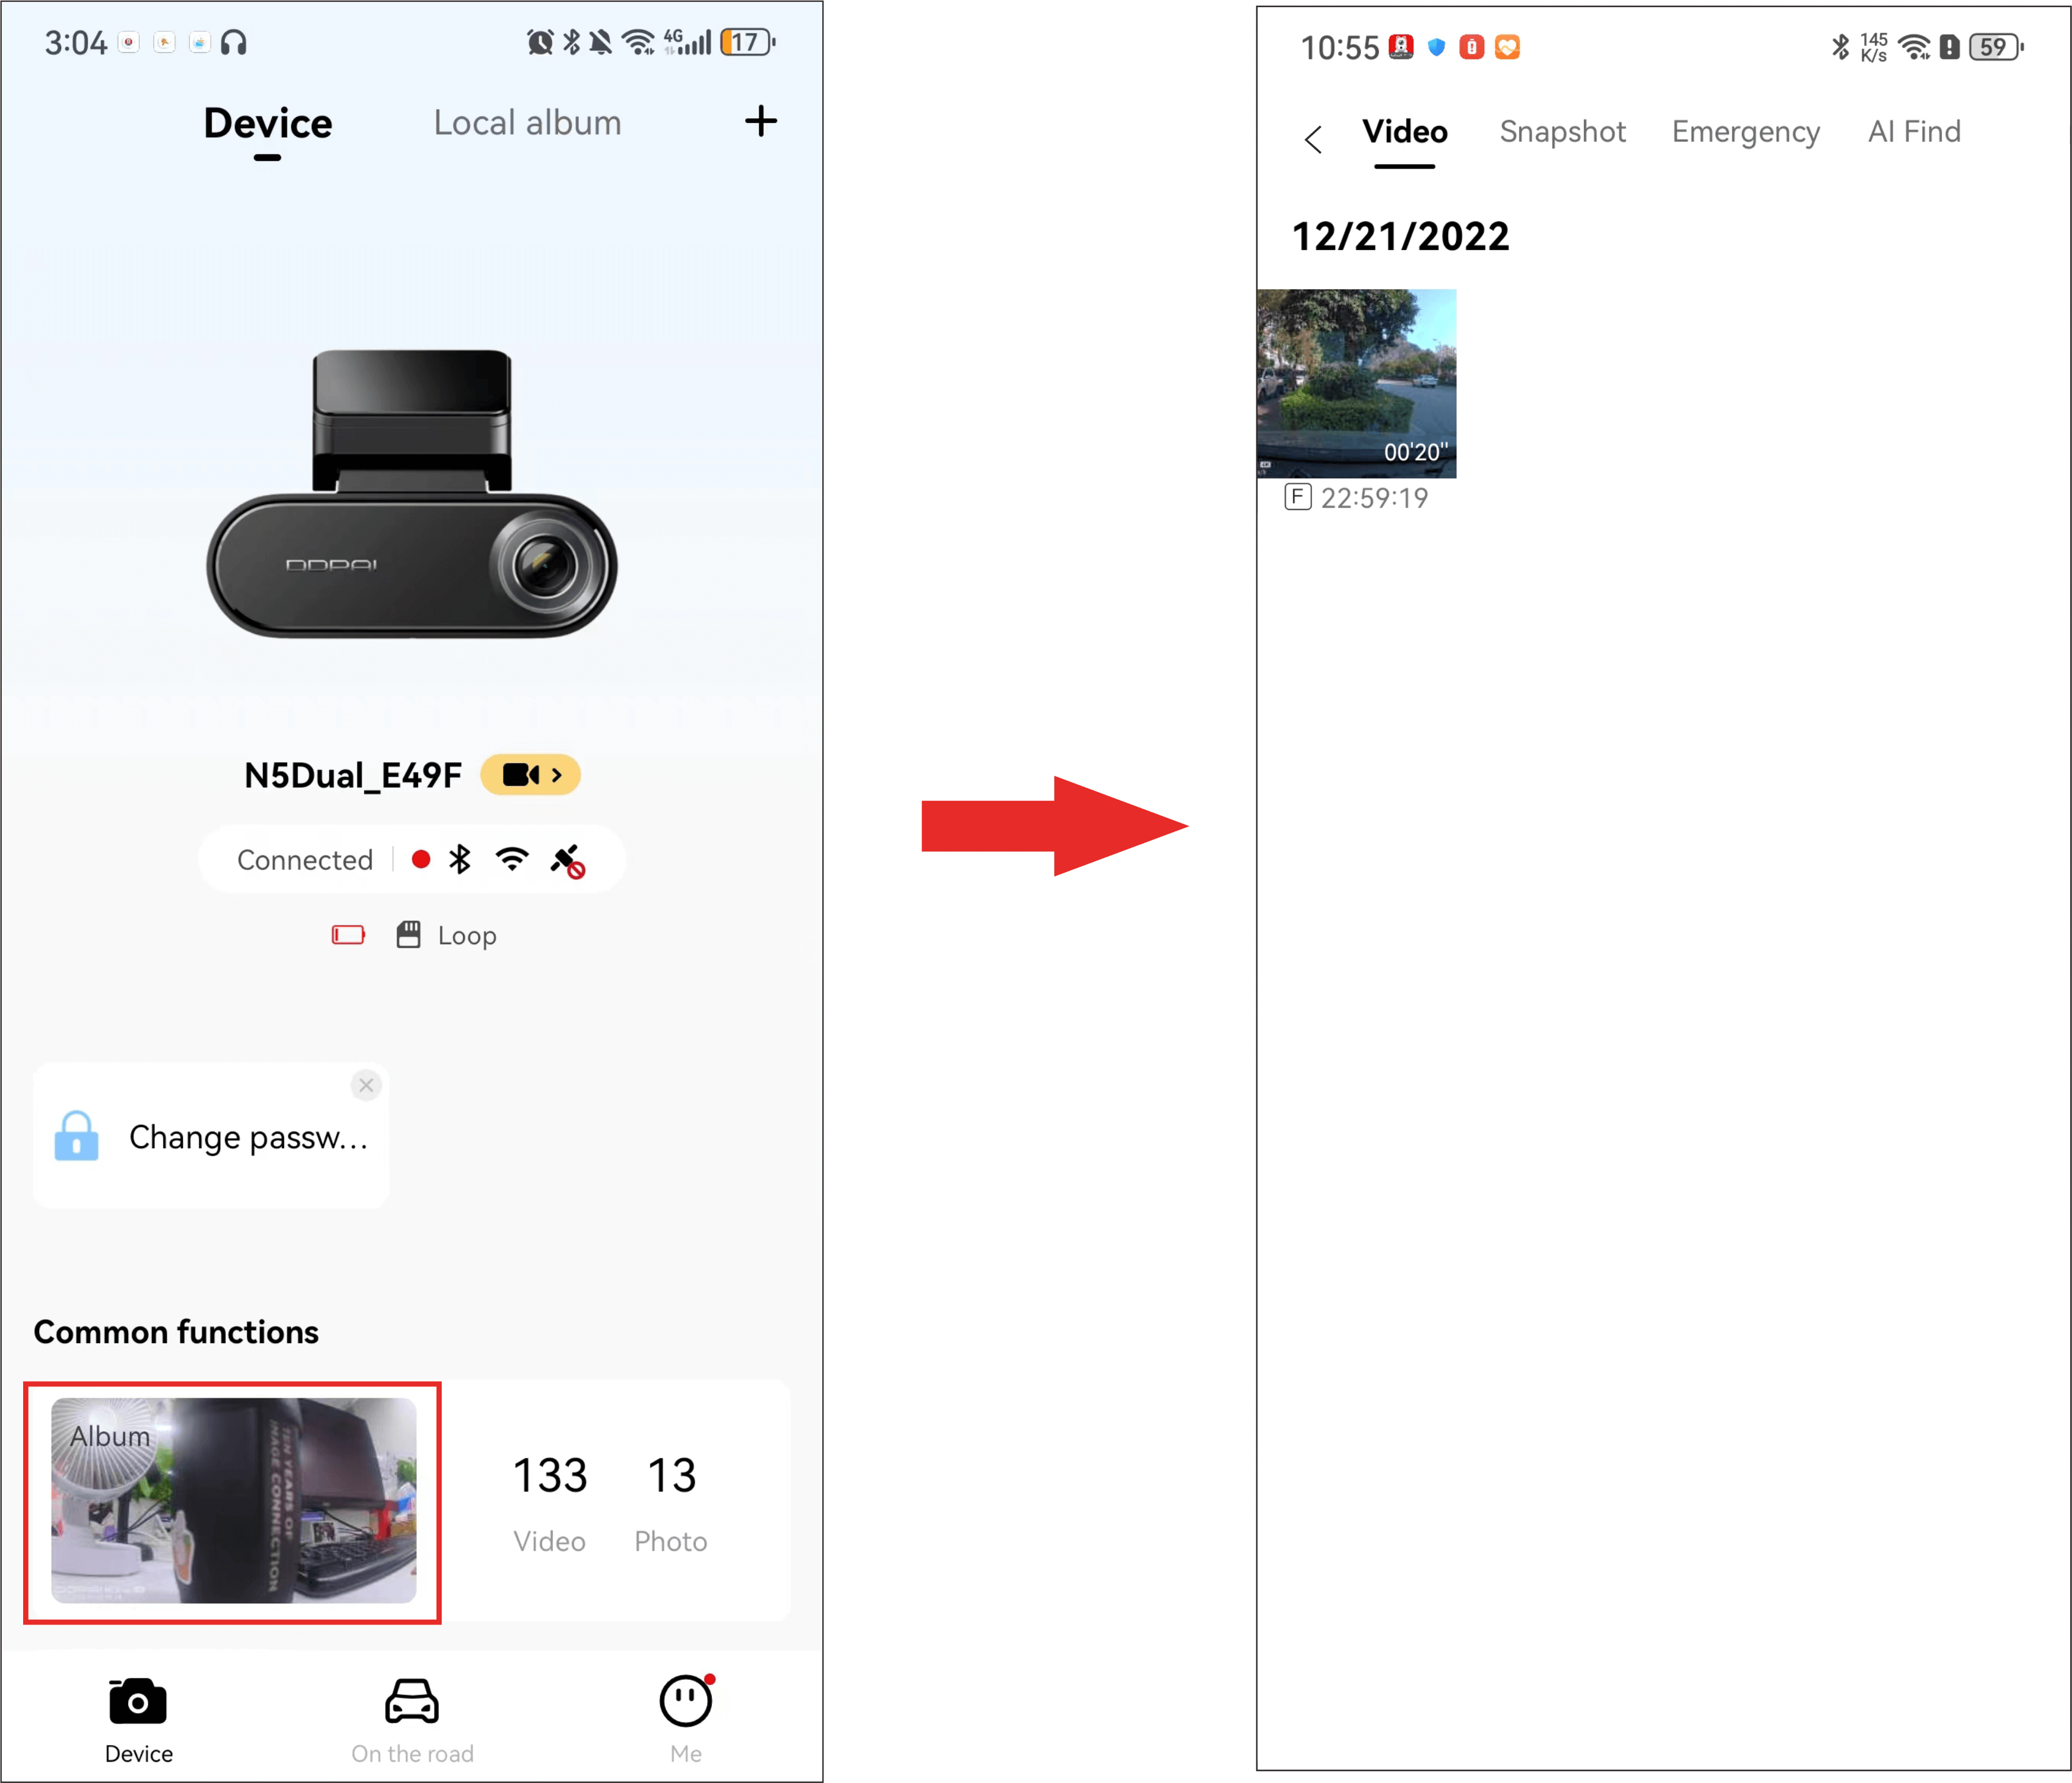
Video
All normally recorded video files will be saved in the “Videos” tab.
Snapshot
When you tap on the preview interface or say “Take photo” to the Dash Cam MIC to take a photo/video, these files will be saved in the “Snapshot” tab.
Emergency
When the Dash Cam is in working mode, when a collision is detected (such as a sudden braking or collision of a vehicle), it will generate an emergency photo and an emergency-related video. Both types of files will be saved in the “Emergency” tab.
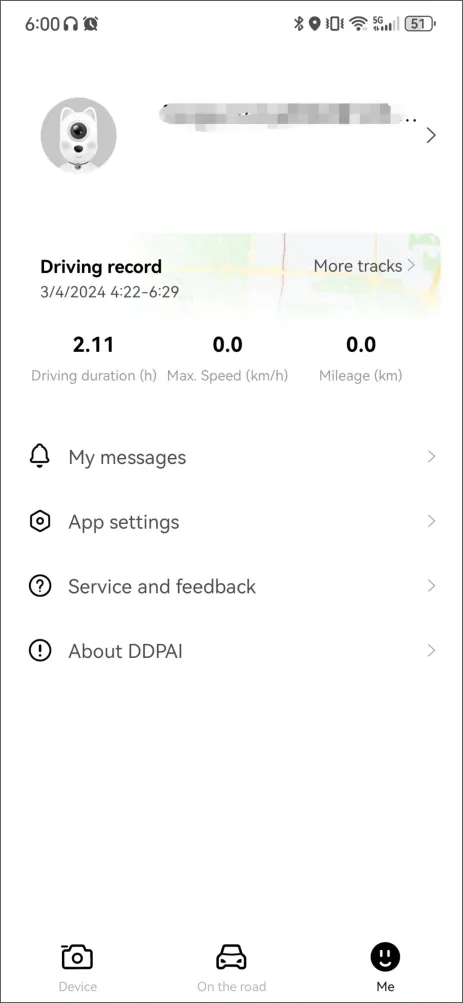
"Me" Interface
Launch the DDPAI App, tap “Me” and you can view all your driving track records, check the firmware version, set up the app, etc.
System Settings
You can tap ”Device Settings” on the “Device” interface or tap on the preview interface to enter the settings interface, where you can check the various parameters of the Dash Cam.
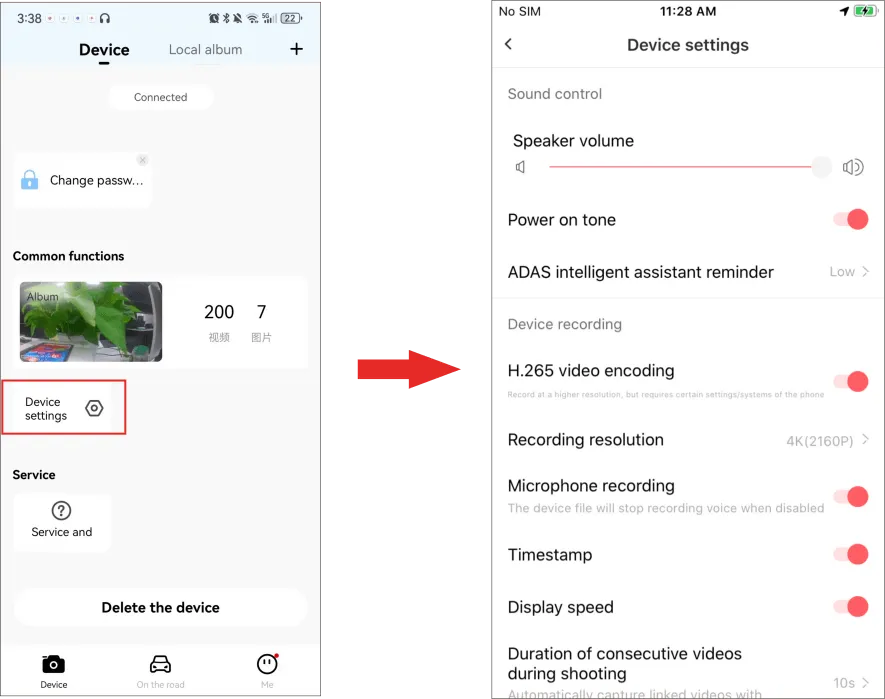
▶ Sound Control
You can set the speaker volume, power-on tone, local voice control and the ADAS function.
| Settings | Details |
| Speaker Volume | Adjust the speaker volume |
| Power-on Tone | You can select to turn on/off the power-on tone (default: on) |
| Local Voice Control | You can select to enable/disable local-voice control function (default: enable) |
| ADAS Intelligent Assistant Reminder | You can select to enable/disable the function. If you enable this function, you can set the ADAS sensitivity, enable/ disable the voice reminder for the vehicle in front starting and the fatigue driving. (Note: If there are changes in installation position or lens angle, you need to re-calibrate the ADAS) |
▶ Preview Display
| Settings | Details |
| Rear lens screen flip left/right | You can select to enable the function, and the rear camera view will be flipped left/right |
▶ Device Recording
You can set video encoding, recording resolution, video duration associated with photographing, photographing sensitivity, etc.
| Settings | Details |
| Rear lens screen flip left/right | You can select to enable the function, and the rear camera view will be flipped left/right |
| AI.265 video encoding | The video is recorded with H.264 encoding by default. You can set AI.265 encoding through the app, which will improve the picture quality by 50% and requires higher mobile phone performance. If the video freezes during playback, you can disable this function or preview the video on the computer. |
| Recording resolution | You can select 4K (2160P) / Full HD (1080P) |
| Microphone recording | You can select to enable/disable the function (default: off) |
| Timestamp | You can select to enable/disable the function |
| Display Speed | You can select to enable/disable the function |
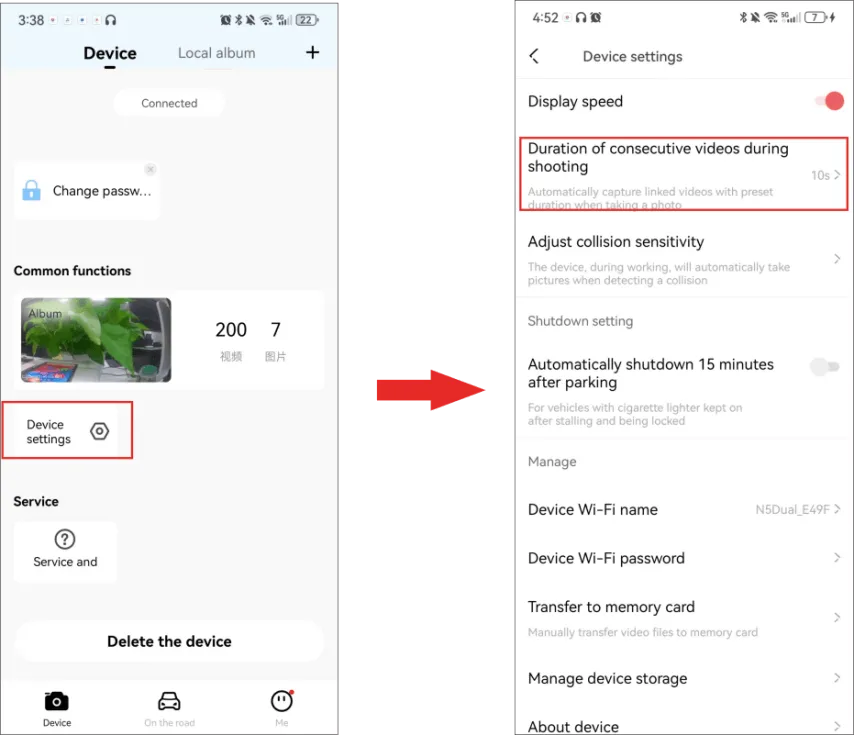
| Duration of related videos during shooting | When the device is in working condition, an emergency photo and an emergency related video will be automatically generated when a collision is detected. You can set the duration of the emergency related video. For details, see Chapter 5 Collision Detection & Locked Videos > “Set the duration of emergency related video” |
| Adjust collision sensitivity | When the device is in driving state, it will automatically take a photo when it detects collision. When the device is in parking mode, it will automatically take a photo and video when it detects collision. You can set the sensitivity of taking pictures. The higher the sensitivity is set, the easier it is to trigger taking pictures. If this function is turned off, the collision detection & locked video function will not be available. For details, see Chapter 5 Collision Detection & Locked Videos |
▶ Shutdown Settings
For vehicles where the cigarette lighter is not powered off after the car is turned off, the Dash Cam will shut down after 15 mins of parking.
| Settings | Details |
| Automatically shutdown after 15 mins of parking | You can select to turn on/off this function (default: off). If this function is enabled, the Dash Cam will automatically shut down after 15 mins of parking. |
▶ Parking Monitoring
When you select the intelligent step-down line, you can set the parking mode, and vehicle battery protection voltage. See Chapter 5 Parking Monitoring for details.
| Settings | Details |
| Parking mode | After the vehicle is turned off, you can choose to enter time-lapse video recording, normal video recording, or sleep. |
| Parking monitoring duration | Set the parking mode duration: 12 hours, 24 hours (default), or 48 hours. When the car is turned off and reaches the set time, the Dash Cam will enter sleep mode to protect the battery. |
| AI-radar recognition | When the radar detects abnormal movement of people or objects around it, it will wake up and record the video. You can set the sensitivity of the radar: High, medium-high, medium, medium-low, and low. |
| Vehicle battery protection | Set the battery protection voltage: High (12.4 V), middle (12V) (default), or low (11.8 V). When the vehicle battery’s power falls below the selected voltage, the Dash Cam will automatically shut down to prevent battery power outage. |
● The radar function needs to be realized by the optional hardwire kit & radar module.
▶ Management
You can set the Wi-Fi password or name, format your memory card, or view information such as device model No., firmware version, etc.
| Settings | Details |
| Dash Cam Wi-Fi Name | You can set the Wi-Fi name for your Dash Cam. |
| Dash Cam Wi-Fi Password | You can set a Wi-Fi password to secure your Dash Cam’s network. |
| Manage device storage | You can check the storage capacity, and choose to format the memory card/built-in storage (Note: formatting will delete all data on the device, please proceed with caution). |
| About device | You can view information such as the device model number, firmware version, and other relevant details. |
Function Introduction
Video Function
Tap on the area outlined by the dotted line (refer the figure below), and you can enter the preview interface directly.
▶ Preview video
After the app is successfully connected to the Dash Cam, enter the real-time preview interface, tap (Landscape Preview) or rotate your mobile phone horizontally (Your phone’s auto-rotate function needs to be turned on), and the real-time screen will automatically switch to the full-screen preview mode.
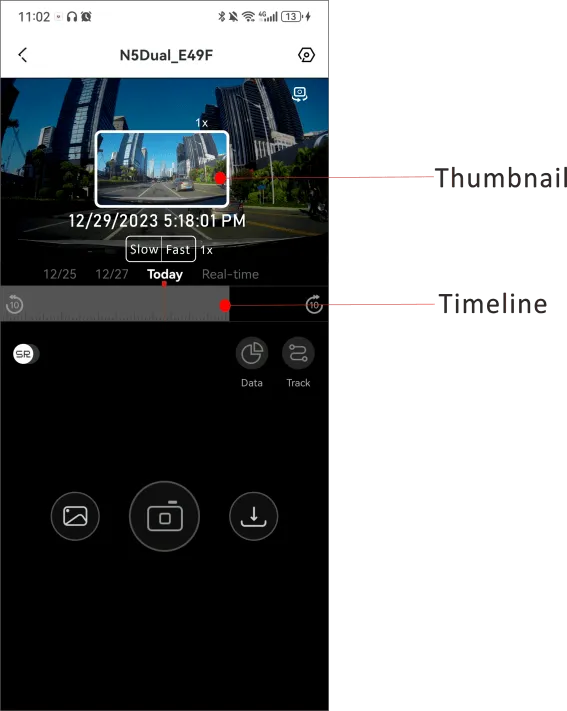
▶ Playback video
1. Drag the progress bar to select the time starting point to view.
2. Tap the thumbnail or wait for 5 seconds to start playing the previously recorded video.
● Time progress bars of different colors represent different video types, please refer to the table below for reference.
| Color-coded timeline | Description |
Red | The video is triggered by an emergency event (such as sudden braking or collision). |
Yellow | The video is recorded in parking monitoring mode. |
Blue | The video is triggered by the AI-radar detection. |
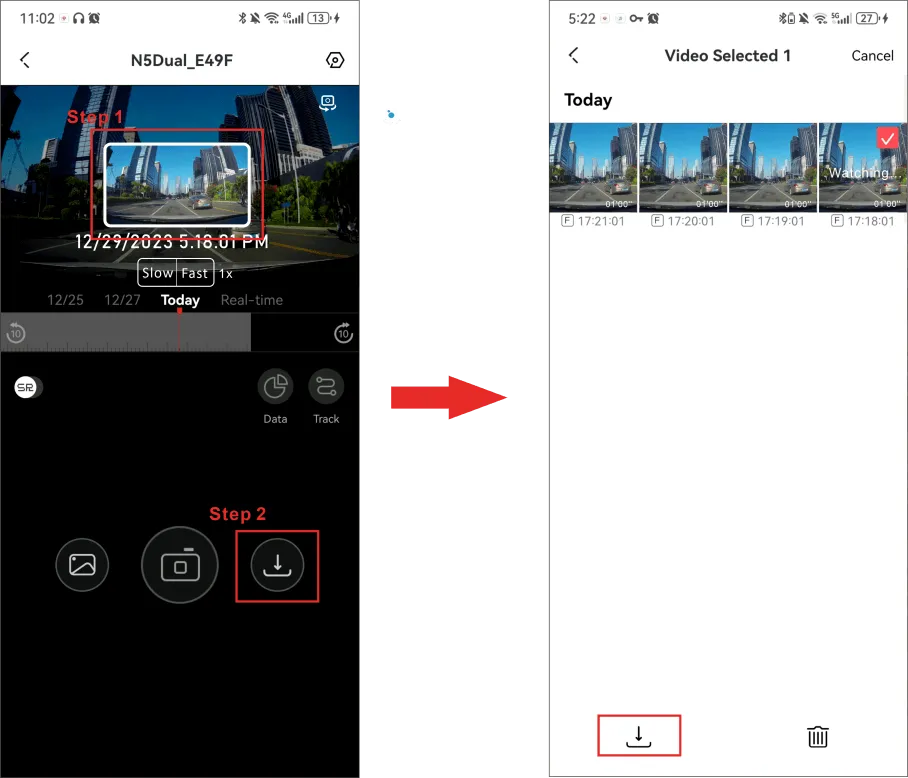
▶ Download video
● Method 1
1. Drag the progress bar to select the time starting point to download.
2. Tap to enter the downloading interface. Then you can select the video file you want to download and tap to start downloading.
3. After downloading, the file is saved to the local photo album, which can be shared and deleted.
● Method 2
1. Tap“Device Album”on the “Device”interface.
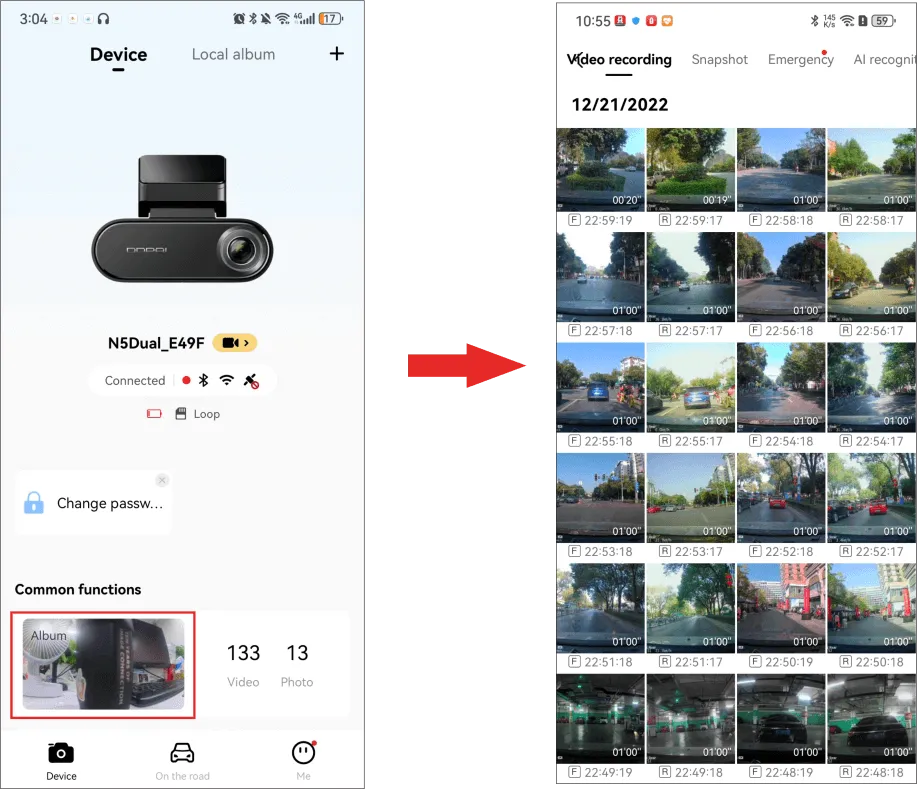
2. Hold the video/photo file you want to download to enter the selection state. Then you can download files in batches.
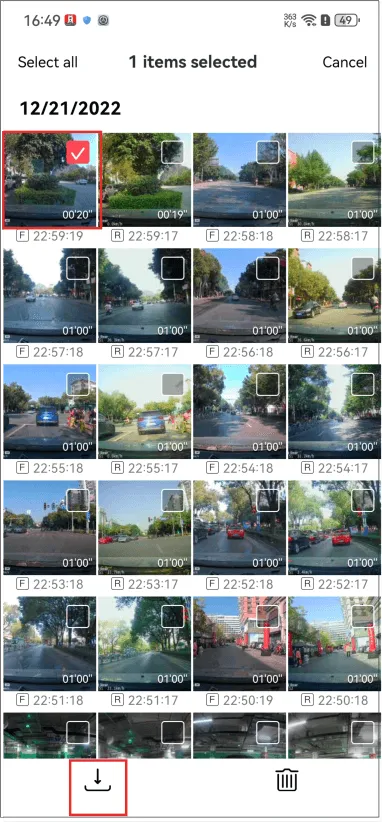
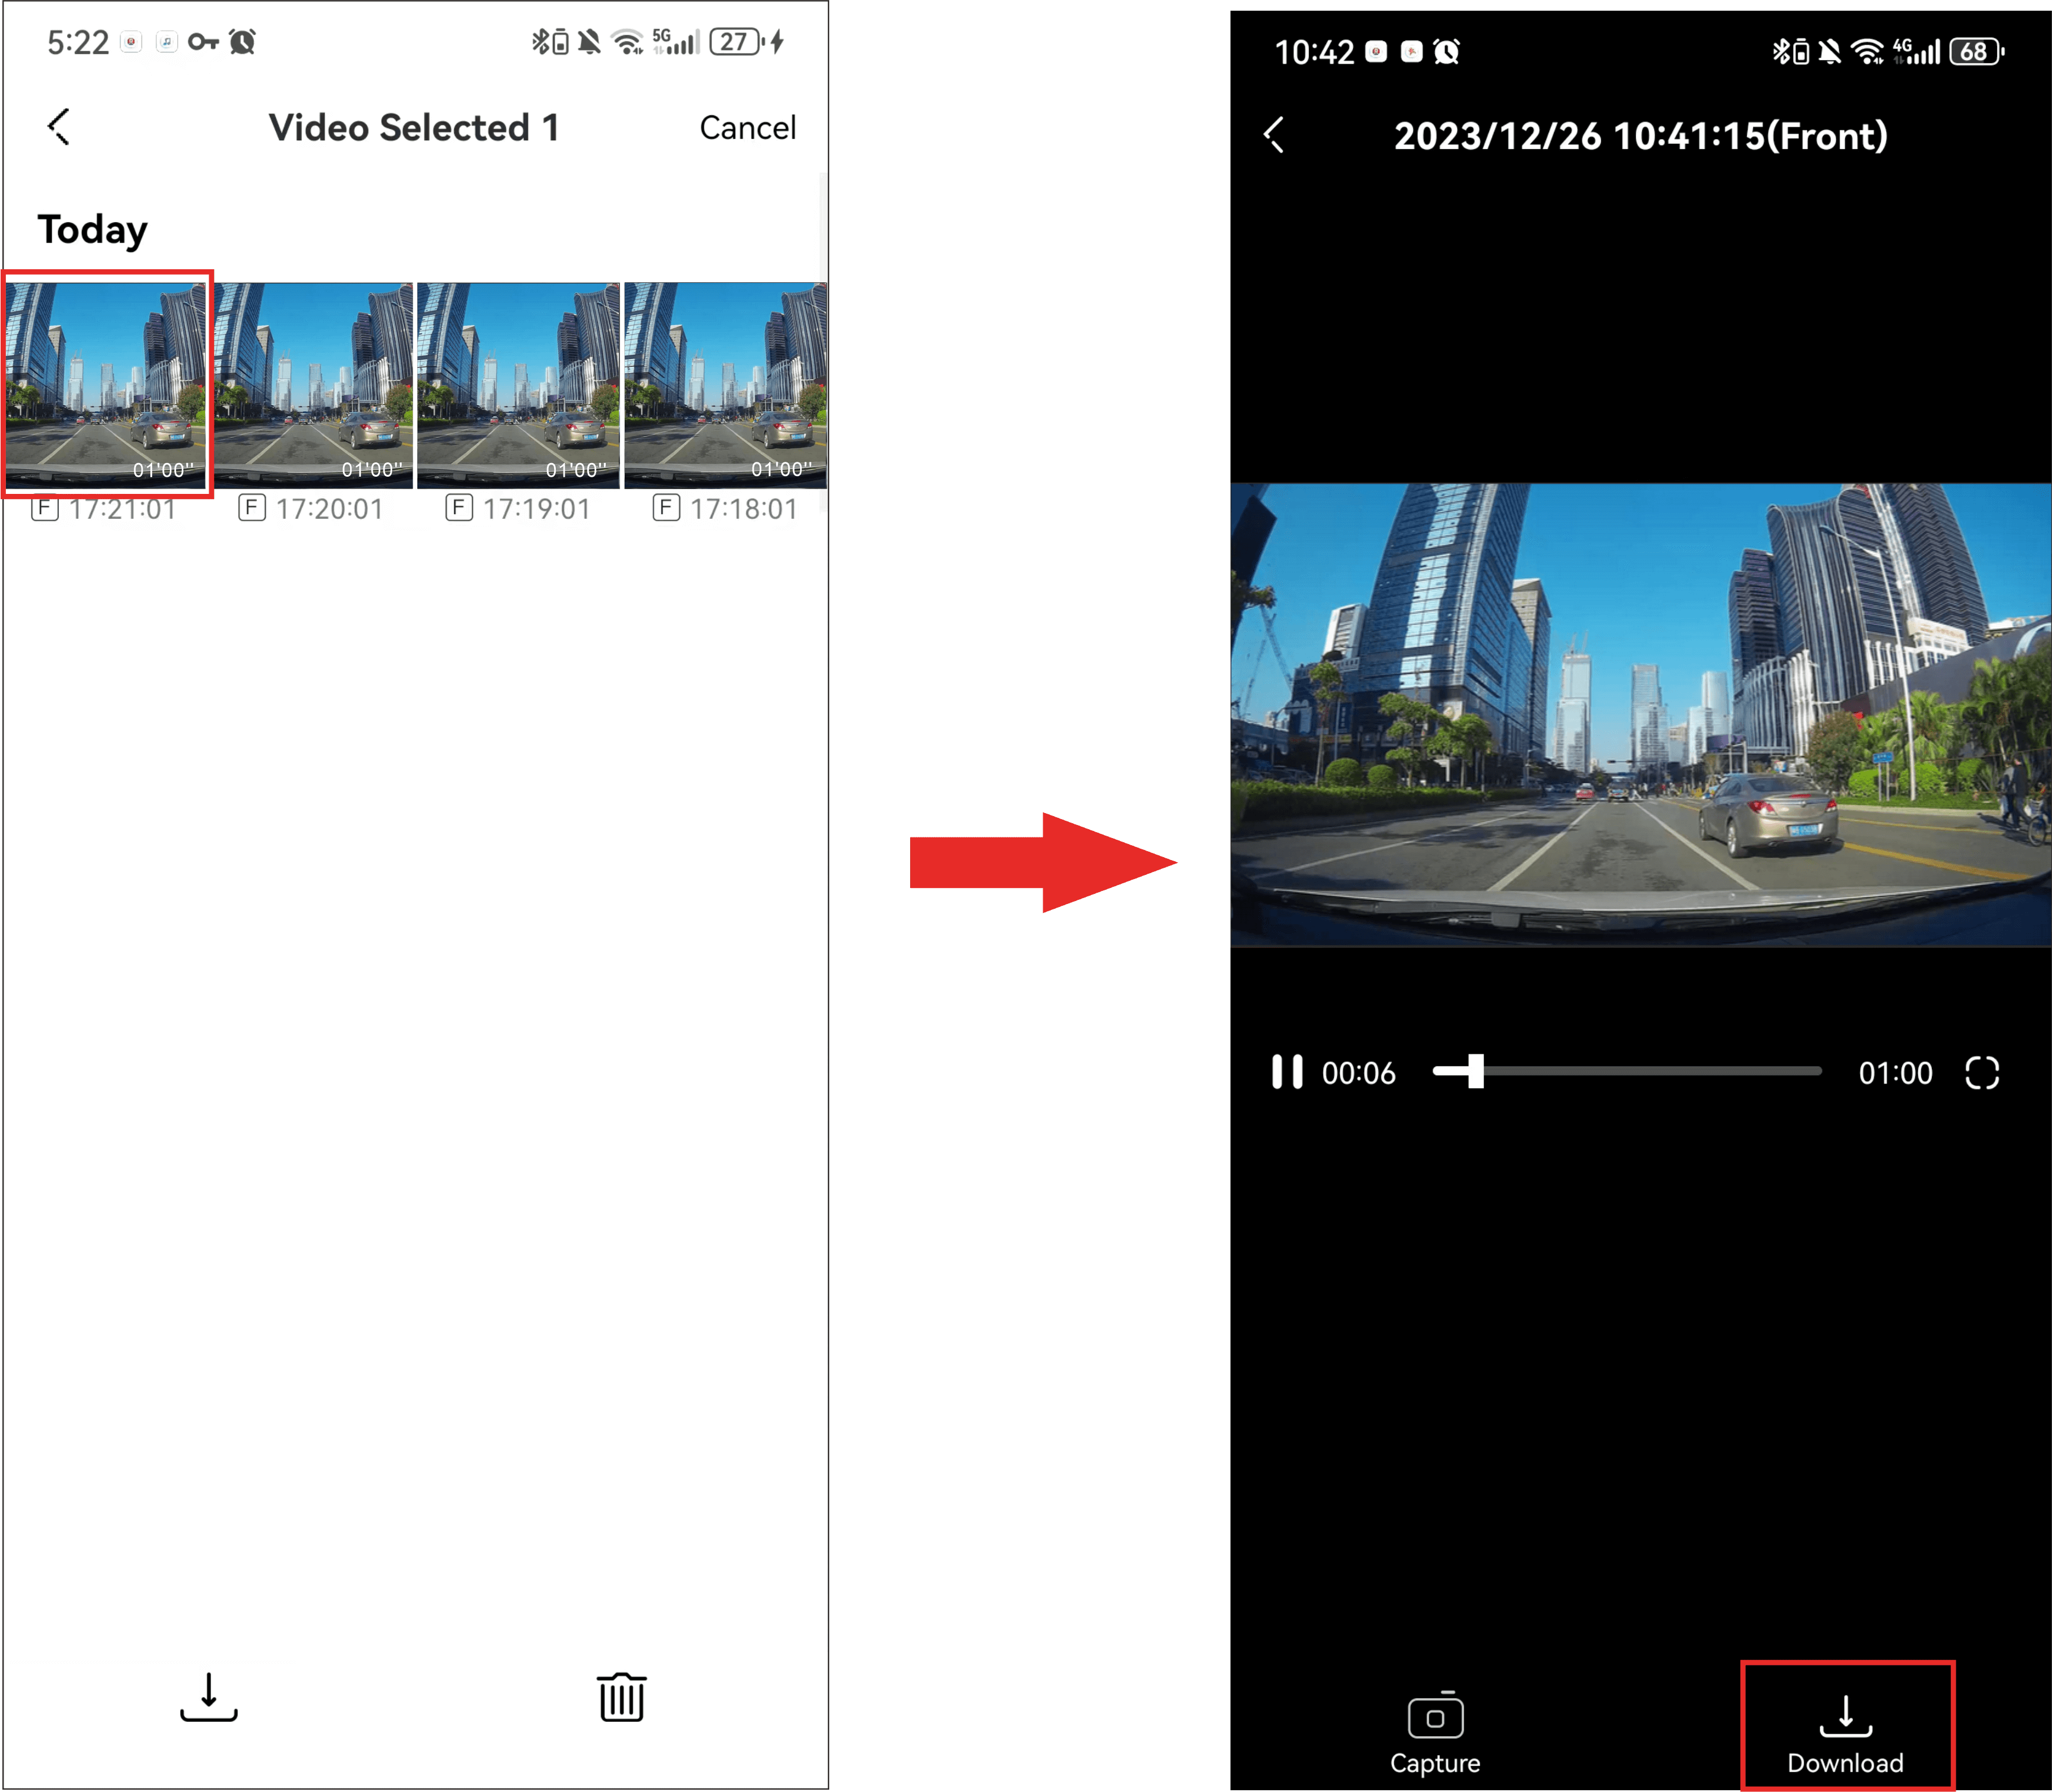
● Method 3
1. Tap “Device Album”on the “Device”interface.
2. Tap the individual video/photo file you want to download.
3. Tap Download.
Photographing Function
This Dash Cam supports the following three photographing modes:
● Collision sensing photography: The Dash Cam will automatically take pictures when it senses the collision or emergency braking of the vehicle.
● Manual photographing: Enter the preview interface, tap to take a photo.
● Voice photographing: Say “Take photo” to the Dash Cam MIC, and the camera will generate a photo and a related short video (when the“Create related video clip when taking a photo”function is enabled ).
● Before using the voice photographing function, please make sure the "Local Voice Control" is enabled on the settings interface.
● When the rear camera is successfully connected to the Dash Cam and the photographing function is triggered, two photos will be generated (one is taken by the front camera, another is taken by the rear camera).
▶ View photos or videos on the device
After connecting the Dash Cam to the mobile phone, launch the DDPAI App. Tap“Device Album” on the “Device” interface, and you can view the captured photos and videos on the Dash Cam.
▶ View photos or videos on your phone
When the captured photos/videos on the device are downloaded to the local album of your phone, they will be moved to the mobile phone for storage, and can be viewed without connecting the mobile phone to the Dash Cam. Launch the app and tap the “Local Album” tab of the “Device” interface. Then you can view photos or videos downloaded to your phone.
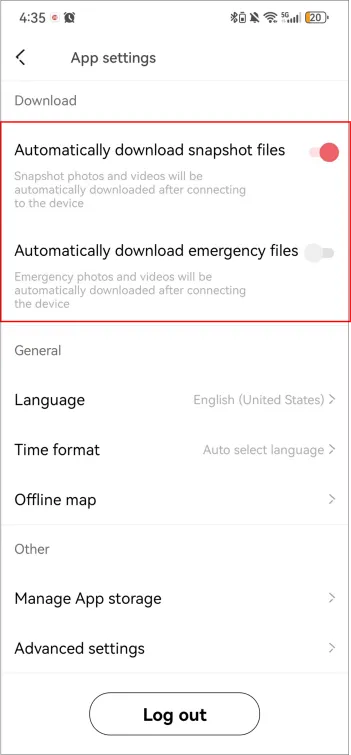
Automatically download snapshot/emergency files:
You can choose to automatically download snapshot/emergency files to the local album after connecting the device. Open the app, tap “Me” > “APP Settings”, and enable “Automatically download snapshot files” / “Automatically download emergency files” function.
When the captured photos/videos on the device are downloaded to the local album of your phone, they will be moved to the mobile phone for storage, and can be viewed without connecting the mobile phone to the Dash Cam. Launch the app and tap the “Local Album” tab of the “Device” interface. Then you can view photos or videos downloaded to your phone.
Share/delete photos or videos
After entering the “Local Album” interface, hold the file to enter the selection state, then you can delete videos, photos, and emergency files downloaded to your phone or share them to social media accounts.
Parking Monitoring
When you select the step-down line to take power, the parking monitoring function can be realized. After the vehicle is turned off, the Dash Cam will automatically enter the parking monitoring mode. If an emergency occurs, the Dash Cam will automatically take a photo and generate a related video. You can set the parking mode and vehicle battery protection voltage value.
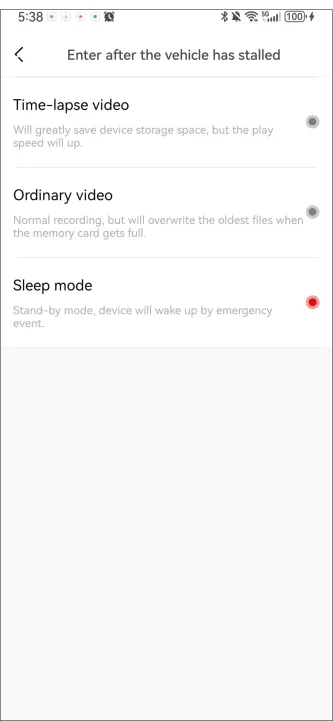
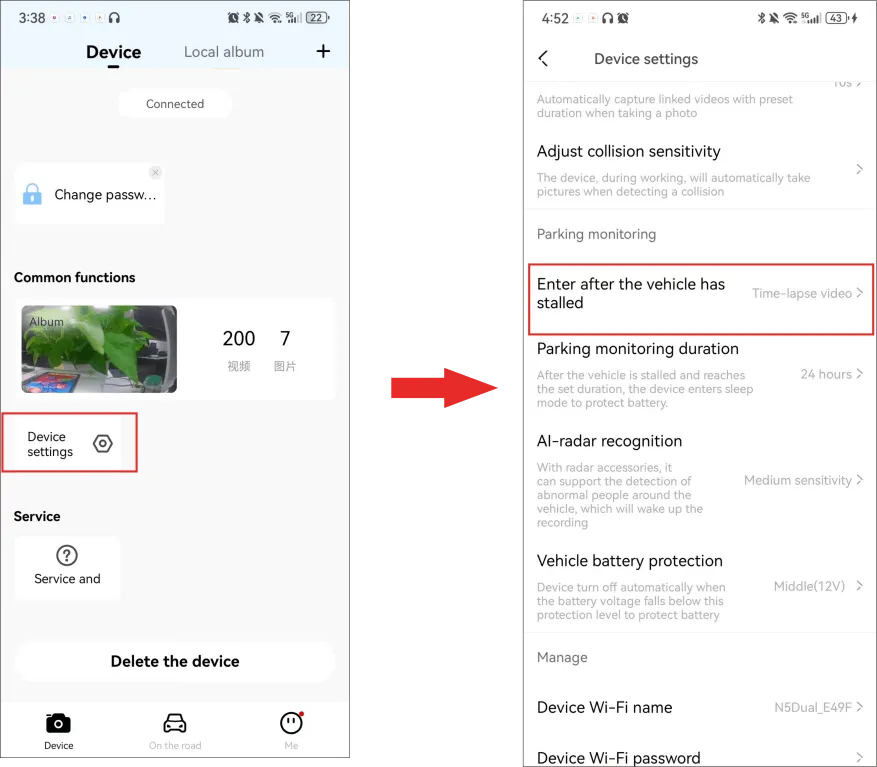
① After the mobile phone is connected to the Dash Cam, launch the app, and tap “Device Settings” > “Enter after the vehicle has stalled”.
② Select the parking monitoring mode.
| Settings | Details |
| Parking mode | After the vehicle is turned off, you can choose to enter time-lapse video recording, normal video recording, or sleep mode. |
| Parking monitoring duration | Set the parking mode duration to 12 hours, 24 hours (default), or 48 hours. When the car is turned off and reaches the set time, the Dash Cam will enter sleep mode to protect the battery. |
| Vehicle battery protection | Set the battery protection voltage to High (12.4 V), Middle (12V) (default), or Low (11.8 V). When the vehicle battery’s power falls below the selected voltage, the Dash Cam will automatically shut down to prevent battery power outage. |
Parking Mode: Time-lapse video recording
After the car is turned off, it will enter time-lapse recording. It will shut down after reaching the set time or detecting low voltage. After shutting down, it can only be awakened by the ignition.
Parking Mode: Normal video recording
Normal recording will be maintained after the car is turned off. It will shut down after reaching the set time or detecting low voltage. After shutting down, it can only be woken up by the ignition.
Parking Mode: Sleep mode
After the car is turned off, it enters the sleep mode. After a collision, it will wake up and work for 2 minutes. It will take a photo and generate a 10-second video (photo file name starts with “G” and ends with “L”). In addition, it will remind you the collision event when waking up next time.
Parking Mode: Radar detection mode (Sleep mode)
After installing the radar module properly and setting the parking mode to “sleep mode”, the Dash Cam will enter the radar detection mode when the car is turned off. When the radar module detects a moving object within the detection range, the Dash Cam will generate a 10-second video. For details, please refer to Chapter 5 Radar Function.
● The radar detection mode needs to be implemented through the optional radar module and hardwire kit.
Collision Detection & Locked Videos
When the Dash Cam is in working mode, when a collision is detected (such as a sudden braking or collision of a vehicle), it will generate an emergency photo and an emergency-related video, and store them separately. These files will not get deleted by loop recording function.
▶ Setting Camera Sensitivity
The higher the sensitivity of the Dash Cam, the easier it is to trigger photographing/taking videos; The lower the sensitivity of the Dash Cam, the less likely it is to trigger photographing/taking videos.
The default collision sensitivity of the Dash Cam is “Medium”, and it supports the selection of collision sensitivity in seven levels: “High”, “Medium-high”, “Medium”, “Medium-low”, “Low”, “Off” and “Custom”.
Select the appropriate collision sensor sensitivity. In emergencies such as vehicle collision or sudden braking, the Dash Cam will be triggered to take pictures and generate an emergency photo and video. If you select “Off”, in emergency situations such as vehicle collision or sudden braking, there will be no photos and videos. You can switch the collision sensing sensitivity of the Dash Cam through the following steps.
① After the mobile phone is connected to the Dash Cam, open the app, enter the “Device” interface, tap “Device Settings” > “Adjust collision sensitivity”.
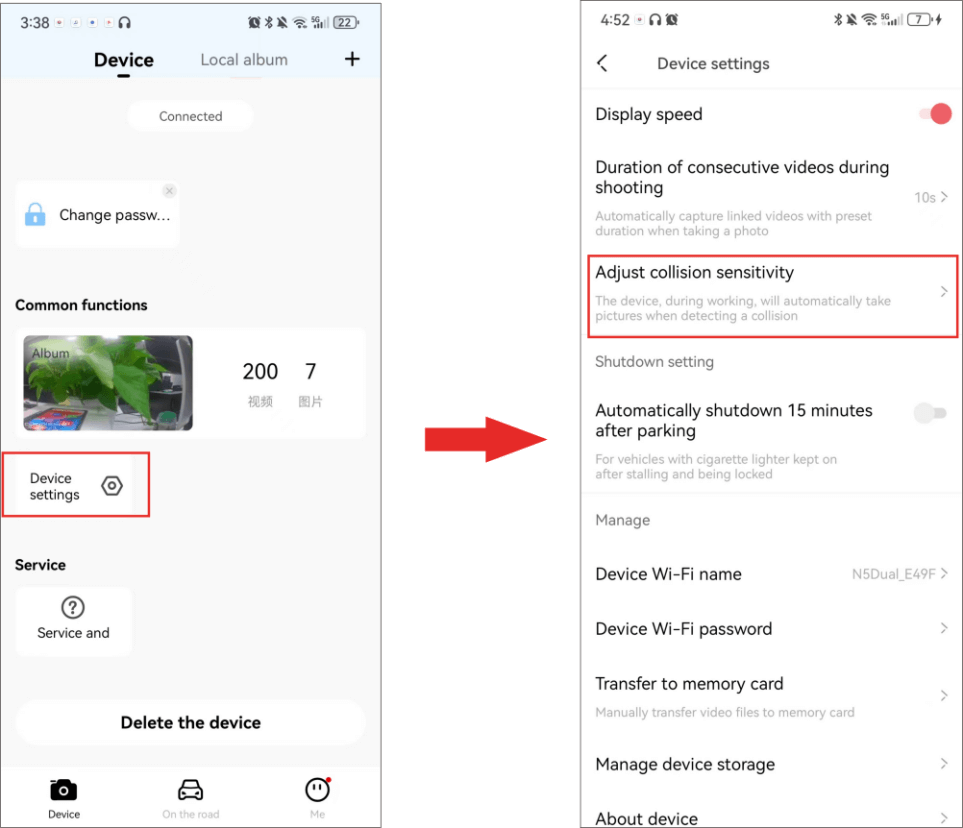
② Select “Driving” / “Parking” and set the appropriate sensitivity.
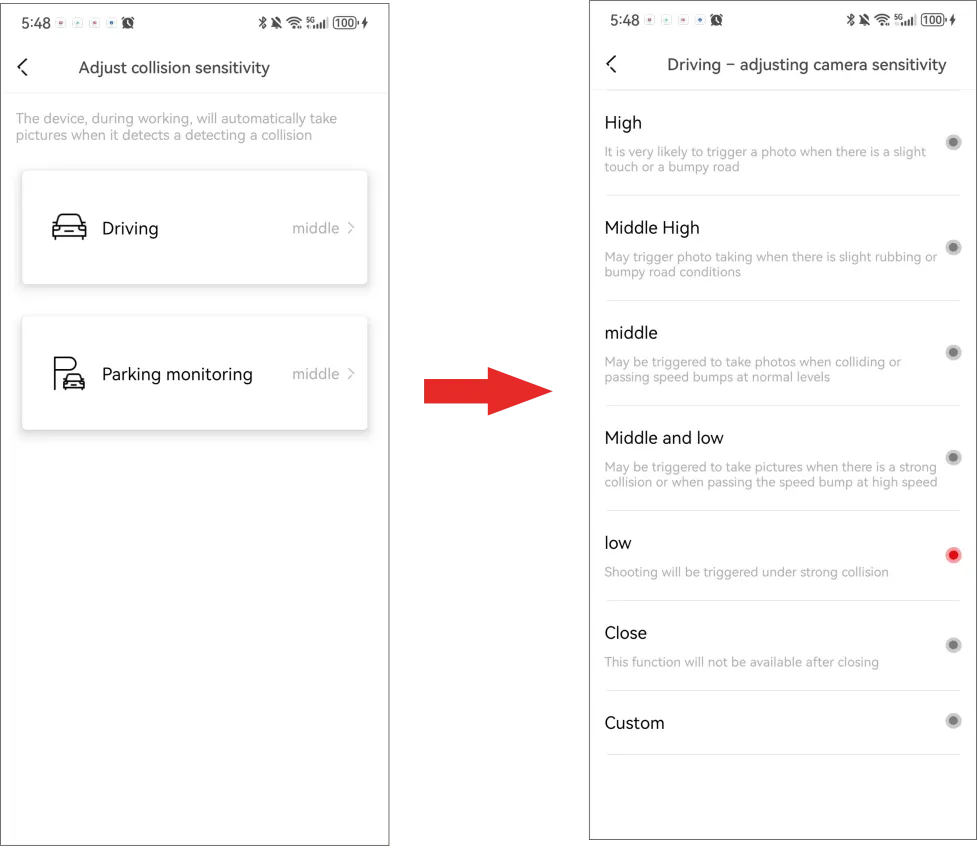
| Settings | Definition |
| High | A very slight collision will trigger taking pictures, likely to be triggered when the road conditions are bumpy. |
| Medium-high | A slight collision will trigger taking pictures, may also be triggered when passing a speed bump. |
| Medium | A normal collision will trigger taking pictures, may also be triggered when passing through the speed bump at high speed. |
| Medium-low | A strong collision will trigger taking pictures. |
| Low | Photography will only be triggered under strong impact. |
| Shut down | This function will not be available after it is turned off. |
| Customize | Set according to individual needs. |
▶ Set the duration of related videos during shooting
The default related video duration of the Dash Cam is “10s” and supports 4 options: “10s”, “20s”, “30s” and “Off”. You can follow the steps below to set the duration of related videos during shooting.
① After the mobile phone is connected to the Dash Cam, open the app, enter the “Device” interface, tap “Device Settings” > “Duration of related videos during shooting”.
② Set the duration of the short video according to your needs.

| Settings | Definition |
| 10s | After the Dash Cam detects a collision, it will generate an emergency related video of 5 seconds before and after the event. |
| 20s | After the Dash Cam detects a collision, it will generate an emergency related video of 10 seconds before and after the event. |
| 30s | After the Dash Cam detects a collision, it will generate an emergency related video of 15 seconds before and after the event. |
| Off | This function will not be available after it is turned off. |
Data Transmission
Method 1:
Gently remove the SD card from the card slot of the Dash Cam, insert it into the card reader, then plug it in the computer, open the DCIM folder, and browse or edit the photos or video files saved in the SD card.
See the following table for details of each folder in the memory card:
| Folder Name | File Name | Source | Details |
| 200 video | Example: 20190719161640_0060.mp4 | Front Camera | Normal video files generated by the front camera, “60” indicates the duration of the video in seconds. |
| Example: 20190719161640_0060_A.mp4 | Rear Camera | Normal video files generated by the rear camera, “A” indicates the file is generated by the rear camera. | |
| Example: S_20190719154514_0364_0030.mp4 | Front Camera | Time-lapse video files generated by the front camera start with “S”. | |
| Example: Q_20190719154514_0364_0030.mp4 | Rear Camera | Time-lapse video files generated by the rear camera start with “Q”. | |
| 201 photo | Example: N_20200524113544_035_0005_L.jpg | Front Camera | The photo file (front) triggered by voice control or capture function begins with “N”, “L” indicates that there is associated video, which will not be covered by loop. |
| 201 photo | Example: R_20200524113544_035_0005_L.jpg | Rear Camera | The photo file (rear) triggered by voice control or capture function begins with “R”, “L” indicates that there is associated video, which will not be covered by loop. |
| 201 photo | Example: G_20190524113544_035_0005_L.jpg | Front Camera | The photo file triggered by collision begins with “G”, “L” indicates that there is associated video, which will not be covered by loop. |
| 201 photo | Example: U_20190524113544_035_0005_L.jpg | Rear Camera | The photo file (rear camera) triggered by collision begins with “U”, “L” indicates that there is associated video, which will not be covered by loop. |
| 202 thumb | / | / | Used to store thumbnails. |
| 203 gps | / | / | Used to store G-sensor data. |
Method 2:
If the memory card is not inserted into the Dash Cam, you can browse emergency video files and radar trigger video files (radar module is required) in the built-in storage of the Dash Cam.
| Folder Name | File Name | Source | Details |
| 200 video | Example: H_20161223091810_0010.mp4 | Front Camera | Front camera file generated by radar trigger, “H” indicates the file is generated by the radar trigger. |
| Example: H_20161223091810_0010_A.mp4 | Rear Camera | Rear camera file generated by radar trigger, “A” indicates the file is generated by the rear camera. | |
| Example: W_20161223091810_0010.mp4 | Front Camera | Front camera file triggered by the collision begins with “W”. | |
| Example: W_20161223091810_0010_A.mp4 | Rear Camera | Rear camera file triggered by the collision begins with “W”, “A” indicates the file is generated by the rear camera. |
●The radar trigger file can only be found after the radar module (optional accessory) is successfully installed.
SR Function
The Dash Cam has a built-in SR function, which can overlay driving data into the real-time preview/playback footage and generate an exclusive cool video, giving you a better visual experience.
▶ View the real-time SR effects
1. When the Dash Cam is connected to the DDPAI App, launch the app and tap on the area outlined by the dotted line (refer the figure below), you can enter the preview interface directly.

2. There is a “SR” switch in the lower left corner of the preview screen. After turning it on, you can view the real-time SR effect in the preview interface.

3. You can also tap “Data” to view the detailed data.
▶ Generate and Share SR Videos
1. Tap Download first. After the video is downloaded, turn on the “SR” switch. After turning it on, you can view the SR effect in the video screen.
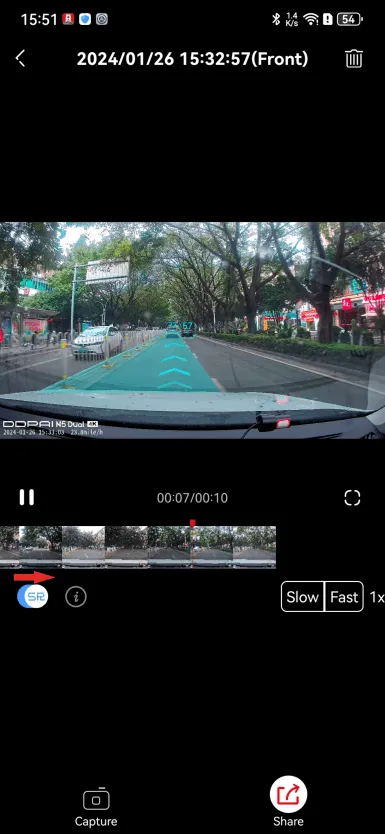
2. Tap Share. You can then crop the video, customize it with SR effects and background music.
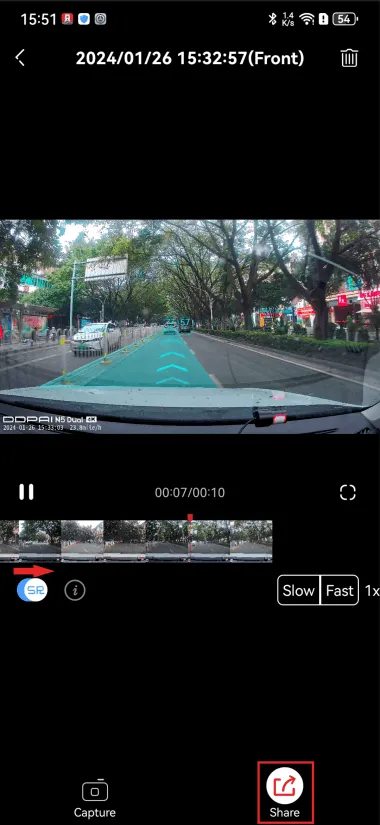
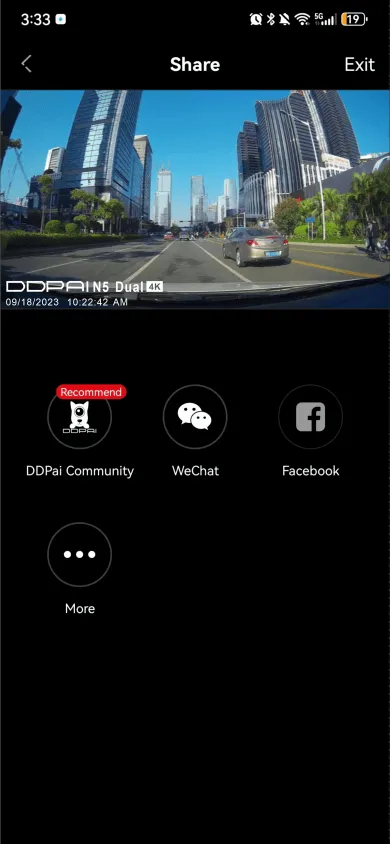
3. Tap Confirm and you can share this video to social media platforms such as DDPai community, WeChat, Facebock, etc.
GPS Function
The N5 Dual Dash Cam supports GPS function, and it is turned on by default.
When the Dash Cam is in an open outdoor area, it can receive GPS signals. After the GPS signal is successfully located, the GPS information will be recorded in your recorded video. You can view various information such as time, speed, altitude, direction, and driving track in the DDPAI App.
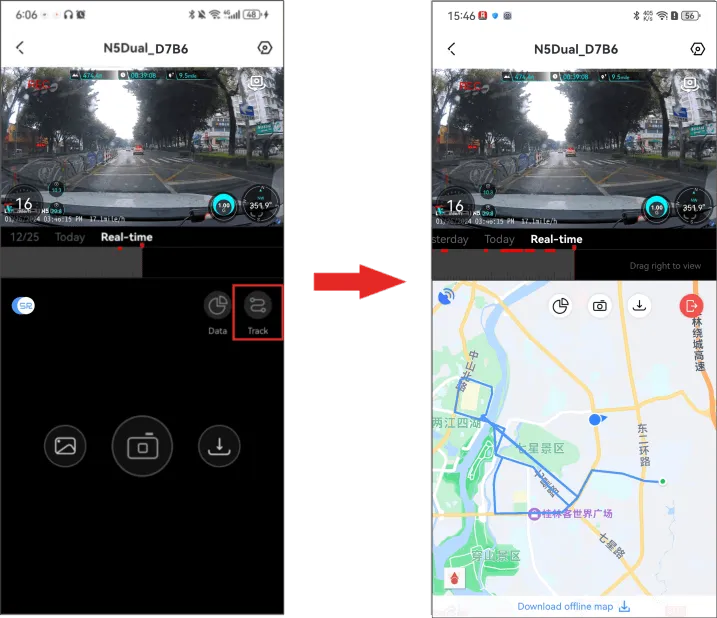
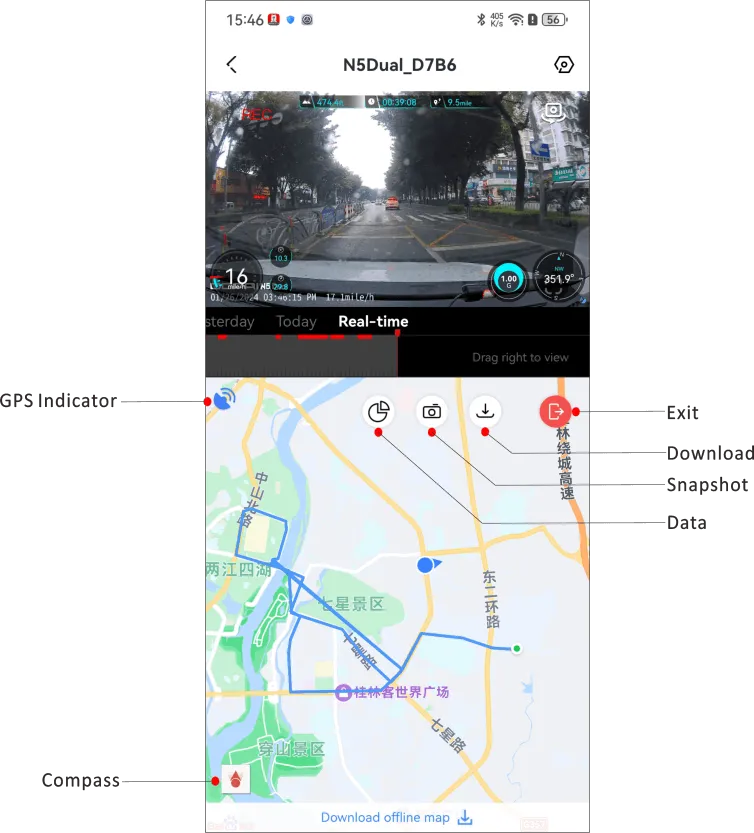
▶ View real-time driving trajectory and current location
When the Dash Cam is connected to the DDPAI App, launch the app and tap the area outlined by the dotted line (refer the figure below), you can enter the preview interface directly.
1. On the preview interface, tap Track and you can view the driving trajectory and current location in real time.
▶ View all recorded driving trajectory
Launch the app, tap “Me” > “Driving Score” to view all driving track records.
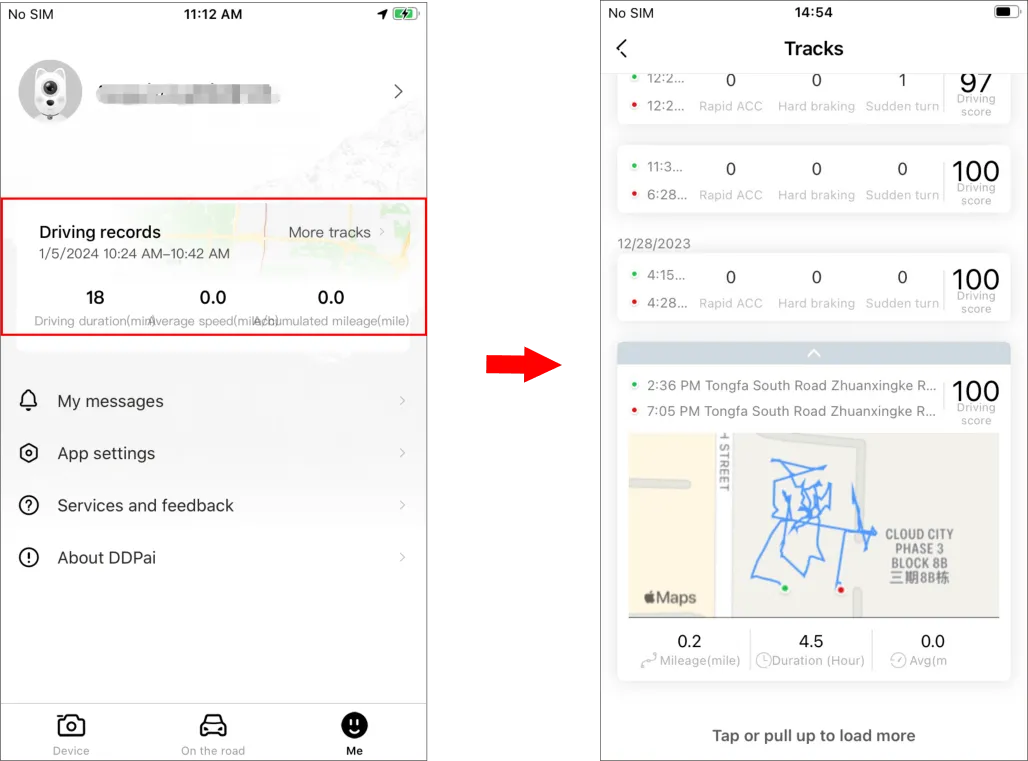
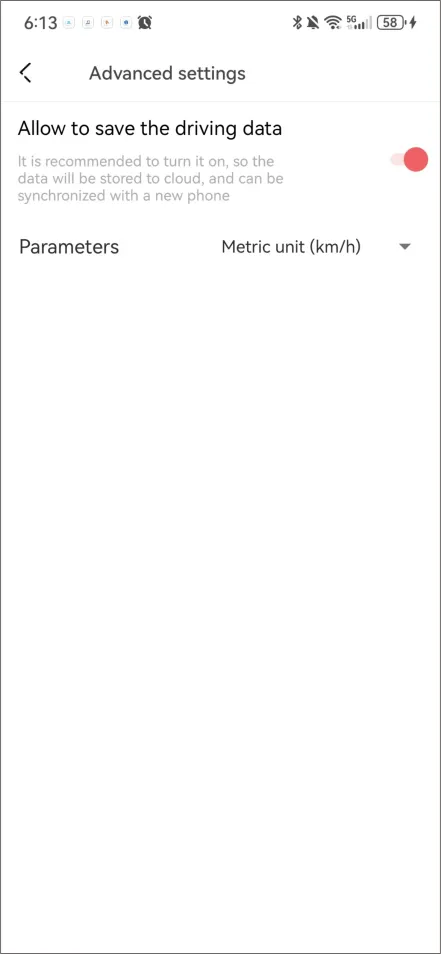
● It is recommended that you enter the “Me” interface of the DDPAI App, select "Me” > “App Settings” > “Advanced Settings" and turn on "Allow to save the driving data". The driving data will be stored in the cloud. If you change the phone or re-install the app later, the driving data can also be synchronized.
Advanced Driver Assistance System (ADAS)
Advanced Driver Assistance System (ADAS) supports the detection of changes in road conditions and provides you with driving reminders, including the voice reminder for the vehicle in front starting and the fatigue driving.
▶ Calibrate the Advanced Driver Assistance System (ADAS)
When ADAS is turned on for the first time, it needs to be calibrated to adapt to different models.
Step 1: After connecting the DDPAI App to the Dash Cam, launch the app, tap“Device Settings”> “ADAS intelligent assistance reminder”> “Adjust ADAS Installation position”.
Step 2: Select “Go to live preview”>“Enter live preview”to enter the calibration interface.
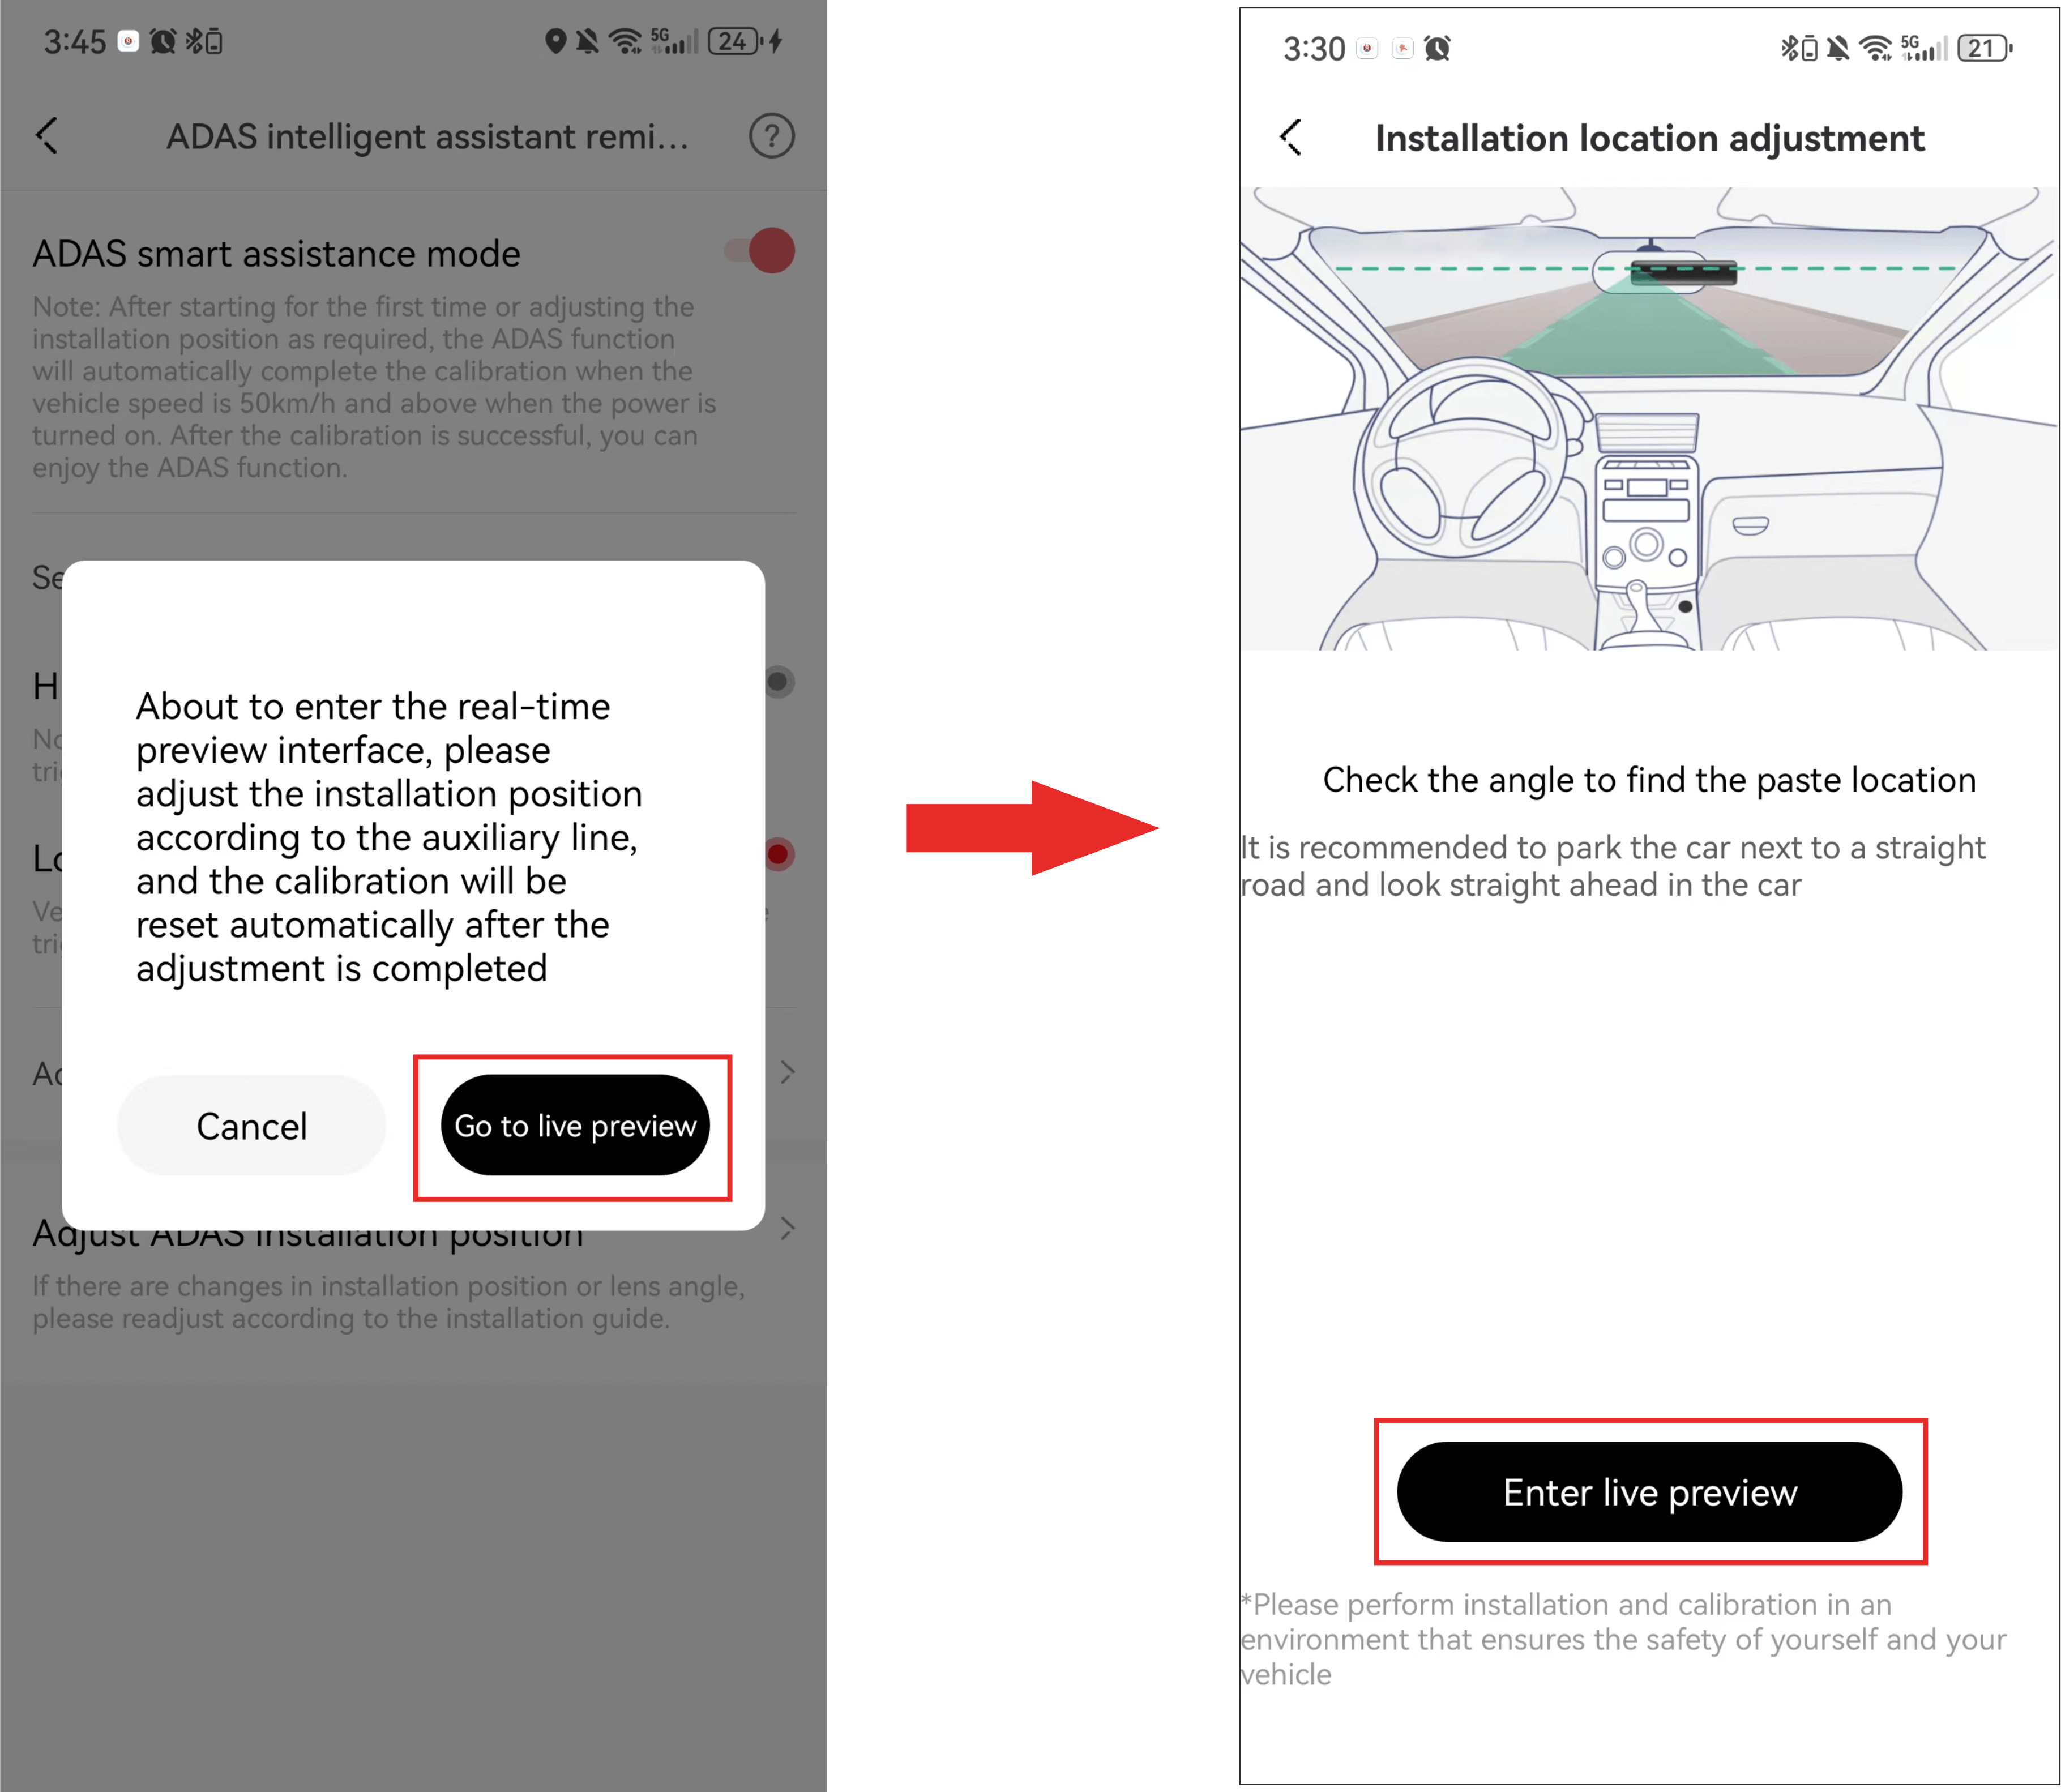
● Vertically: Moving the N5 Dual side to side with the help of the vertical guideline on the middle of the screen, keep adjusting until to the middle of the vehicle’s front end align to this vertical guideline.
● Horizontally: Rotating the camera up and down with the help of the horizontal guideline on the middle of the screen, keep adjusting until the ground-level horizon outside vanishes from the scope of this horizontal guideline.
Step 3: After completing the installation, tap “Calibration completed”.

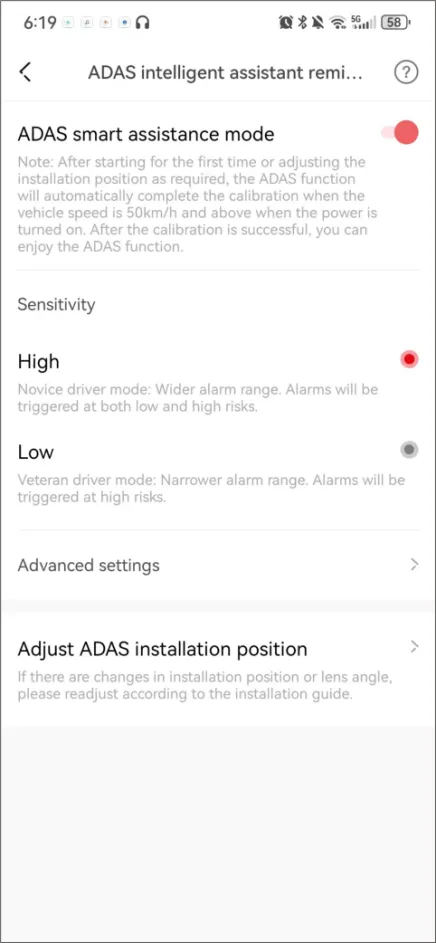
▶ Set the Sensitivity of ADAS
You can select to turn on/off the ADAS intelligent driving assistance, or set the ADAS intelligent driving assistance sensitivity.
When the Dash Cam is connected to the DDPAI App, tap “Device Settings” > “ADAS Intelligent Assistance Reminder”.
● ADAS Intelligent Assistant Reminder: Enabled
You can set the sensitivity of the ADAS function and the voice reminder for the vehicle in front starting and the fatigue driving.
● ADAS Intelligent Assistant Reminder: High
The ADAS function is turned on. When the Dash Cam is in working condition, there will be corresponding voice reminders when the vehicle in front starts, the vehicle in front is too close, the vehicle is driving on the line, or pedestrians are approaching. Its alarm reminder range is wider, alarming in both high-risk and low-risk scenarios, making it easier to trigger alarms, making it suitable for novice drivers.
● ADAS Intelligent Assistant Reminder: Low
The ADAS function is turned on. When the Dash Cam is in working condition, there will be corresponding voice reminders when the vehicle in front starts, the vehicle in front is too close, the vehicle is driving on the line, or pedestrians are approaching. Its alarm range is smaller and only warns in high-risk scenarios, making it suitable for experienced drivers.
▶ Set the Voice Reminder
Tap “Advanced settings” and choose to enable/disable the voice reminder for the vehicle in front starting and the fatigue driving.
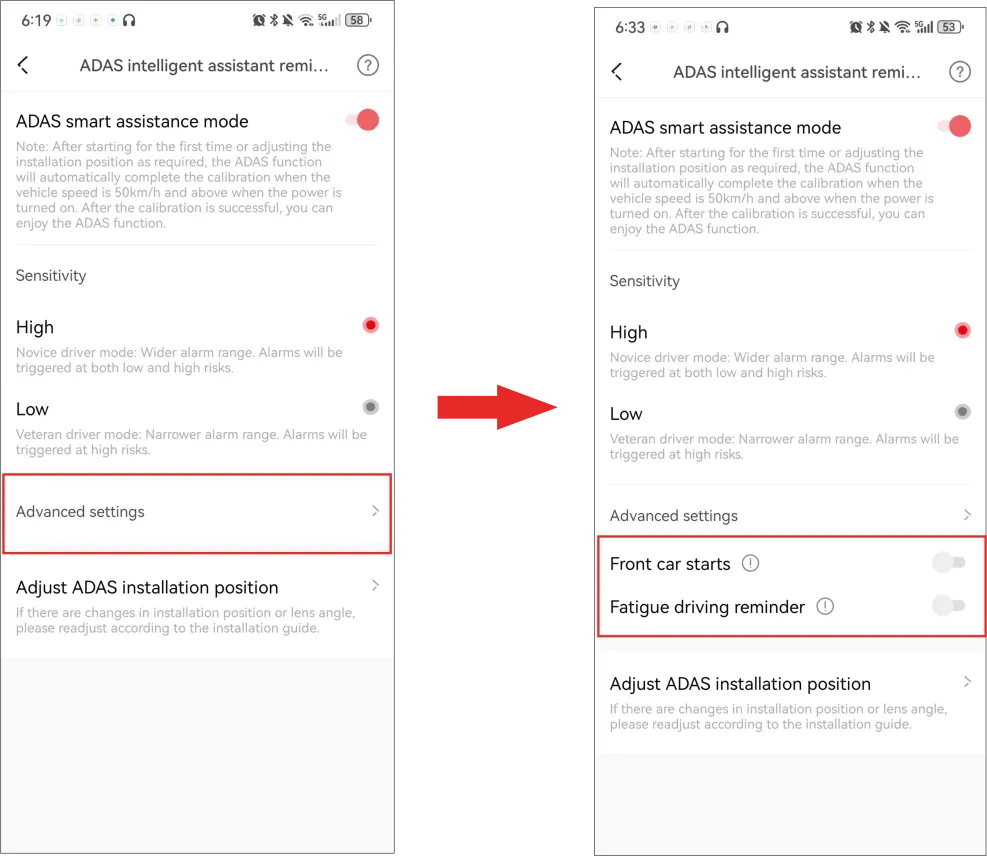
● Voice Reminder for Front Car Starts: Enabled
When the vehicle in front starts to move, voice prompts are given in a timely manner, mainly used in scenes after waiting at traffic lights.
● Voice Reminder for Fatigue Driving: Enabled
When the user is driving, a smart voice prompt for fatigue driving will be given to remind the user to take a break or be more vigilant.
Radar Function (Optional)
If you have installed the optional hardwire kit and radar module successfully, you can use the radar detection function in the parking monitoring mode.
After the device enters the parking monitoring mode (sleep mode), the radar starts working. Within the detection range of the radar, when the radar detects a moving object, it will wake up the Dash Cam to record a 10-second video. If the radar still detects moving objects within 20 seconds during this period, it will perform time-lapse recording (up to 30 minutes). If not, it will enter sleep mode. If the radar/AI recognition does not detect any target objects (people/motor vehicles/non-motor vehicles/animals) for 2 minutes, it will also enter sleep mode again.
● After the car is turned off, the radar starts to detect. If it continues to detect a driver/passenger in the car, it will not enter the parking monitoring mode. The Dash Cam will not enter the parking monitoring mode until the radar detects no target in the front or rear within 5 seconds.
① Install the hardwire kit & radar module. For details, please refer to Chapter 3 Radar Module Installation (Optional).
② When the system detects radar module (optional), the parking monitoring mode automatically switches to sleep mode.
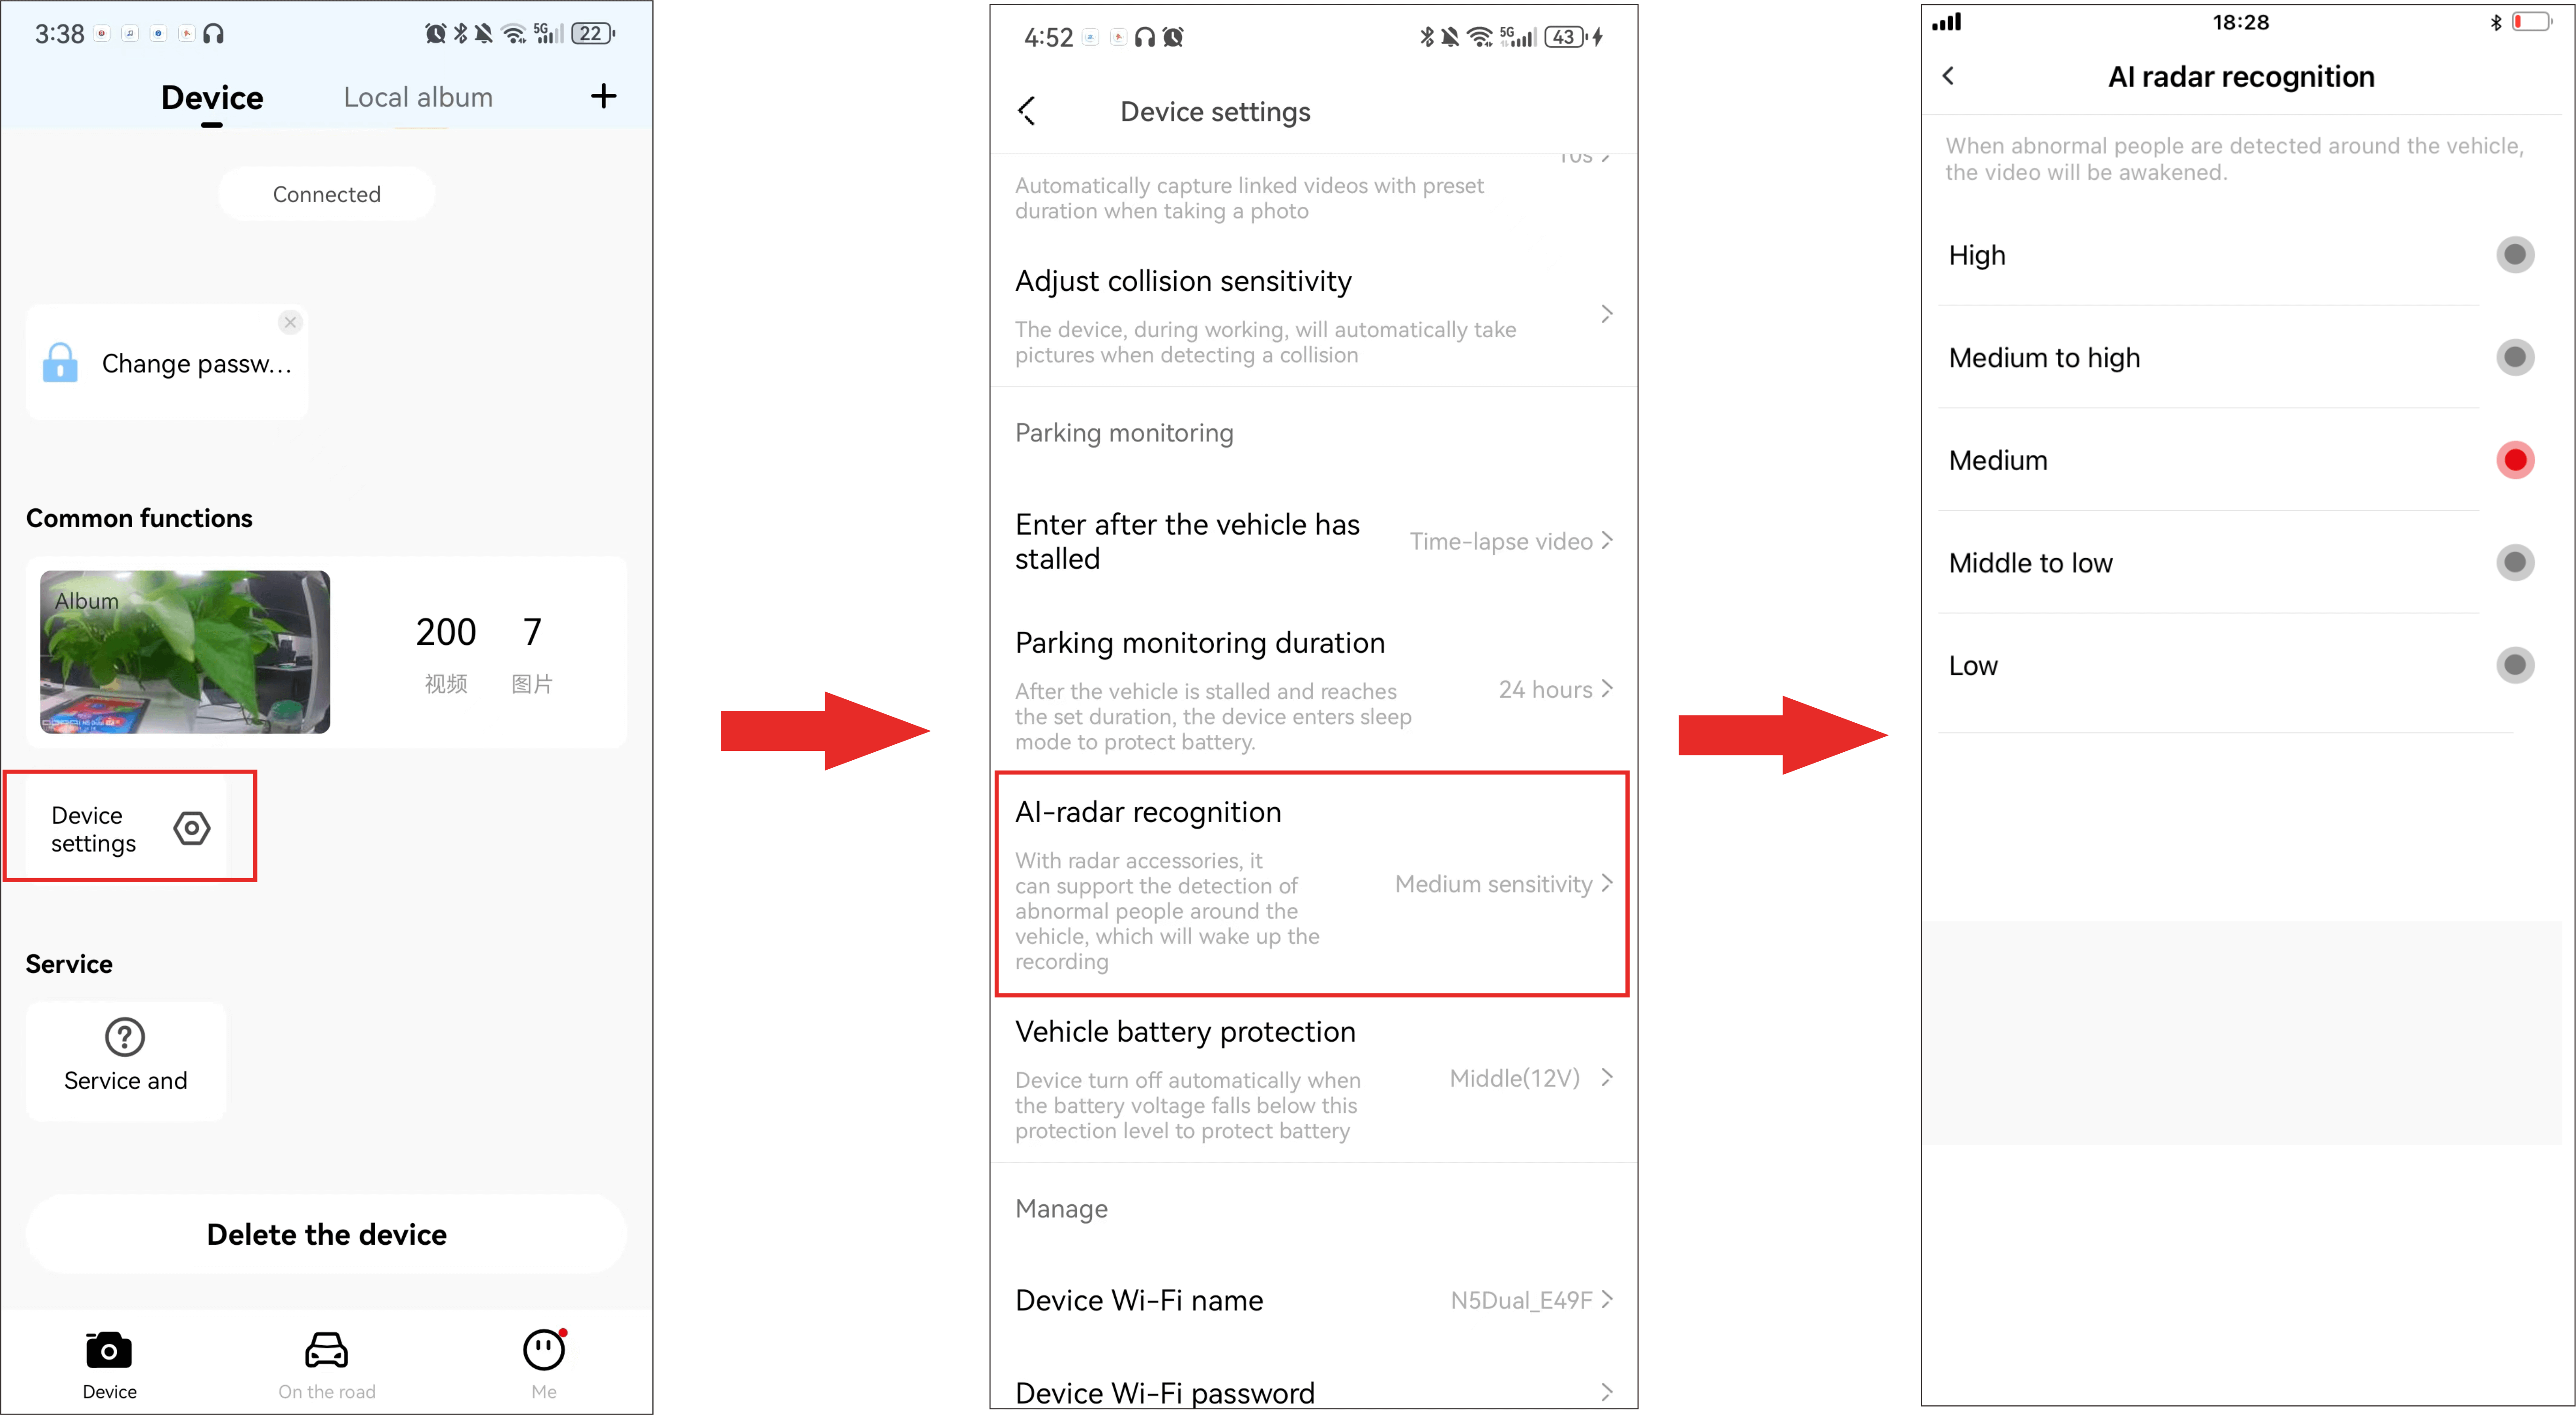
▶ Setting Radar Sensitivity
The radar sensitivity includes high, medium-high, medium (default), medium-low, and low. The higher the sensitivity of the Dash Cam, the easier it is to identify the target and trigger the shooting of video; The lower the sensitivity of the Dash Cam, the less likely it is to identify the target and trigger the shooting of video.
After the mobile phone is connected to the Dash Cam, open the app, and tap “Device Settings” > “AI-radar recognition”.
Maintenance
Firmware Upgrade
Open the DDPAI App, connect the Dash Cam Wi-Fi, and tap “Me” > “About DDPAI” > “Check version” and the app will automatically detect whether the App version and the firmware version are the latest versions. If there is a new version of the firmware of App or device, upgrade the version according to the operation displayed on the screen.
Safety Precautions
Before using this product, please read all precautions and operating instructions to ensure correct and safe use.
1. Please do not debug the Dash Cam or watch the video on your mobile phone while driving, and pay attention to driving safety.
2. Please do not install the Dash Cam in a location that may block the driving view.
3. Make sure to use the power cord included in the product package. Other power cords may cause fire or short circuit and electric shock due to defective products.
4. Make sure to use UHS-3 or higher speed SD card (Up to 512GB). When using the device, please do not insert or remove the memory card. Please format it through the App before use, otherwise it will not be recognized. It is recommended to format the Dash Cam regularly through the app to ensure better maintenance of this product.
5. Please do not open the Dash Cam shell or repair it yourself. If this product fails, please call the official customer service for relevant consultation.
6. The Dash Cam is not only suitable for vehicles, but can also be used in other places and can be powered by an adapter.
7. If a power adapter is used for power supply, an adapter that meets standard requirements should be purchased for use.
8. The pictures in this operating guide are for reference only, please refer to the actual product.
FAQ
FAQ
1. How do I format a memory card?
Since this device has dual storage, you can choose to format the SD card or the built-in storage.
Format the SD card (Method 1): After the mobile phone successfully connects to the device, enter the “Camera Settings” interface, tap“Storage Management”and you can select to format the memory card.
Format the SD card (Method 2): Remove the memory card, insert it into the card reader, and connect it to the computer. Find the memory card drive, Right-click and select “Format”. The fat32 option will appear and select “Format” (uncheck “Quick Format”).
Format the built-in storage: After the mobile phone successfully connects to the device, enter the “Camera Settings” interface, tap“Storage Management”and you can select to format the built-in storage.
2. How to export the driving video in the memory card?
Use the card reader to connect the memory card with the computer, and you can export the driving video.
3. What is the Wi-Fi password of the Dash Cam?
The default Wi-Fi password of the device is “1234567890”. You can change the password, go to “Device Settings” > “Device Wi-Fi Password” after connecting the APP with your mobile phone.
4. Can I change the Wi-Fi password of the Dash Cam?
It can be modified. The specific modification method is to enter “Camera Settings” interface after the Dash Cam is connected to the mobile phone, select “Set Wi-Fi Password” after entering, enter a new password, confirm it, and save it.
5. How do I reset the Dash Cam?
In case of abnormal state, press the function button for approximately 6 seconds to reset the device. After successful reset, the device will automatically start up.
6. What if I forget the Wi-Fi password?
Press the function button for approximately 6 seconds to reset the device, and then connect the Dash Cam again (default password: 1234567890).
7. Why can’t I see the image of my rear camera?
Please ensure that the rear camera cable is firmly connected to the front camera, and observe whether the rear camera indicator light is solid green. Then enter the preview interface of the app and tap to switch to view the image of rear camera.

