DDPAI » Product Manuals » RANGER M1 User Manual
DDPAI RANGER M1
User Manual
Product Introduction
Appearance

| No. | Component |
| 1 | Lens |
| 2 | Mounting Bracket |
| 3 | Speaker |
| 4 | Indicator |
| 5 | Micro-SD Card Cover (Need to be removed before inserting the Micro-SD card ) |
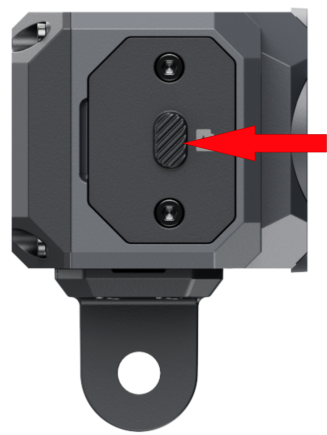
| 6 | Function Button (For reset, Bluetooth authorization, or networking) |
| 7 | Anti-theft Screw |
Function Button
| Function | Operation |
| Bluetooth authorization | Press once |
| Confirm the primary device during networking | Press once |
| Reset | Press and hold for 6 seconds |
Indicator Guide
| Indicator | System Status |
| Steady Green | Recording |
| Flashes Green | Tilting Event/Emergency Event |
| Flashes Blue | Bluetooth Authorization/Networking |
| Steady Blue | Networking Successful |
| Steady Yellow | Upgrading |
| Steady Red | Not Recording |
Specifications
| Model | RANGER M1 |
| Input | 5V⎓2A |
| Storage | Support Micro-SD card (Up to 256GB) |
| Resolution | 3K 2880*1620 @30fps |
| Aperture | F1.55 |
| Encoding Technology | Support AI.265 / H.264 encoding |
| Field of View (FOV) | 145° |
| Wi-Fi | 5GHz |
| Bluetooth | BLE5.4 |
| Video Format | MP4 |
| Waterproof and Dustproof | IP67 |
| Dimensions | 63*30.5*29.6mm |
| Working Temperature | -4℉ to 113℉ (-20℃ to 45℃) |
Installation Instructions
Installing Micro-SD Card
Install Micro-SD Card
Step 1: Use the included hexagonal wrench to remove the Micro-SD card cover.
Step 2: Install the Micro-SD card (Need to be purchased separately).
Note:
Please use a branded Micro-SD card with a capacity of up to256GB. Hot swapping is not supported.
Step 3: Re-install the Micro-SD card cover and lock the anti-theft screw.
Note:
Please ensure that the Micro-SD card cover is properly locked. Improper installation may compromise the device’s waterproofing.
Installing Bracket
Insert the two claws of the mounting bracket into the three claws of the 3M adhesive base, and then use the included Allen wrench to tighten the bolts.
Powering Up Dash Cam
- Power up the dash cam with USB power cable
Connect the USB power cable to the dash cam, then plug the other end into the motorcycle’s USB charging port.
- Power up the dash cam with intelligent hardwire kit
Notes:
● The parking monitoring function requires the optional hardwire kit.
●For specific installation steps, please refer to the Intelligent Hardwire Kit User Guide.
App Connection
Downloading DDPAI App
Note:
As the app is constantly upgraded, the actual operation may be slightly different from the following description. Please connect your device to a phone according to the prompts in the DDPAI App.
Please scan the QR code below or search for “DDPai” in Google Play Store (Android) or App Store (iOS) to download the DDPAI App.
Bluetooth Connection
Note:
For the first time of use, please connect the Dash Cam to your mobile phone through the Bluetooth.
Step 1: Power on the Dash Cam. Turn on the Bluetooth of your mobile phone.
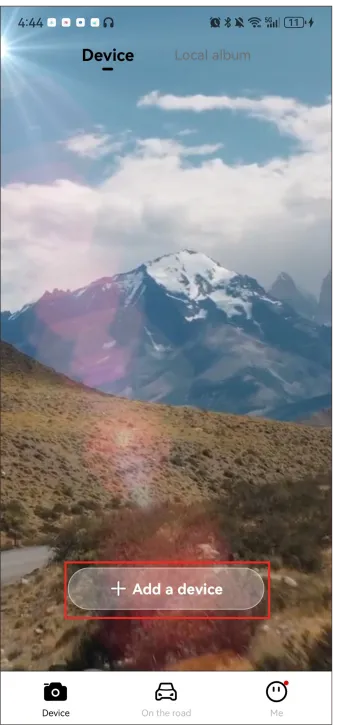
Step 2: Launch the DDPAI App, tap “Device”> “+ Add a device”.
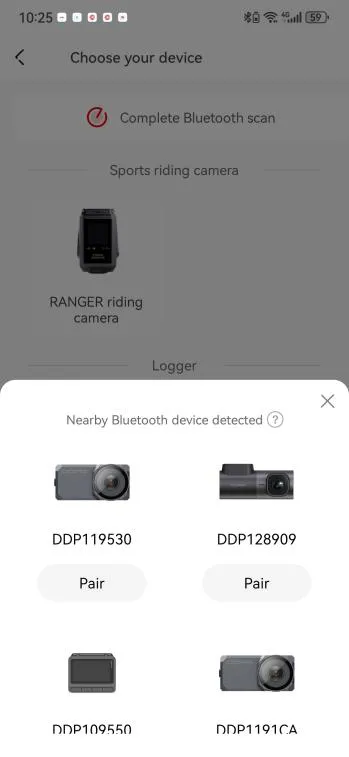
Step 3: Select the current device name (DDP11XXXX) in the detected Bluetooth device list.
Step 4: Press the function button on the Dash Cam to authorize.
Note:
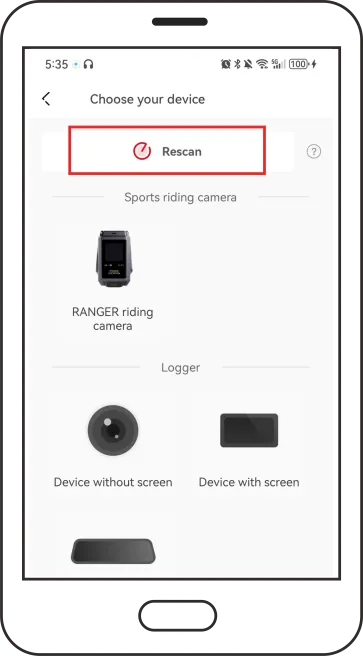
If you fail to search the Bluetooth device, you can tap “Rescan” to search for the Bluetooth device again.
Notes:
- The device can only connect to one phone at a time via Bluetooth.
- To connect a different phone, please either turn off Bluetooth on the currently connected phone, remove the device from the app, or reset the device to allow another phone to connect via Bluetooth.
Note:
After successfully connecting via Bluetooth, you need to connect to the camera via Wi-Fi to view the device album, adjust settings, or access the preview interface.
- For iPhones:
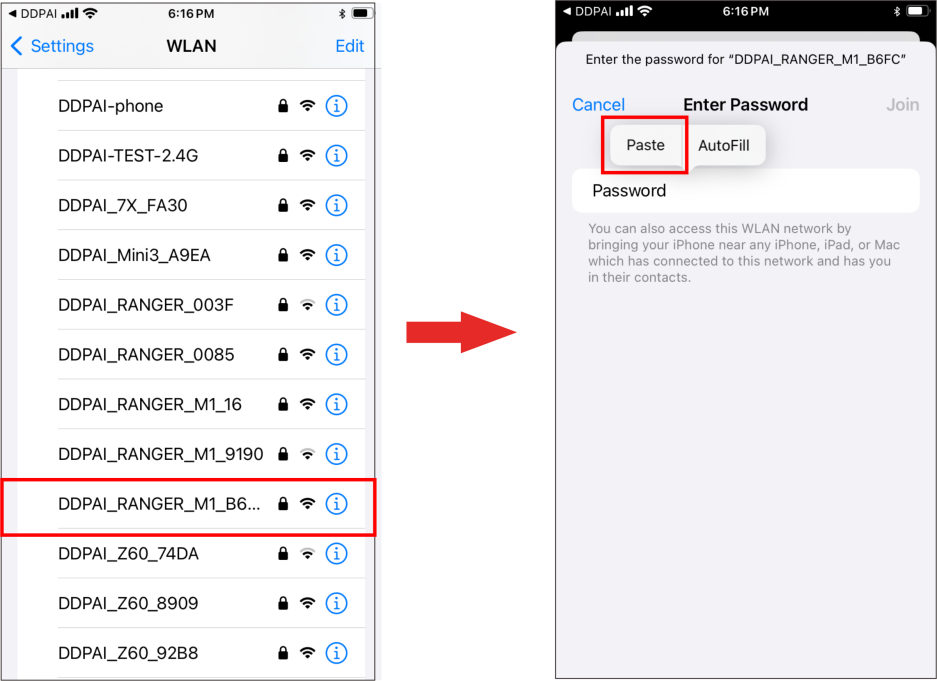
Step 1: Tap “Go to connection” > “WLAN”
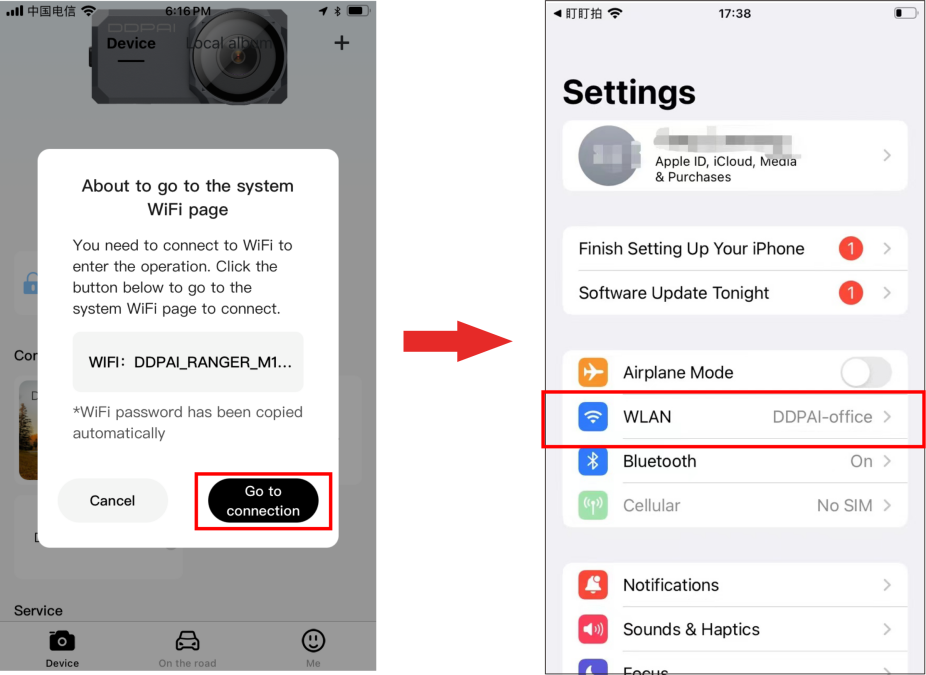
Step 2: Select the current device “DDPAI_RANGER_M1_XXXX”. Paste the password directly into the edit box, or choose to enter the password manually (default: 1234567890). Then tap “Join”.
- For Android Phones:
If the Wi-Fi function is enabled, the system will automatically connect without requiring manual input.
Function Introduction
Video Function
Note:
Due to the continuous update and upgrade of the app, the actual operation may be slightly different from the description below. Please follow the actual operation instructions in the app.
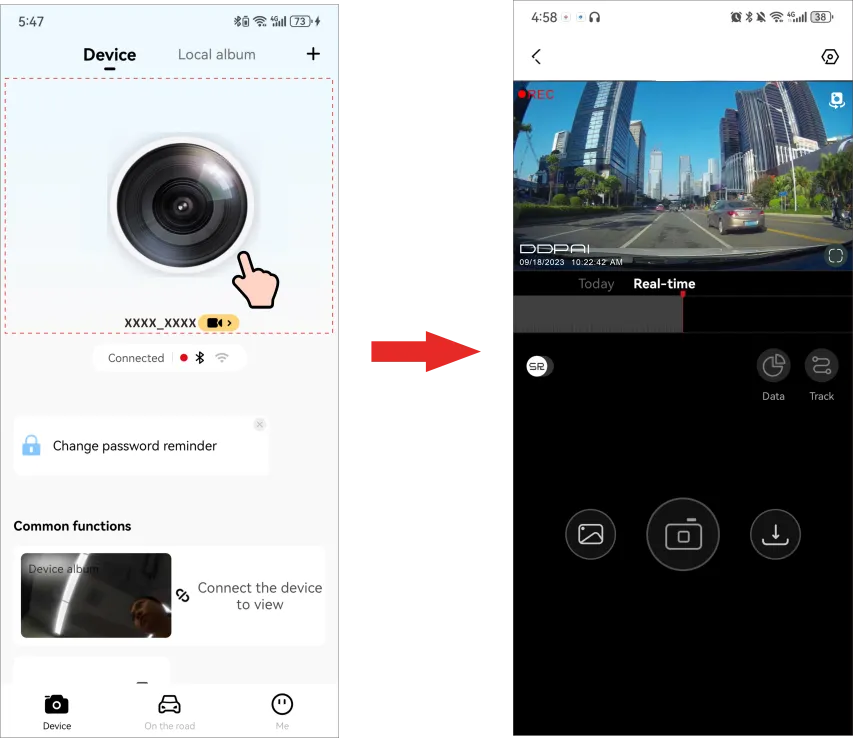
Tap on the product image displayed on the interface , and you can enter the preview interface directly.
- Preview video
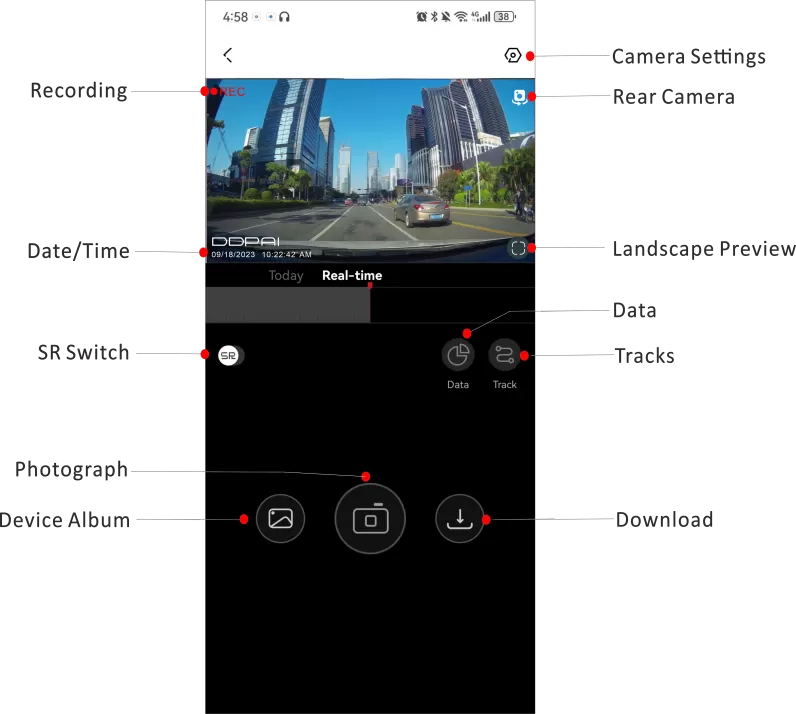
After the app is successfully connected to the Dash Cam, enter the real-time preview interface, tap (Landscape Preview) or rotate your mobile phone horizontally (Your phone’s auto-rotate function needs to be turned on), and the real-time screen will automatically switch to the full-screen preview mode.
Note: It is currently in preview quality and can be viewed in HD quality by downloading.
- Playback video
- Drag the progress bar to select the time starting point to view.
- Tap the thumbnail or wait for 5 seconds to start playing the previously recorded video.
Note: Time progress bars of different colors represent different video types, please refer to the table below for reference.
Color-coded timeline | Description |
This video is triggered by an emergency event (detection of a large tilt angle or a collision in parking monitoring mode (sleep mode)) |
- Download video
- Method 1
- Drag the progress bar to select the time starting point to download.
- Tap
to enter the downloading interface.
- Tap “Complete” to complete the download. The file will be saved to the local album and can be shared and deleted.
Note: The length of each video ranges from 5 seconds to 3 minutes.
- Method 2
- Tap
on the “Device” interface.
- Hold the video/photo file you want to download to enter the selection state.
- Select the video file you want to download and tap Download.
Taking Photos
This Dash Cam supports the following photographing modes:
- Photography triggered by collision:During the parking monitoring mode (sleep), the dash cam will take a photo when a collision occurs.
- Photography triggered by tilting: During driving, when the dash cam detects that the tilt angle of the motorcycle changes significantly (the tilt angle is greater than 40°), it will take a photo.
- Manual photographing:Launch the DDPAI app, enter the preview interface and tap
to take a photo.
Note:
When a collision or tilting triggers the dash cam to photograph, a related video will also be generated. The photos and related videos will be saved in the “Emergency” tab in the “Device Album” interface.
▶ View photos or videos on the device
After connecting the Dash Cam to the mobile phone, launch the DDPAI App. Tap“Device Album” on the “Device” interface, and you can view the captured photos and videos on the Dash Cam.
Note:
The video and photo files are stored in the recorder’s storage memory and are not downloaded to your mobile phone. Please connect to the Dash Cam to your mobile phone through the DDPAI App to view or download these files to the local album.
▶Automatically download snapshot/emergency files:
You can choose to automatically download snapshot/emergency files to the local album after connecting the device. Open the app, tap “Me” > “APP Settings”, and enable “Automatically download snapshot files” / “Automatically download emergency files” function.
Parking Monitoring
When you select the intelligent hardwire kit for power supply, you can enable the parking monitoring function. After the motorcycle is turned off, the dash cam will automatically enter the parking monitoring mode (sleep).
- If there is an abnormal collision, the dash cam will be awakened to take a photoand generate a 30-second video.
- If there is no collision, ignition or other events within 30 seconds, it will go back to sleep.
- If there is still a collision within 30 seconds, it will continue to record 30 seconds of video.
● Setting collision sensitivity during the parking monitoring
The default collision sensitivity of the Dash Cam is “Medium”, and it supports the selection of collision sensitivity in seven levels: “High”, “Medium-high”, “Medium”, “Medium-low”, “Low”, “Off” and “Custom”.
Select the appropriate collision sensing sensitivity. During parking monitoring, when a collision occurs, the recorder will be triggered to take a photo and a 30-second short video. If you choose to turn it off, no photos or videos will be generated when a collision occurs after the motorcycle is turned off. You can switch the collision sensing sensitivity of the recorder in the following ways.
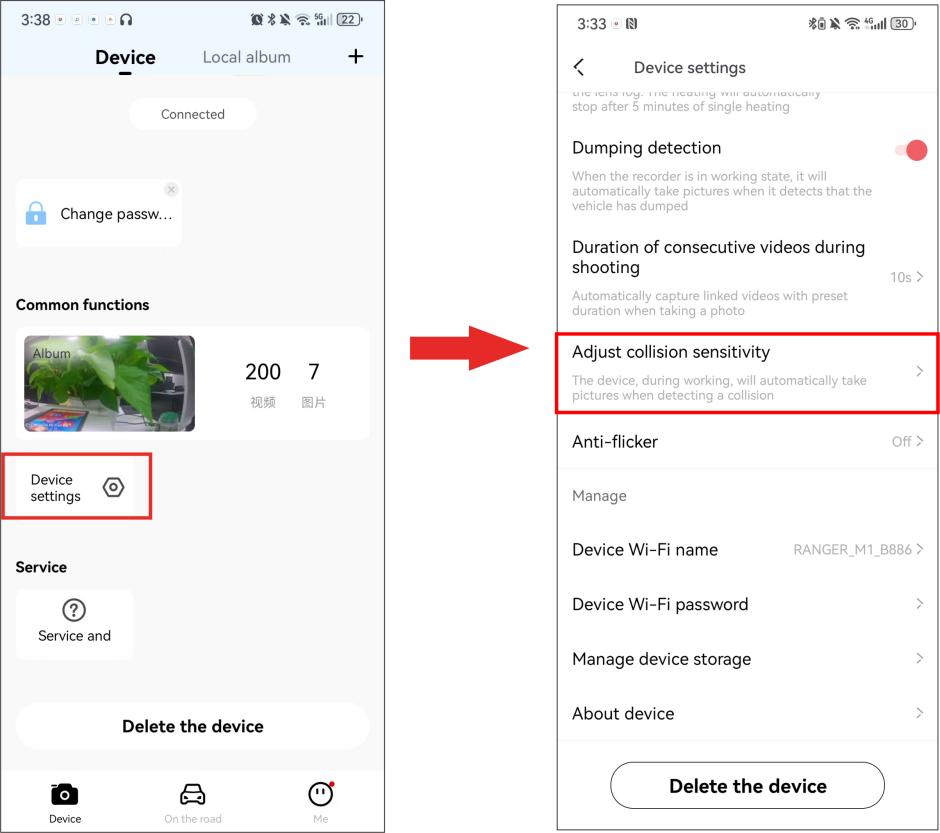
①After the mobile phone is connected to the Dash Cam, launch the app, enter the “Device” interface, tap “Device Settings” > “Adjust collision sensitivity”.
② Select the appropriate sensitivity during the parking monitoring.
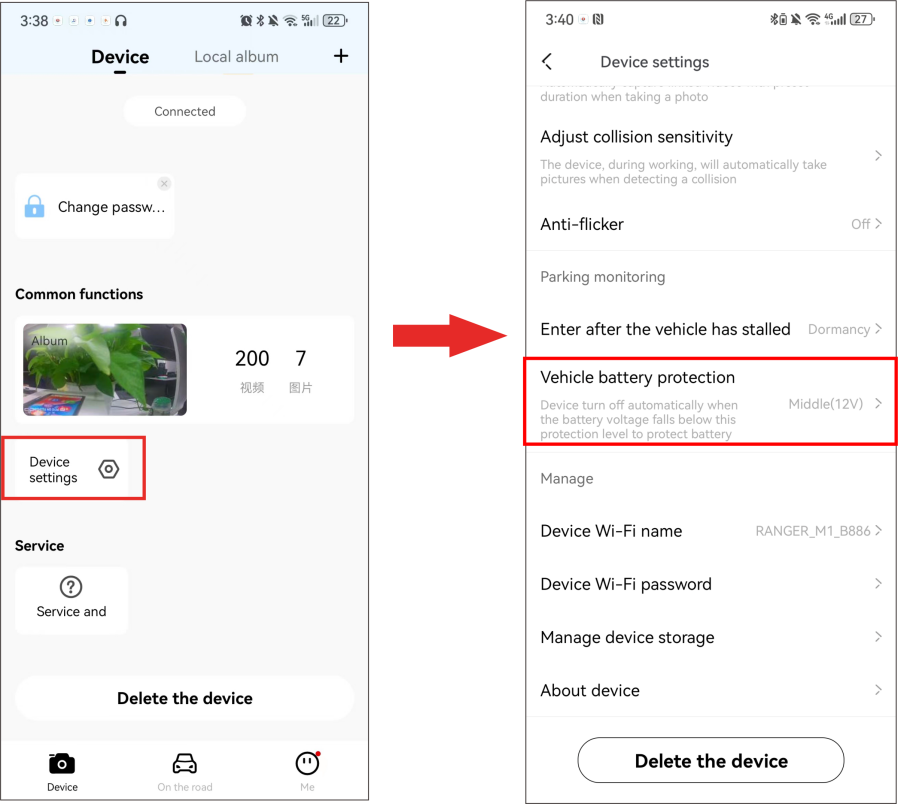
● Setting the motorcycle battery protection voltage
You can set the motorcycle battery protection voltage. When the motorcycle battery power is lower than the selected voltage value, the Dash Cam will automatically shut down to prevent the battery from running out of power.
After your mobile phone is connected to the Dash Cam through the DDPAI App, launch the app, enter the “Device” interface, and tap “Device Settings” > “Vehicle Battery Protection”.
Tilting Detection
During driving, when the Dash Cam detects a large tilt angle change (the tilt angle is greater than about 40°), it will automatically take a photo and generate a 10-second video by default.
You can choose to turn on/off the “Tilting Detection” switch. When this function disabled, the Dash Cam will not photograph or generate a related short video when it detects a large tilt angle change.
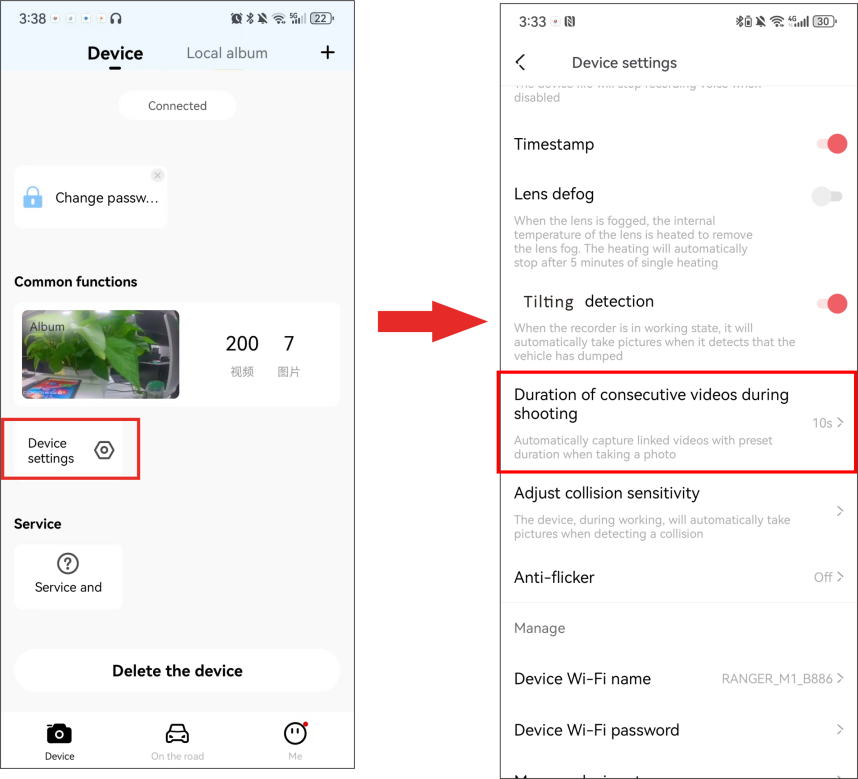
Set the duration of the related video
- Tap ”Device Settings”> “ Duration of consecutive videos during shooting”.
- Set the duration of the short video according to your needs.
Defogging Function
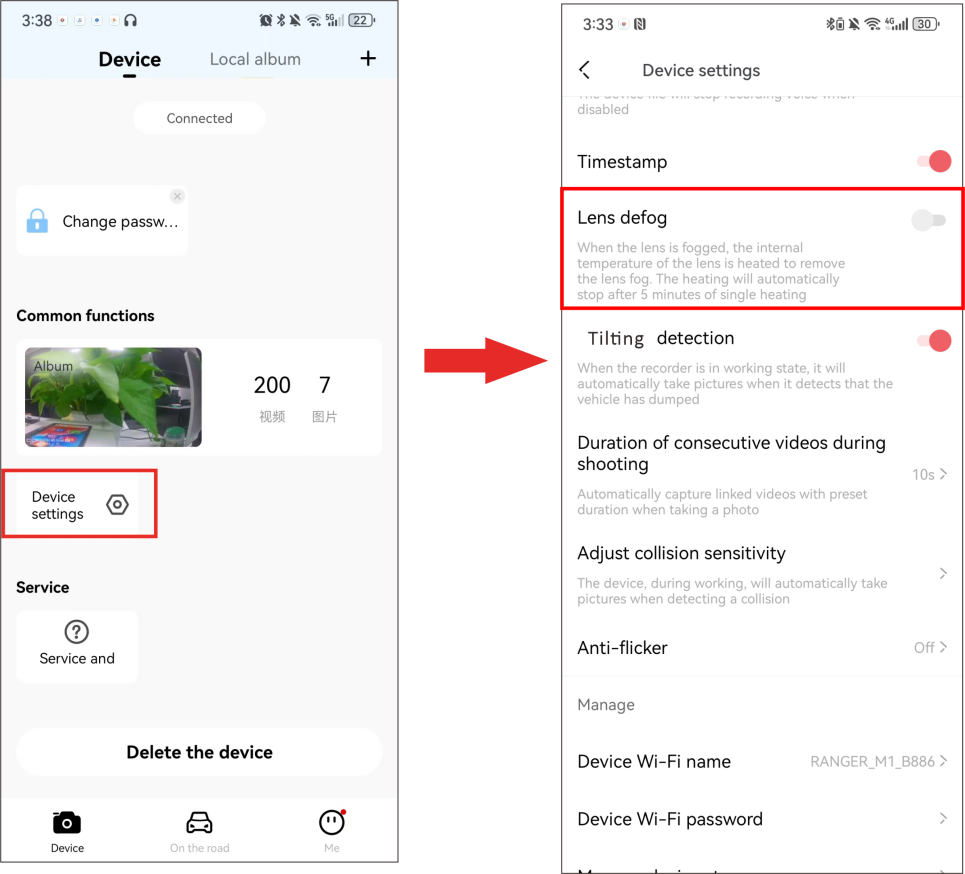
On rainy, foggy or cold days, the camera lens tends to fog. To improve picture clarity, you can enable the defogging function through the app. This increases the lens surface temperature, reduces temperature differences, and eliminates condensed water vapor.
After connecting the Dash Cam to the DDPAI App, launch the app, enter the “Device” interface, tap “Device Settings” > “Lens defog”, and turn on the “Lens defog” switch. After this function is enabled, the lens glass will be heated and defogged for 5 minutes, and the defogging will stop automatically after 5 minutes.
πLink Function
RANGER M1 supports the πLink function, enabling multi-device interconnection. When you purchase two devices and successfully network them, you can view real-time recordings from both devices on a single mobile phone. Additionally, you can perform operations such as video playback and downloading
● πLink connection
Notes:
- The πLink function currently supports up to two devices to network at the same time.
- Please make sure that both devices are powered on normally before networking.
- During the networking process, the “PrimaryDevice” and “Secondary Device” are distinguished. The primary device is generally used as a front camera, and the secondary device is generally used as a rear camera.
1.Power on both devices.
2.Follow the steps below to add the two devices to the device list of the DDPAI app via Bluetooth.
① Turn on the Bluetooth of your phone.
② Launch the DDPAI app, enter the “Device” interface, and tap “+ Add Device”.
③ Select the current device name (DDP11XXXX) in the searched Bluetooth list.
④ Press the function button on the device to authorize.
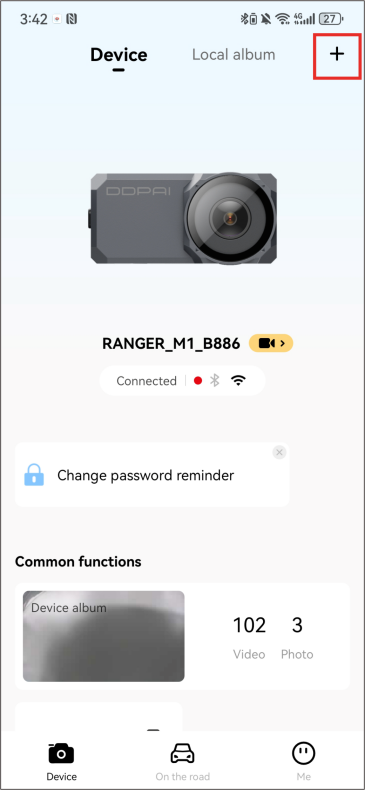
⑤ After the first device is successfully connected, tap “+” in the upper right corner of the “Device” interface to add a second device. For specific connection methods, refer to Step 1 to Step 4 above.
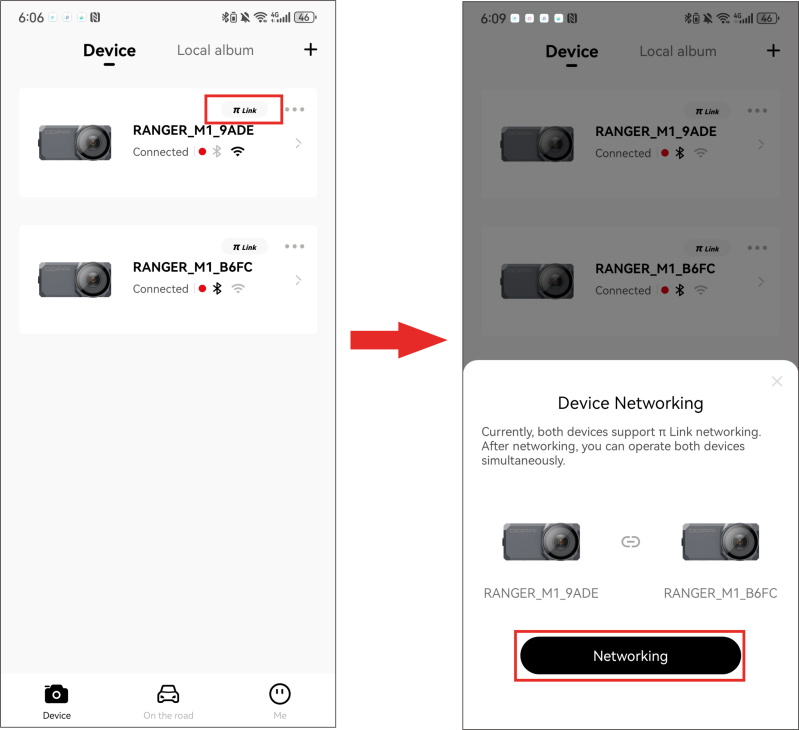
3. On the “Device” interface, you can see the two added devices. Tapthe “πLink” button. When the “Device Networking” pop-up window pops up, Tap the “Networking” button.
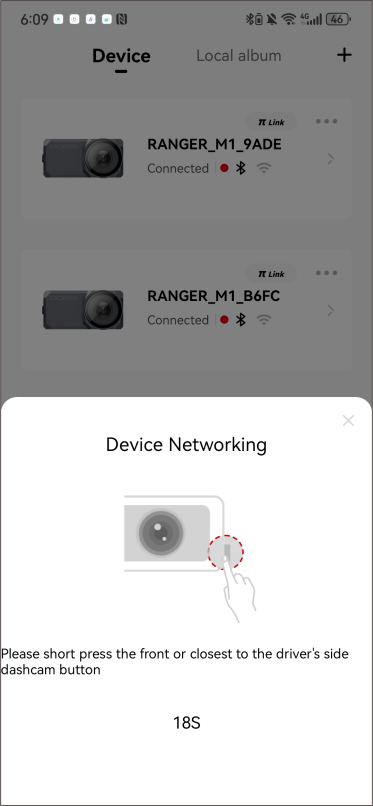
4. Press the function button on the primary device to confirm according to the instructions on the app page.
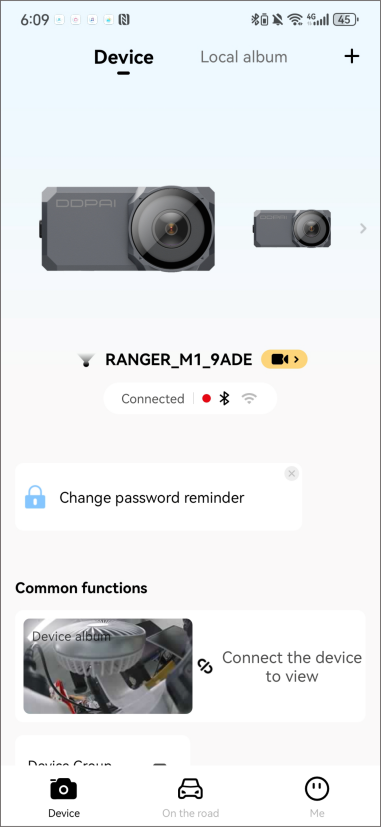
5. After the networking is successful, the images of the two devices will appear on the “Device” interface.
● Switch device
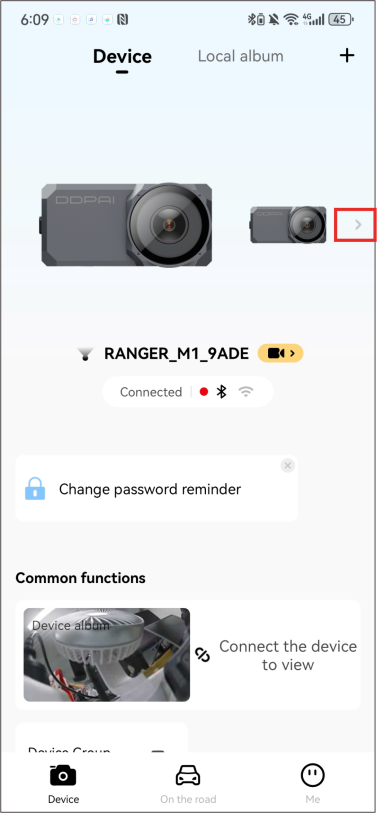
You can switch by tapping (Switch) button or tapping the device image you want to preview. After switching devices, the “Device” interface will display the function details of the current device.
● Disconnect networking
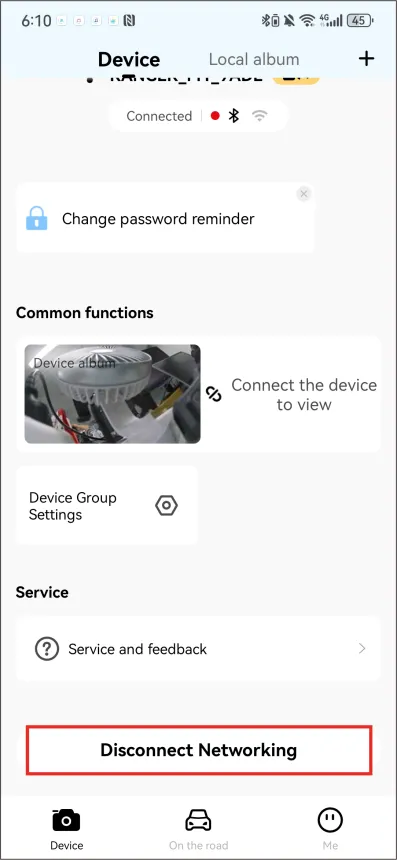
Tap the “Disconnect Networking” button on the “Device” interface. After disconnecting networking, the video files will be separated into the device albums to which they belong.
Data Transmission
To access the saved files, gently remove the memory card from the dash cam’s card slot and insert it into a reader. Then plug the card reader into your computer, open the “DCIM” folder, and browse or edit the photos and video files saved in the dash cam.
- 200 video: This folder contains normal recorded videos.
- 201 photo: This folder contains photos generated by collision.The file name of the photo begins with “G”.
Maintenance
Firmware Upgrade
Open the DDPAI App, connect the dash cam Wi-Fi, and tap “Me”>”About DDPAI”>”Detect New Version” and the app will automatically detect whether the App version and the firmware version are the latest versions. If there is a new version of the firmware of App or device, upgrade the version according to the operation displayed on the screen.
Safety Precautions
Before using this product, please read all precautions and operating instructions to ensure correct and safe use.
- Please do not debug theDash Cam or watch the video on your mobile phone while driving, and pay attention to driving safety.
- Please do not installthe Dash Cam in a location that may block the driving view.
- Make sure to use the power cord included in the product package. Other power cords may cause fire or short circuit and electric shock due to defective products.
- Make sure to usea branded Micro-SD card with capacity of up to 256GB. When using the device, please do not insert or remove the memory card. Please format it through the App before use, otherwise it will not be recognized. It is recommended to format the Dash Cam regularly through the app to ensure better maintenance of this product.
- Please do not open the Dash Camshell or repair it yourself. If this product fails, please call the official customer service for relevant consultation.
- The Dash Camis not only suitable for vehicles, but can also be used in other places and can be powered by an adapter.
- If a power adapter is used for power supply, an adapter that meets standard requirements should be purchased for use.
- The pictures in this operating guide are for reference only, please refer to the actual product.
FAQ
FAQ
Q1: Why does the product feel very hot during use?
A: Ranger M1 can work normally and continuously in the temperature range of -20℃ to 45℃. It is normal for electronic products to heat up during use, so please feel free to use it. In addition, all DDPAI products have undergone high temperature tests. During normal use, the heat generated by the machine will not affect the normal operation of the machine, nor will it cause safety issues.
Q2: How do I format a memory card?
A: Format the memory card (Method 1): After the mobile phone successfully connects to the device, enter the “Camera Settings” interface, tap“Storage Management”and you can select to format the memory card.
Format the memory card (Method 2): Remove the memory card, insert it into the card reader, and connect it to the computer. Find the memory card drive, Right-click and select “Format”.
Q3: What is the Wi-Fi password of the Dash Cam?
A: The default Wi-Fi password of the device is “1234567890”. You can change the password, go to “Camera Settings” > “Set WIFI Password” after connecting the APP with your mobile phone.
Q4: Can I change the Wi-Fi password of the Dash Cam?
A: It can be modified. The specific modification method is to enter “Device Settings” interface after the Dash Cam is connected to the mobile phone, select “Device Wi-Fi Password” after entering, enter a new password, confirm it, and save it.
Q5: How to reset the Dash Cam?
A: In case of abnormal state, press the function button for approximately 6 seconds to reset the device. After successful reset, the device will automatically restart. If the device still does not respond, you can try to hold the function button for approximately 10 seconds to force restart the device.
Q6: Why does the Dash Cam stop recording when playing back/cropping/downloading videos or pictures?
A: When your mobile phone is connected to the dash cam for playback, cropping, downloading and other working modes, we hope to give you a smoother experience. In this scenario, we pause the recording and storage of the device. When you finish the operation of the relevant video file, we will immediately restart the storage of the video file. You will hear the “Start recording” and “Stop recording” prompts. This is normal. Don’t worry that the device will not record for a long time.
Q7. How to install the device on a motorcycle?
A: First, install the 3M adhesive base of the device, stick the device in the center of the motorcycle, adjust the angle of the dash cam, and ensure that the device remains horizontal. If it is not installed horizontally, it will affect the accuracy of photography triggered by the tilting.
Q8: Is the motorcycle installation anti-theft?
A: The 3M adhesive base is equipped with mounting screws. If there is an anti-theft installation requirement, you can select an appropriate drilling position for installation. The screws are M3 type.
Q9: Will the parking monitoring mode use up the motorcycle battery?
A: The hardwire kit has a battery low voltage detection function. When the motorcycle battery is detected to be lower than the set voltage value, the parking monitoring function will be automatically turned off.
Q10: About the defogging function
A: Since the defog function requires heating of the device, please do not turn on the defog function too frequently if you are able to clear the water mist. If conditions permit, you can remove the Micro-SD card cover to defog the lens, which can effectively reduce subsequent lens fogging problems.


