Appearance
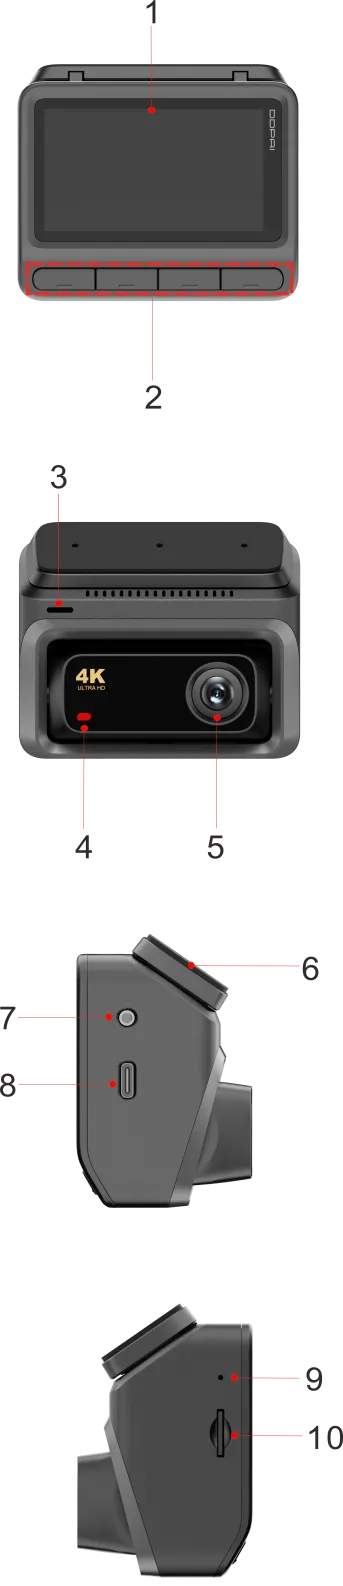
| No. | Component |
| 1 | Display (Non-touchscreen) |
| 2 | Function Button |
| 3 | Speaker |
| 4 | Indicator |
| 5 | Lens |
| 6 | 3M Adhesive Bracket (Removable) |
| 7 | Rear Camera Port |
| 8 | USB Type-C Port |
| 9 | MIC |
| 10 | Micro-SD Card Slot |
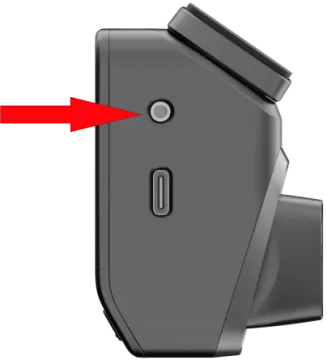
Function Button
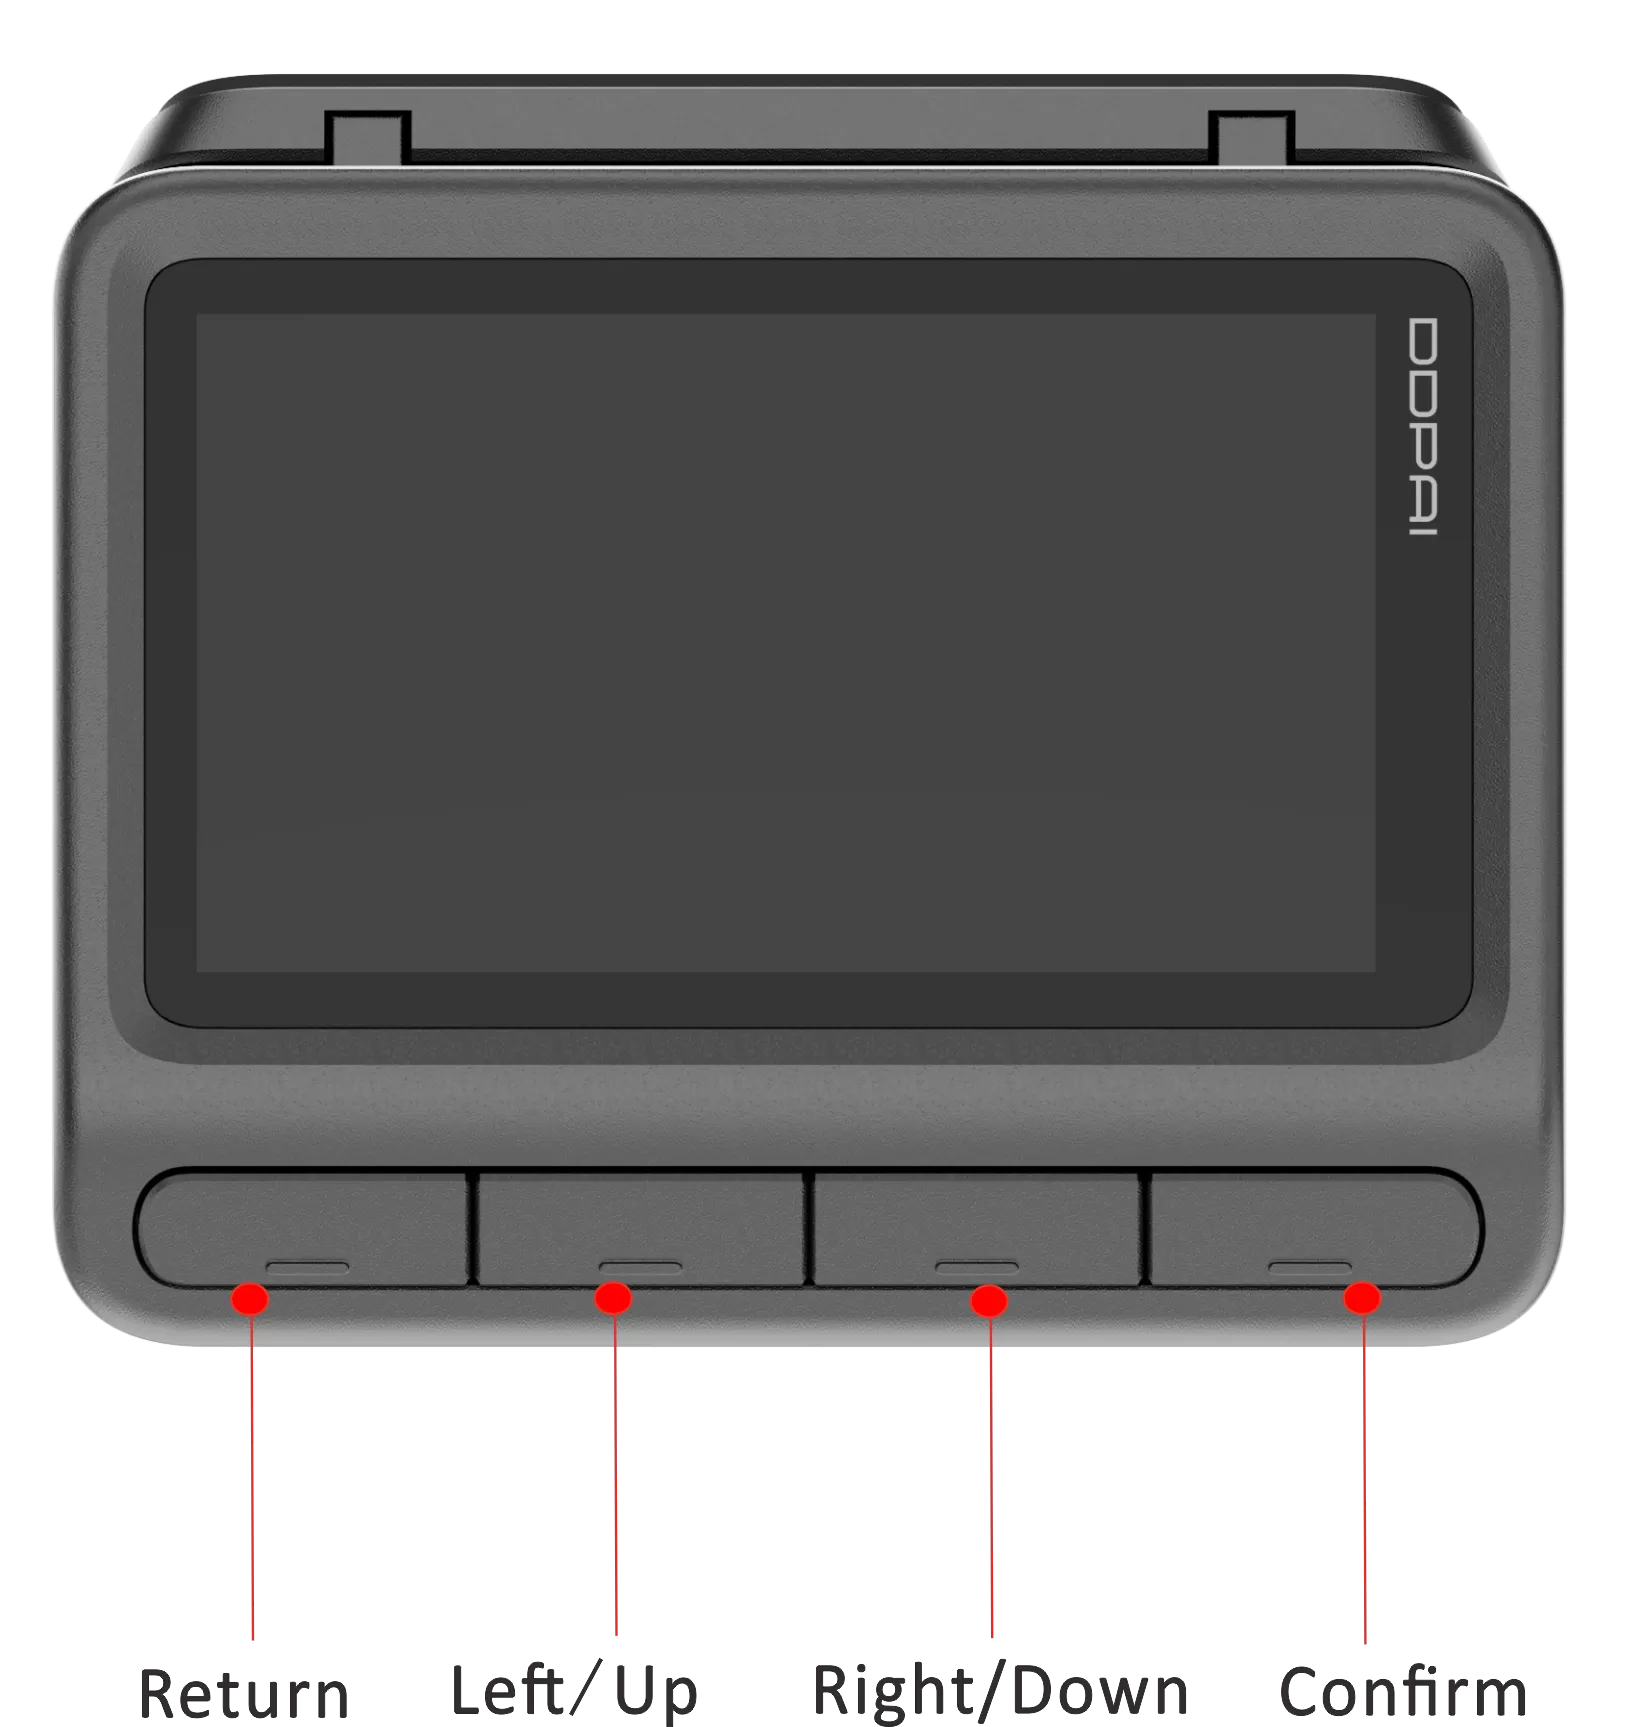
Reset: Hold the confirm button for 6 seconds.
Indicator Guide
Specifications
Memory Card Installation
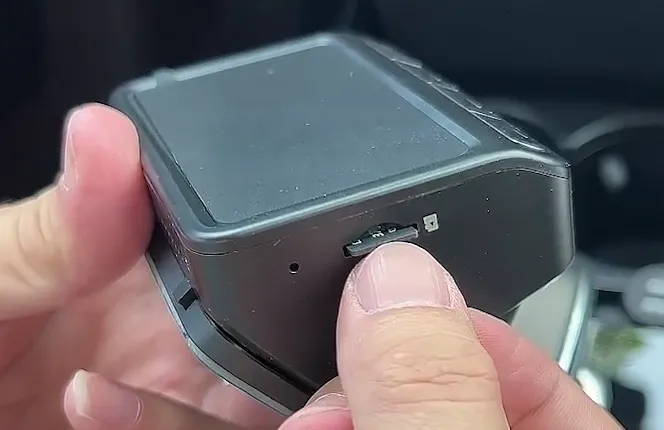
Install the Memory Card
Please make sure the Dash Cam is not powered on first. Insert the memory card half way in (refer to the silkscreen printed pattern beside the memory card slot) and use the finger nail or a paper clip to push the card all the way inward until it clicks and locks in place.
Remove the Memory Card
To remove the memory card, gently push its edge inward until it clicks and pops out, and then simply pull it out of the slot.
Notes:
- Please purchase a memory card separately and make sure to usea branded Micro-SD card with capacity of up to 512GB.
- Before first time use, please format the memory card to prevent any errors and for smooth operation.
- Do not remove the memorycard while the Dash Cam is turned on.
Dash Cam Installation
The wiring and power-taking installation method of the Dash Cam include the following three types. You can scan the QR code below for reference.

- Cigarette Lighter Power Supply
Insert the car charger into the cigarette lighter, and connect the car charger and the Dash Cam through the power cord. Most of the power cord will be embedded in the plastic guard plate of the car, and a small part will be exposed in the car. This wiring method is simple and easy to operate.
Step 1: Wipe the front windshield
Wipe the front windshield with a clean soft cloth to ensure that the bracket can stick firmly.
Step 2: Power on the Dash Cam
After inserting the car charger into the cigarette lighter, connect the Dash Cam to the car charger using the included Type-C power cord.
After the car starts, the Dash Cam will automatically start when it is powered on, and the start-up prompt tone “Hello, DDPAI” will be issued, and the Dash Cam will start recording at this time.
Step 3: Determine the installation position of the Dash Cam and adjust the lens angle
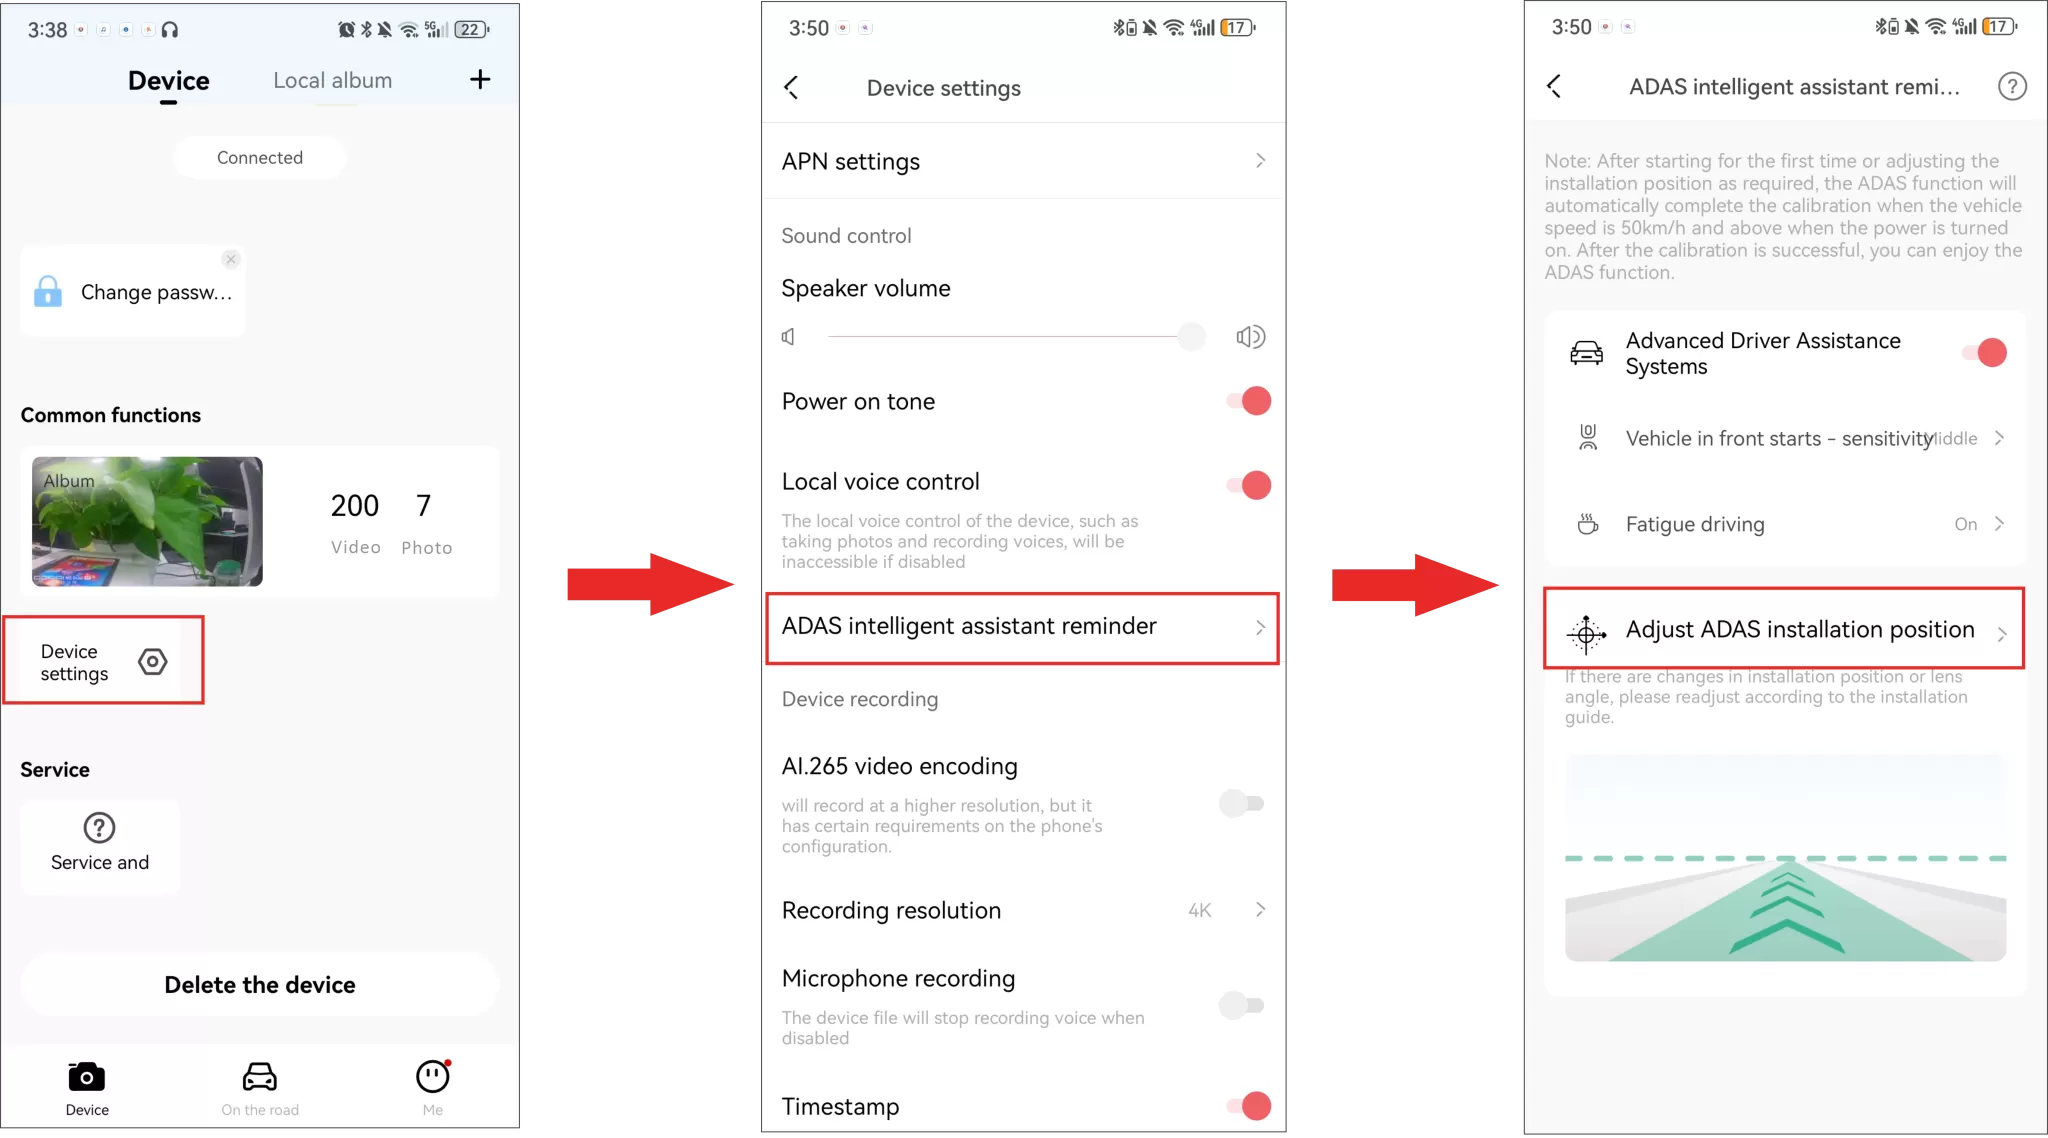
① Please refer to Chapter 3 App Connection to connect the Dash Cam to your mobile phone. Then launch the app, enter the preview interface of the DDPAI app, tap “Device Settings” > “ADAS intelligent assistance reminder” > “Adjust ADAS installation position”.
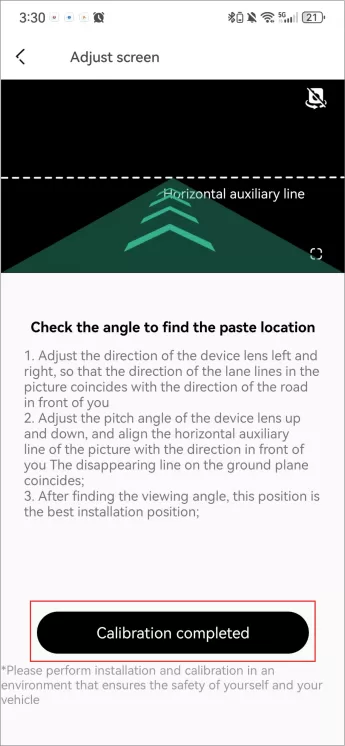
② Select “Go to live preview”>“Enter live preview”to enter the calibration interface. Then you will see the on-screen instructions to assist with installation, according which the installation position of the dash cam is located.
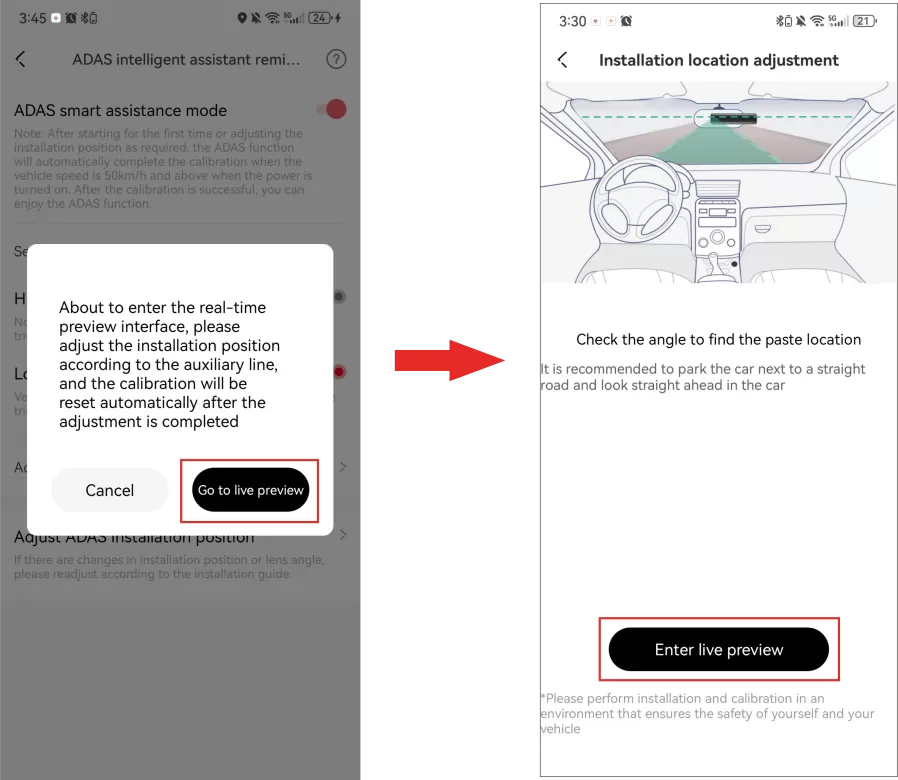
③ After completing the installation, tap “Calibration completed”.
Step 4: Stabilize the Dash Cam
① After determining the installation position of the Dash Cam, attach the electrostatic sticker to the installation position.
② Peel off the film of the 3M sticker on the bracket, and stick the bracket to the center of the electrostatic sticker.
Note:
Please pay attention to the direction and position when attaching the 3M sticker which is a disposable item. Please confirm that the recording angle of the Dash Cam is correct before attaching.
Step 5: Wiring
As shown in the following figure, please place the power cord from the cigarette lighter receptacle to the fixed position of the Dash Cam, and hide the power cord in the plastic guard plate of the car by using the crowbar.
Note:
The cigarette lighter receptacle might be positioned differently in your car. The figure above is provided for reference only.
- Connect the Fuse Box (Intelligent Hardwire Kitis Required)
This wiring method ensures neatness and beauty in the car, and enables parking monitoring function at the same time. However, the wiring process is complicated. To avoid vehicle damage due to improper operation, please have the installation completed at a professional automobile service shop.
Note:
The intelligent hardwire kit needs to be purchased separately or by purchasing a package including the step-down cable.
Connect the 4G-Cloud Box (Optional)
1. Install SIM card
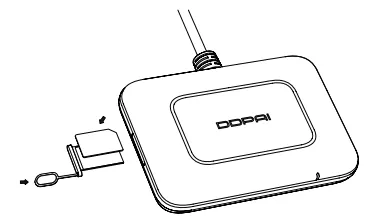
Use the included SIM ejector tool to remove the card tray, install the SIM card, and insert it back into the 4G-cloud box.
2. Connect the 4G-box to the dash cam
- Connect the Type-C female connector of the 4G-cloud box tothe USB power cable or intelligent hardwire kit.
- Connect the Type-C male connector ofthe 4G-cloud box to the dash cam.
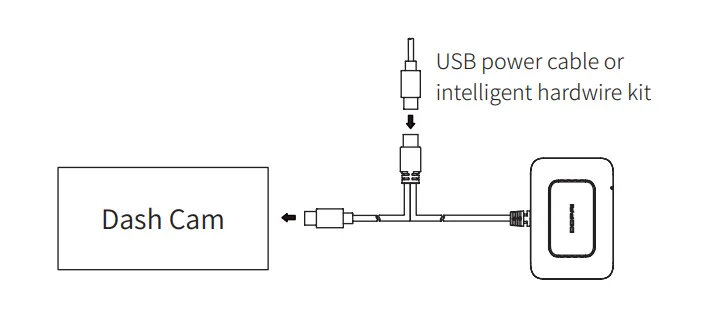
Note:
After a successful connection, the indicator on the 4G-box flashes green.
Connect the Rear Camera
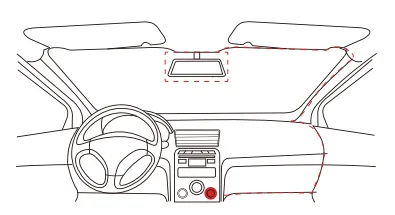
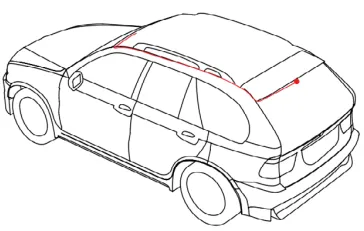
Step 1: Clean the rear windshield (the approximate installation position of the rear camera Is shown in the figure below).
Step 2: Connect the rear camera to the power cable (rear).
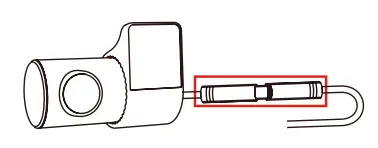
Step 3: Insert the rear power cable fully into the headphone jack.
Note:
Please make sure that the power cable is fully plugged into the jack, if not, the rear camera indicator will not on, and the rear camera will not work.
Step 4: Route the rear power cable from the Dash Cam to the rear camera, cable routing is shown in the figure above.
Step 5: Remove the red backing film of the adhesive sticker, and adjust the field of view of the rear camera, then fix the rear camera to the inner wall of the rear windshield.
Note:
Make sure to install the rear camera in the direction indicated on the sticker and make sure the lens is facing the rear windshield.
Downloading DDPAI App
Note:
As the app is constantly upgraded, the actual operation may be slightly different from the following description. Please connect your device to a phone according to the prompts in the DDPAI App.
Please scan the QR code below or search for “DDPai” in Google Play Store (Android) or App Store (iOS) to download the DDPAI App.

Bluetooth Connection
Step 1: Power on the device and follow the instructions on the screen as shown in the figure below.

Step 2: Power on the Dash Cam. Turn on the Bluetooth of your mobile phone.

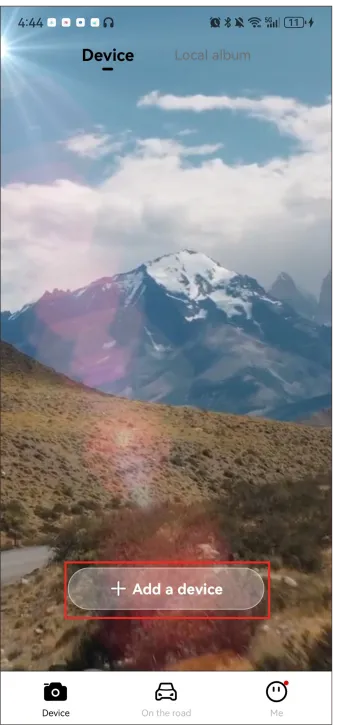
Step 3: Launch the DDPAI App, tap “Device”> “+ Add a device”.
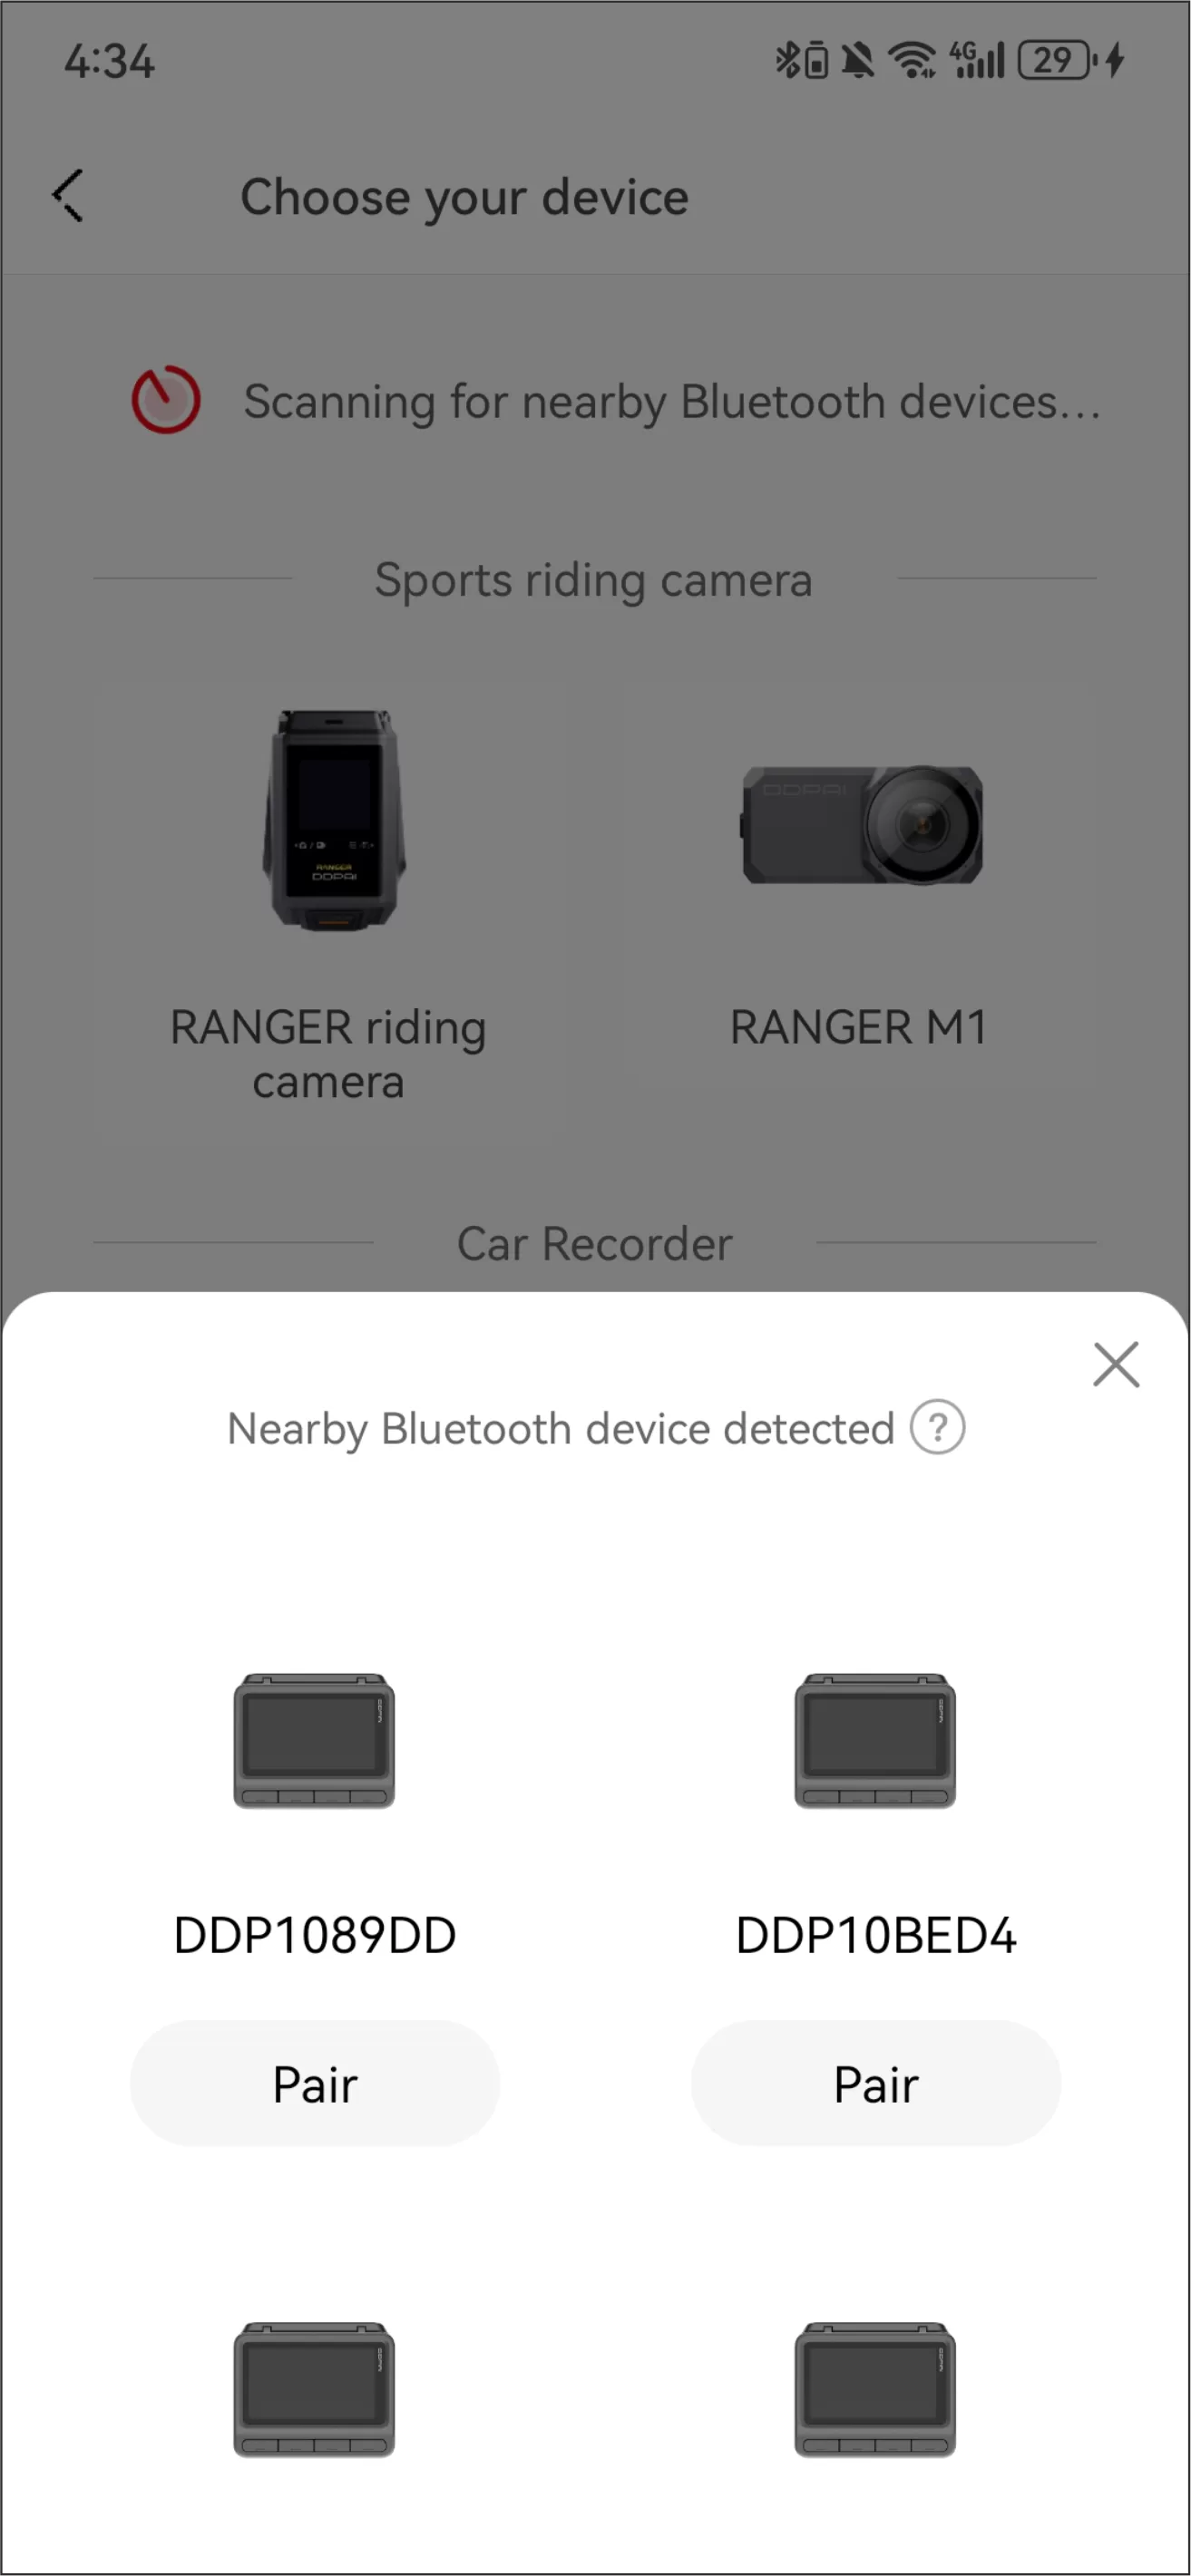
Step 4: Select the current device name (DDP10XXXX) in the detected Bluetooth device list.
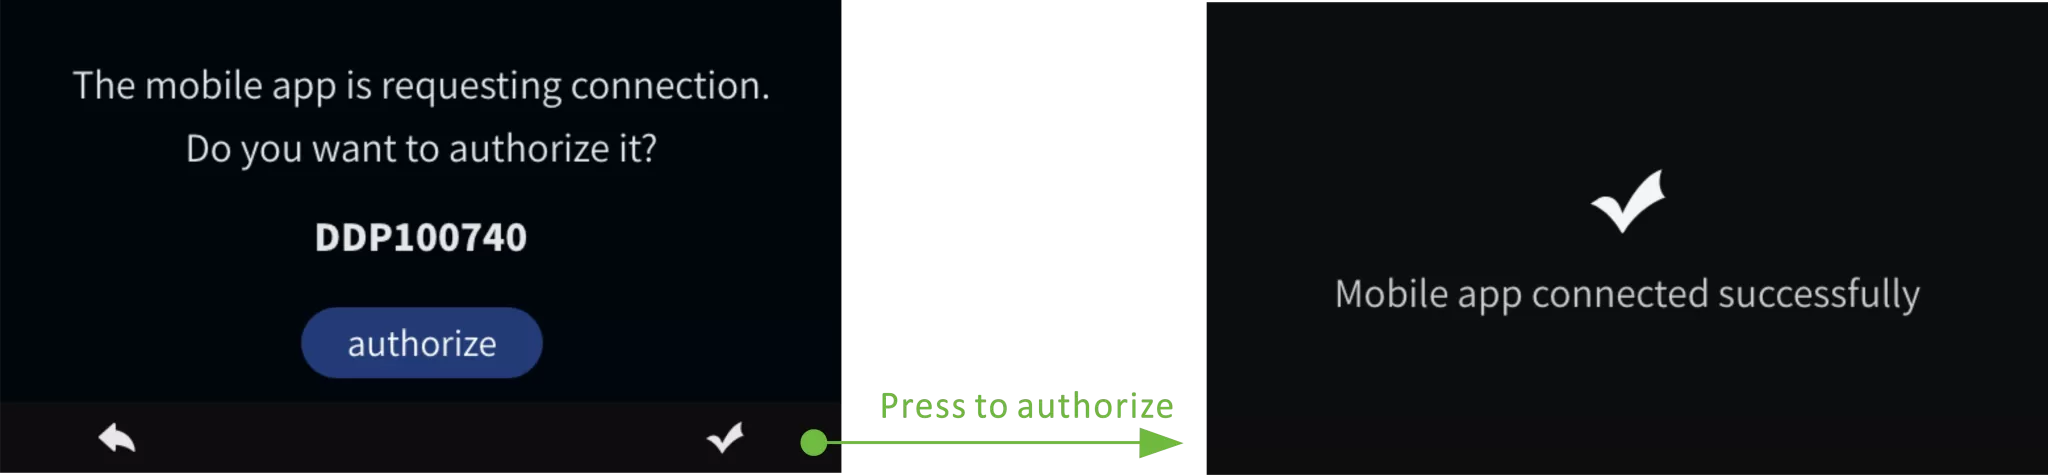
Step 5: Press the confirm button on the far right of the device to authorize.
Note:
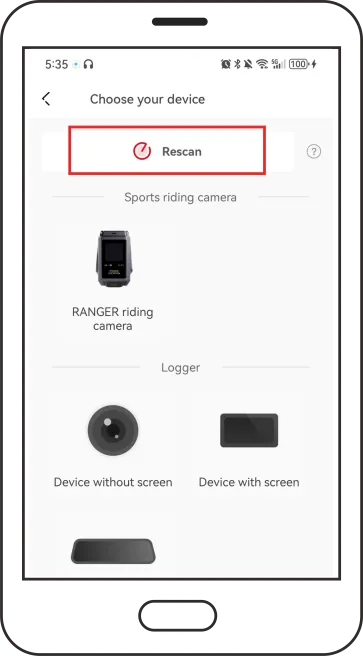
If you fail to search the Bluetooth device, you can tap “Rescan” to search for the Bluetooth device again.
Notes:
- The device can only connect to one phone at a time via Bluetooth.
- To connect a different phone, please either turn off Bluetooth on the currently connected phone, remove the device from the app, or reset the device to allow another phone to connect via Bluetooth.
Note:
After successfully connecting via Bluetooth, you need to connect to the camera via Wi-Fi to view the device album, adjust settings, or access the preview interface.
- For iPhones:
Step 1: Tap “Go to connection” > “WLAN”
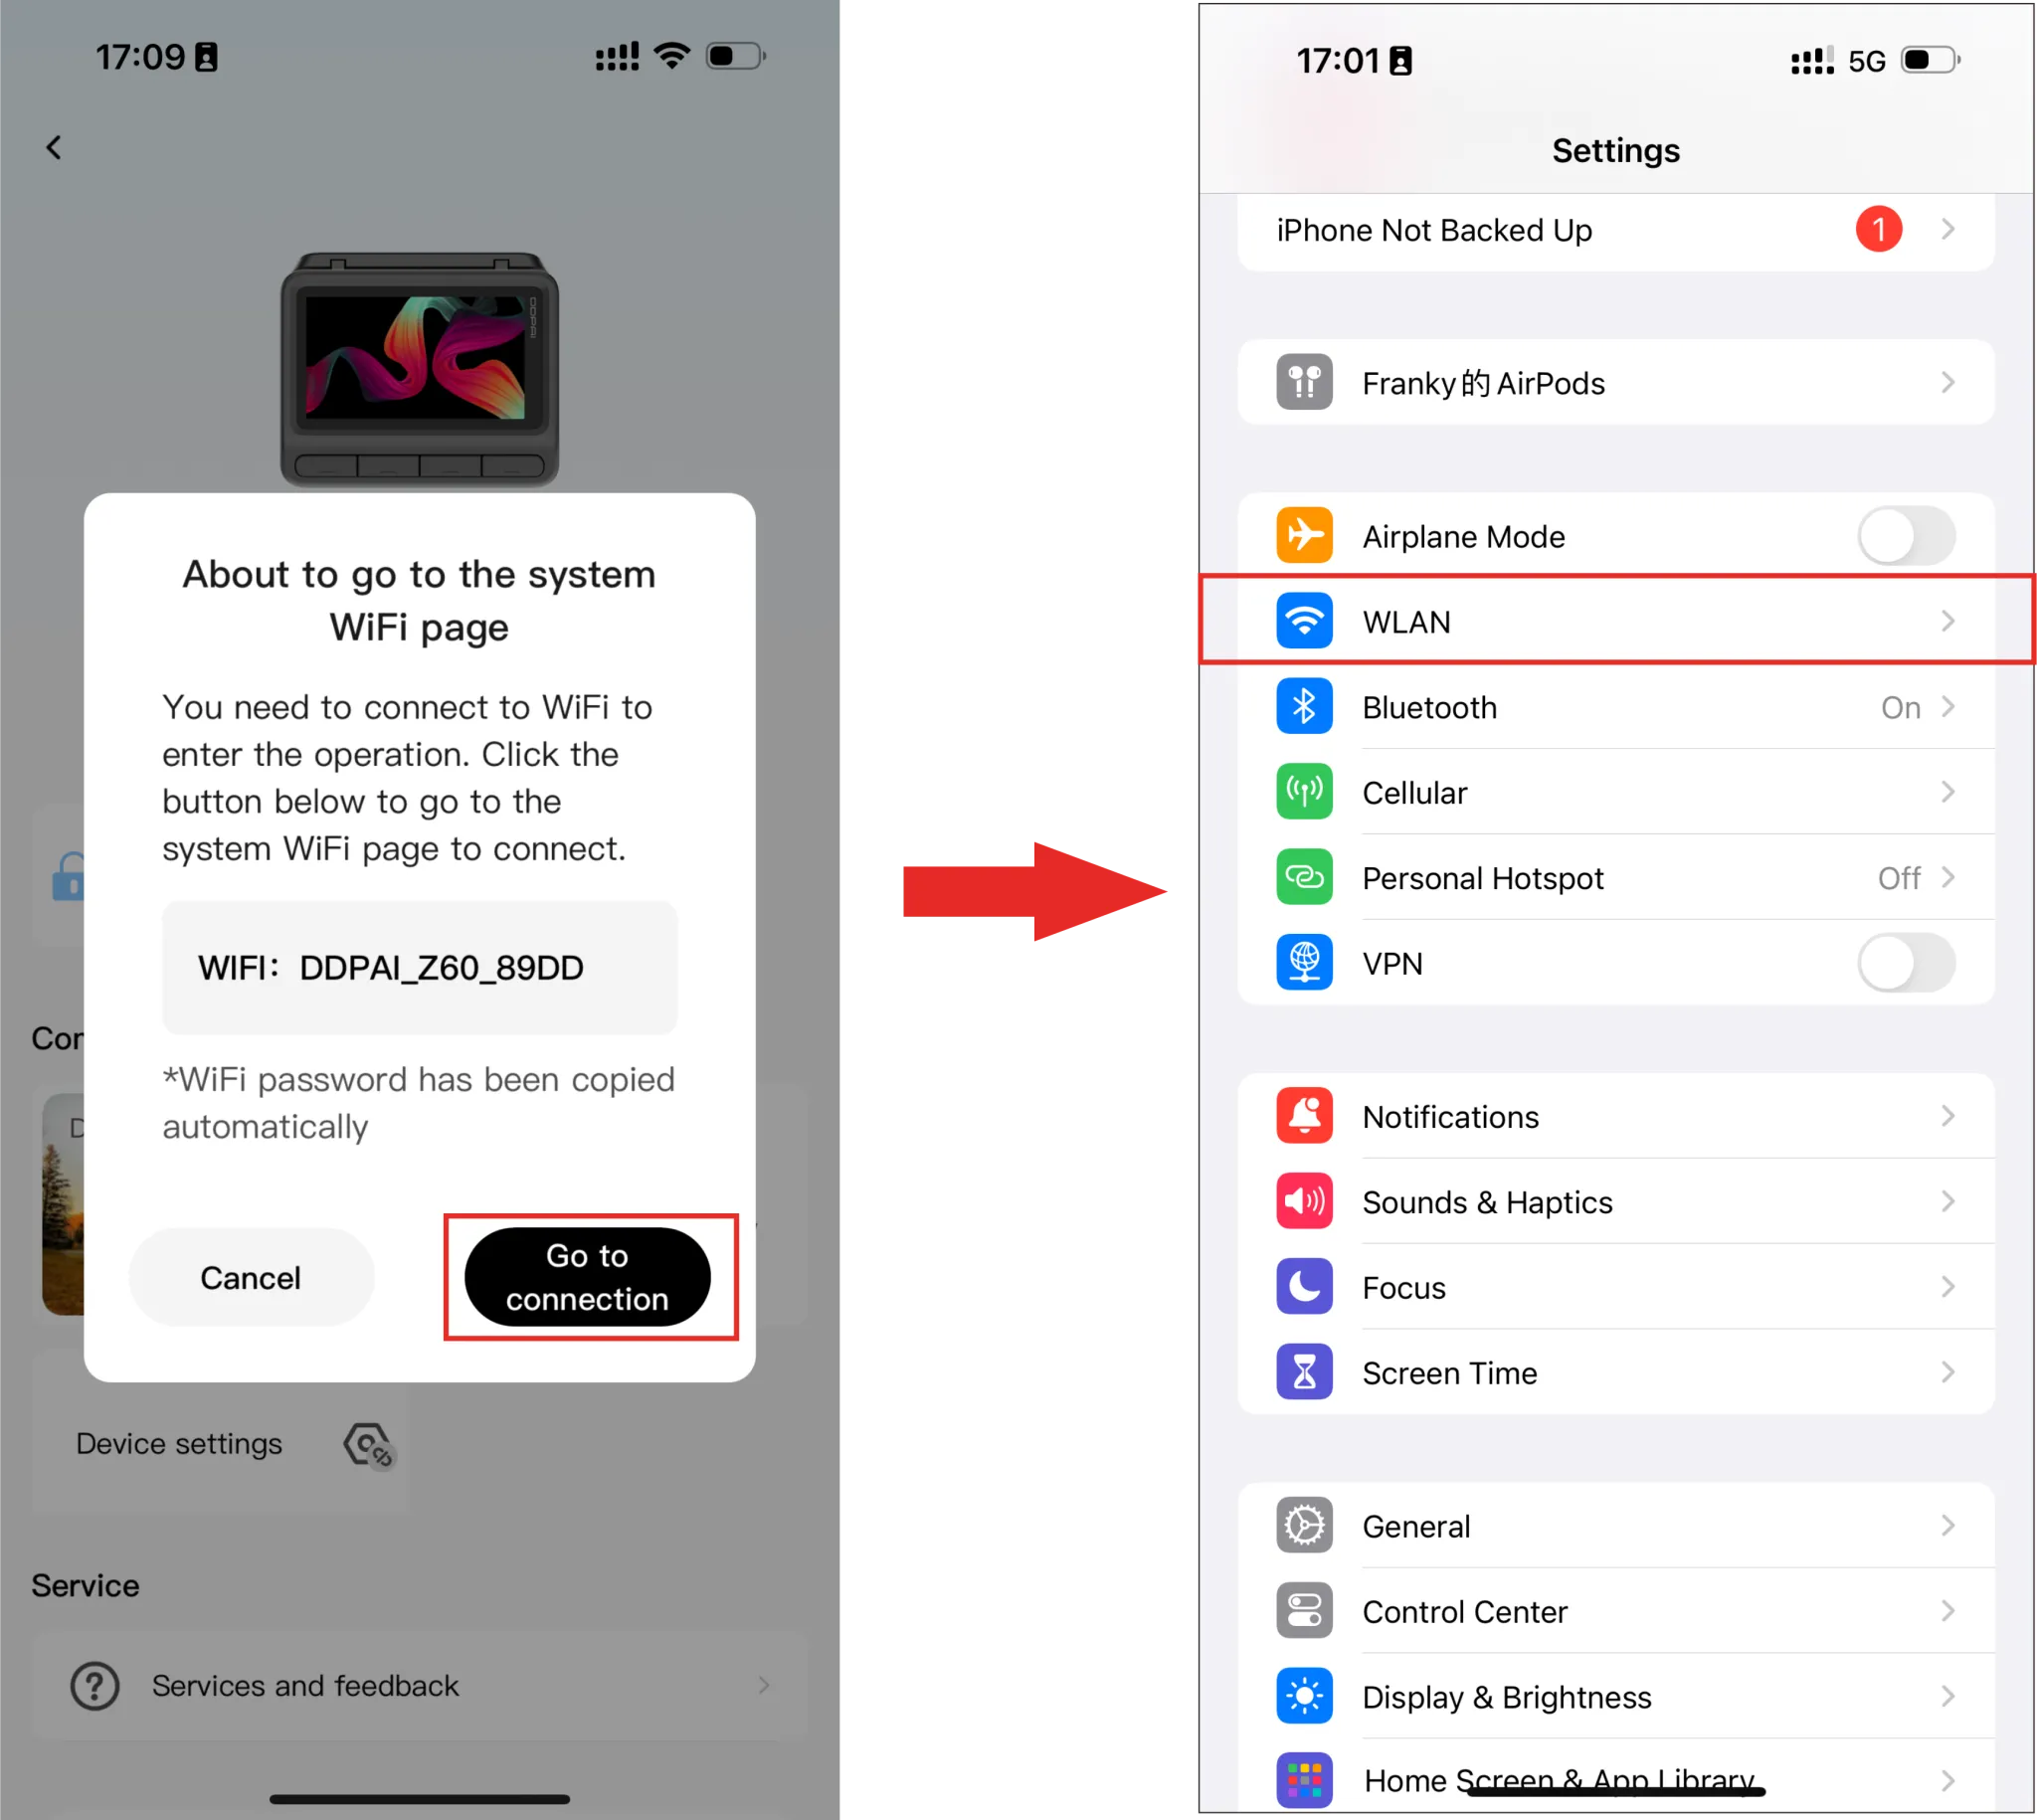
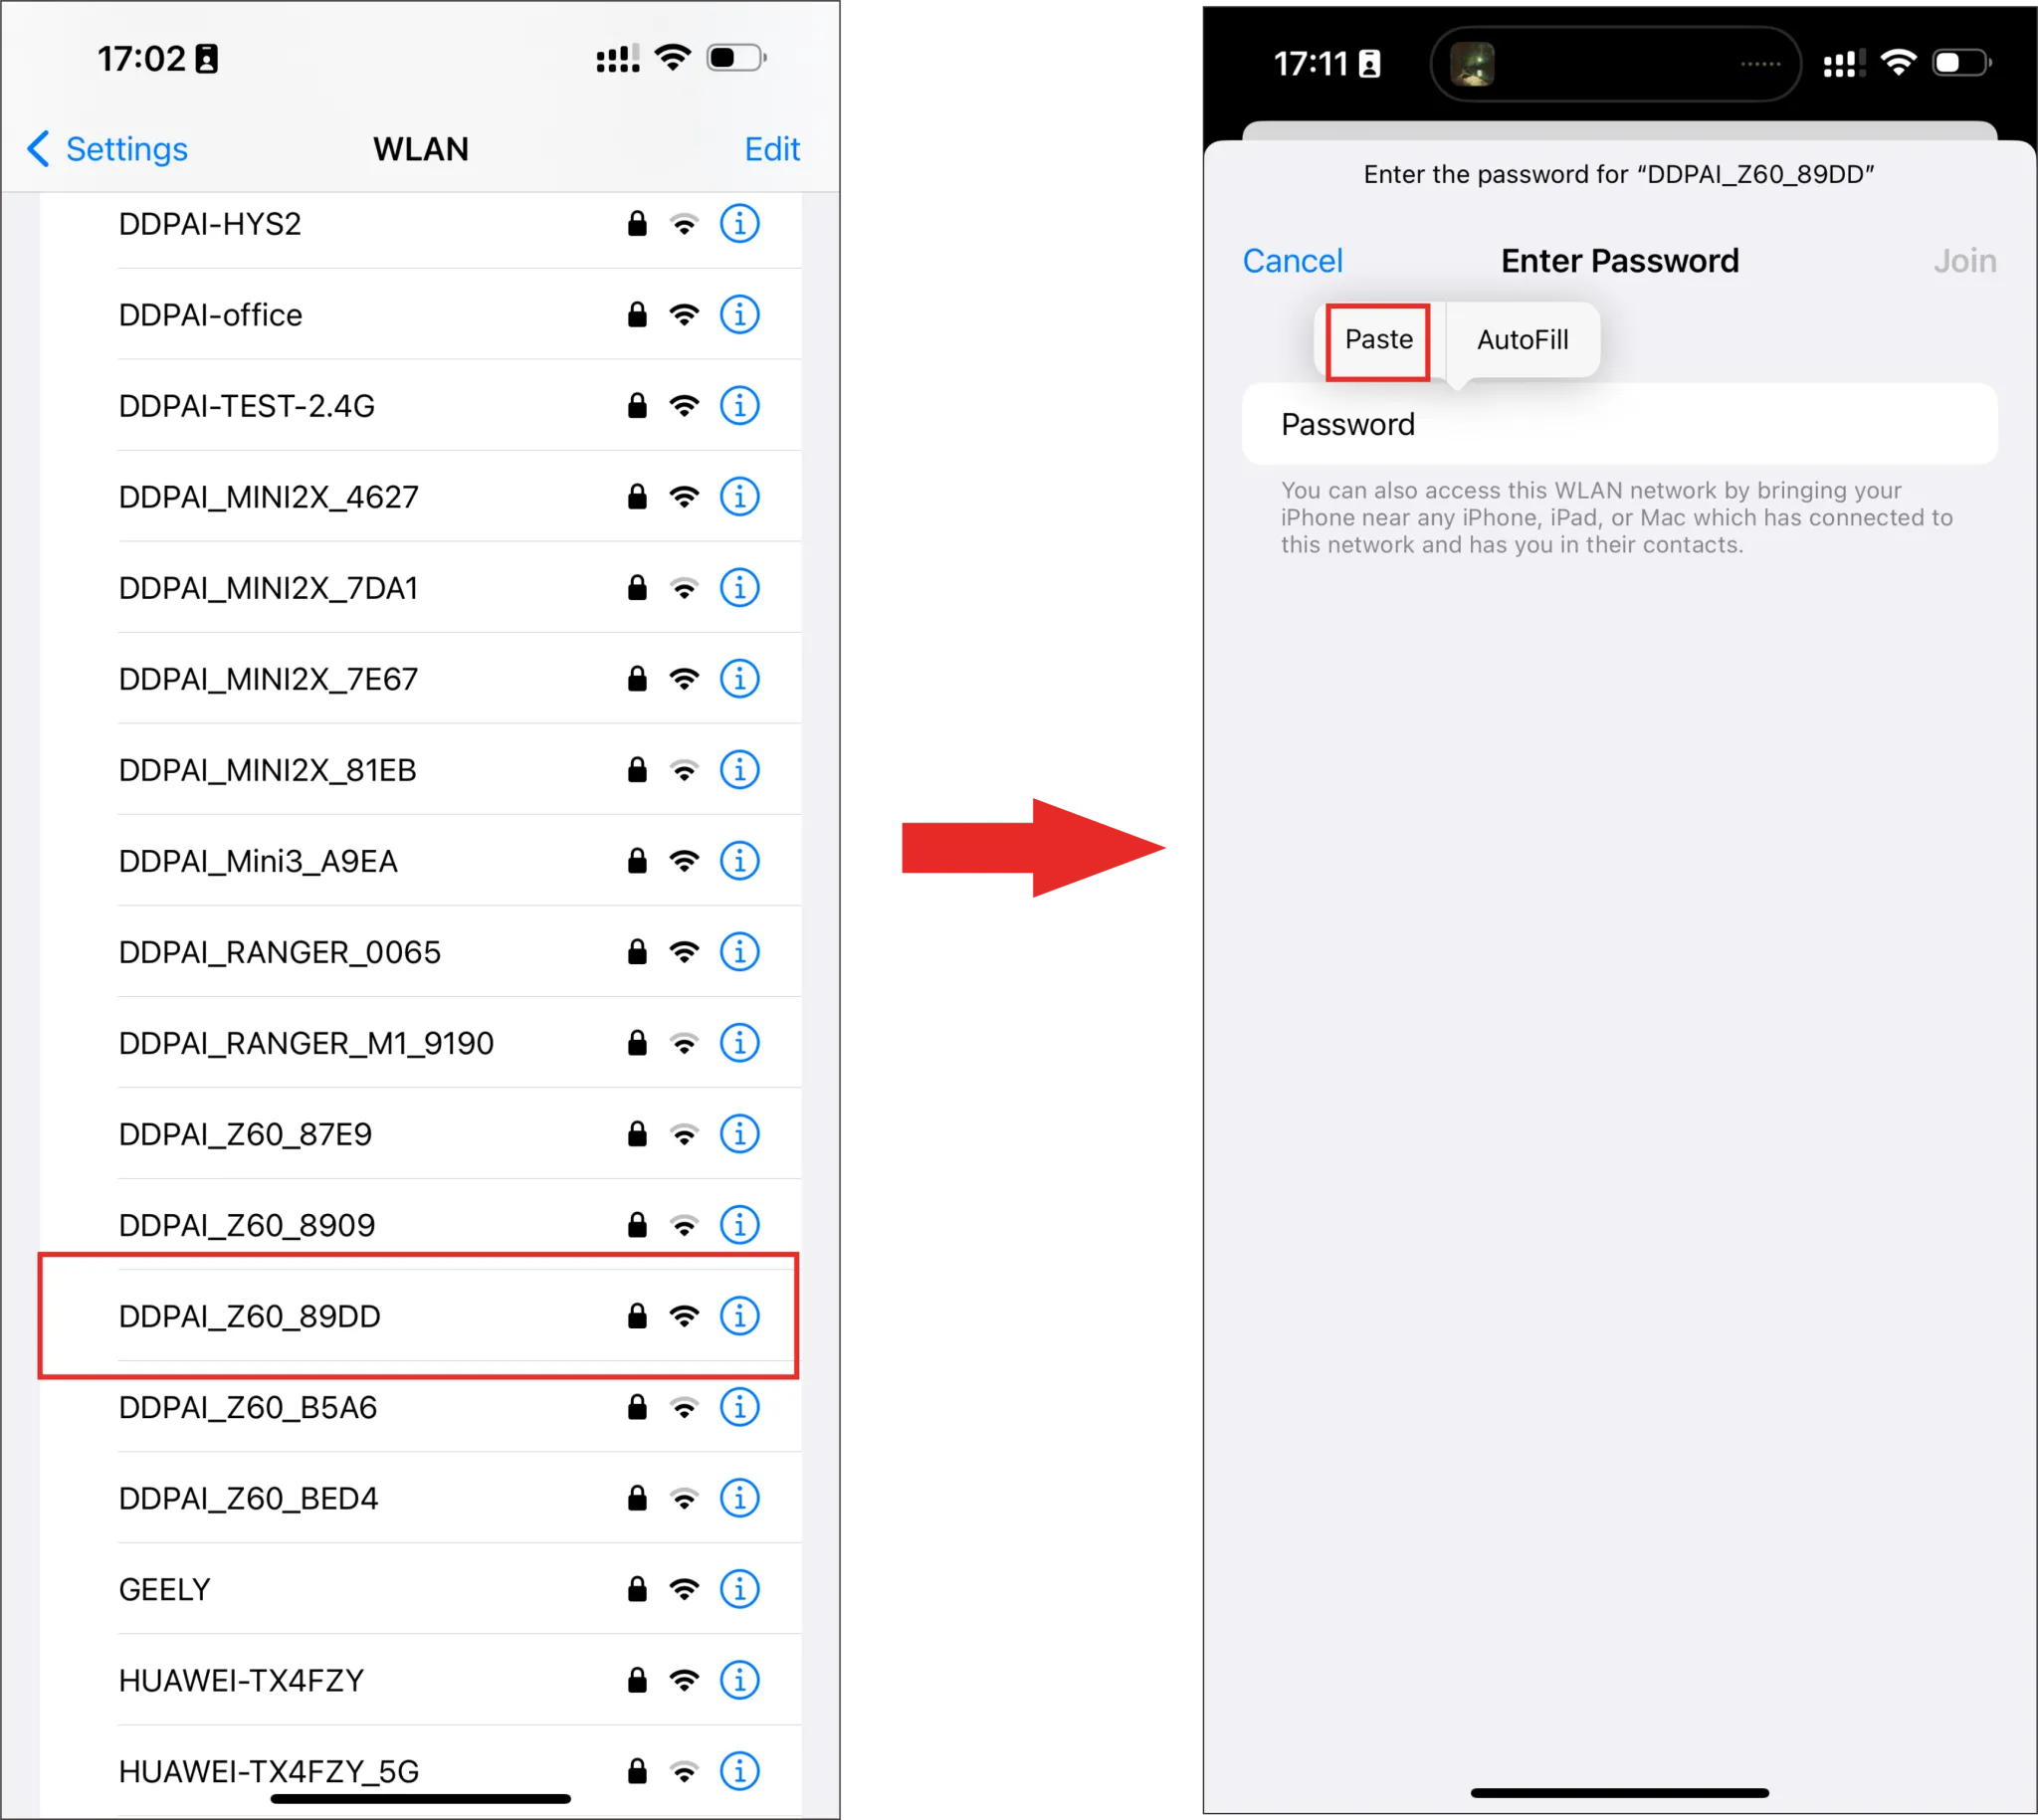
Step 2: Select the current device “DDPAI_Z60_XXXX”. Paste the password directly into the edit box, or choose to enter the password manually (default: 1234567890). They tap “Join”.
- For Android Phones:
If the Wi-Fi function is turned on normally, the system will automatically connect without the user having to manually connect.
Note:
If the Bluetooth connection fails, you can also select to connect the Dash Cam by using built-in Wi-Fi feature.
① Launch the DDPAI app, enter the “Device” page, tap “+ Add a device“, enter the “Choose your device” interface, and then tap “Device with screen“.

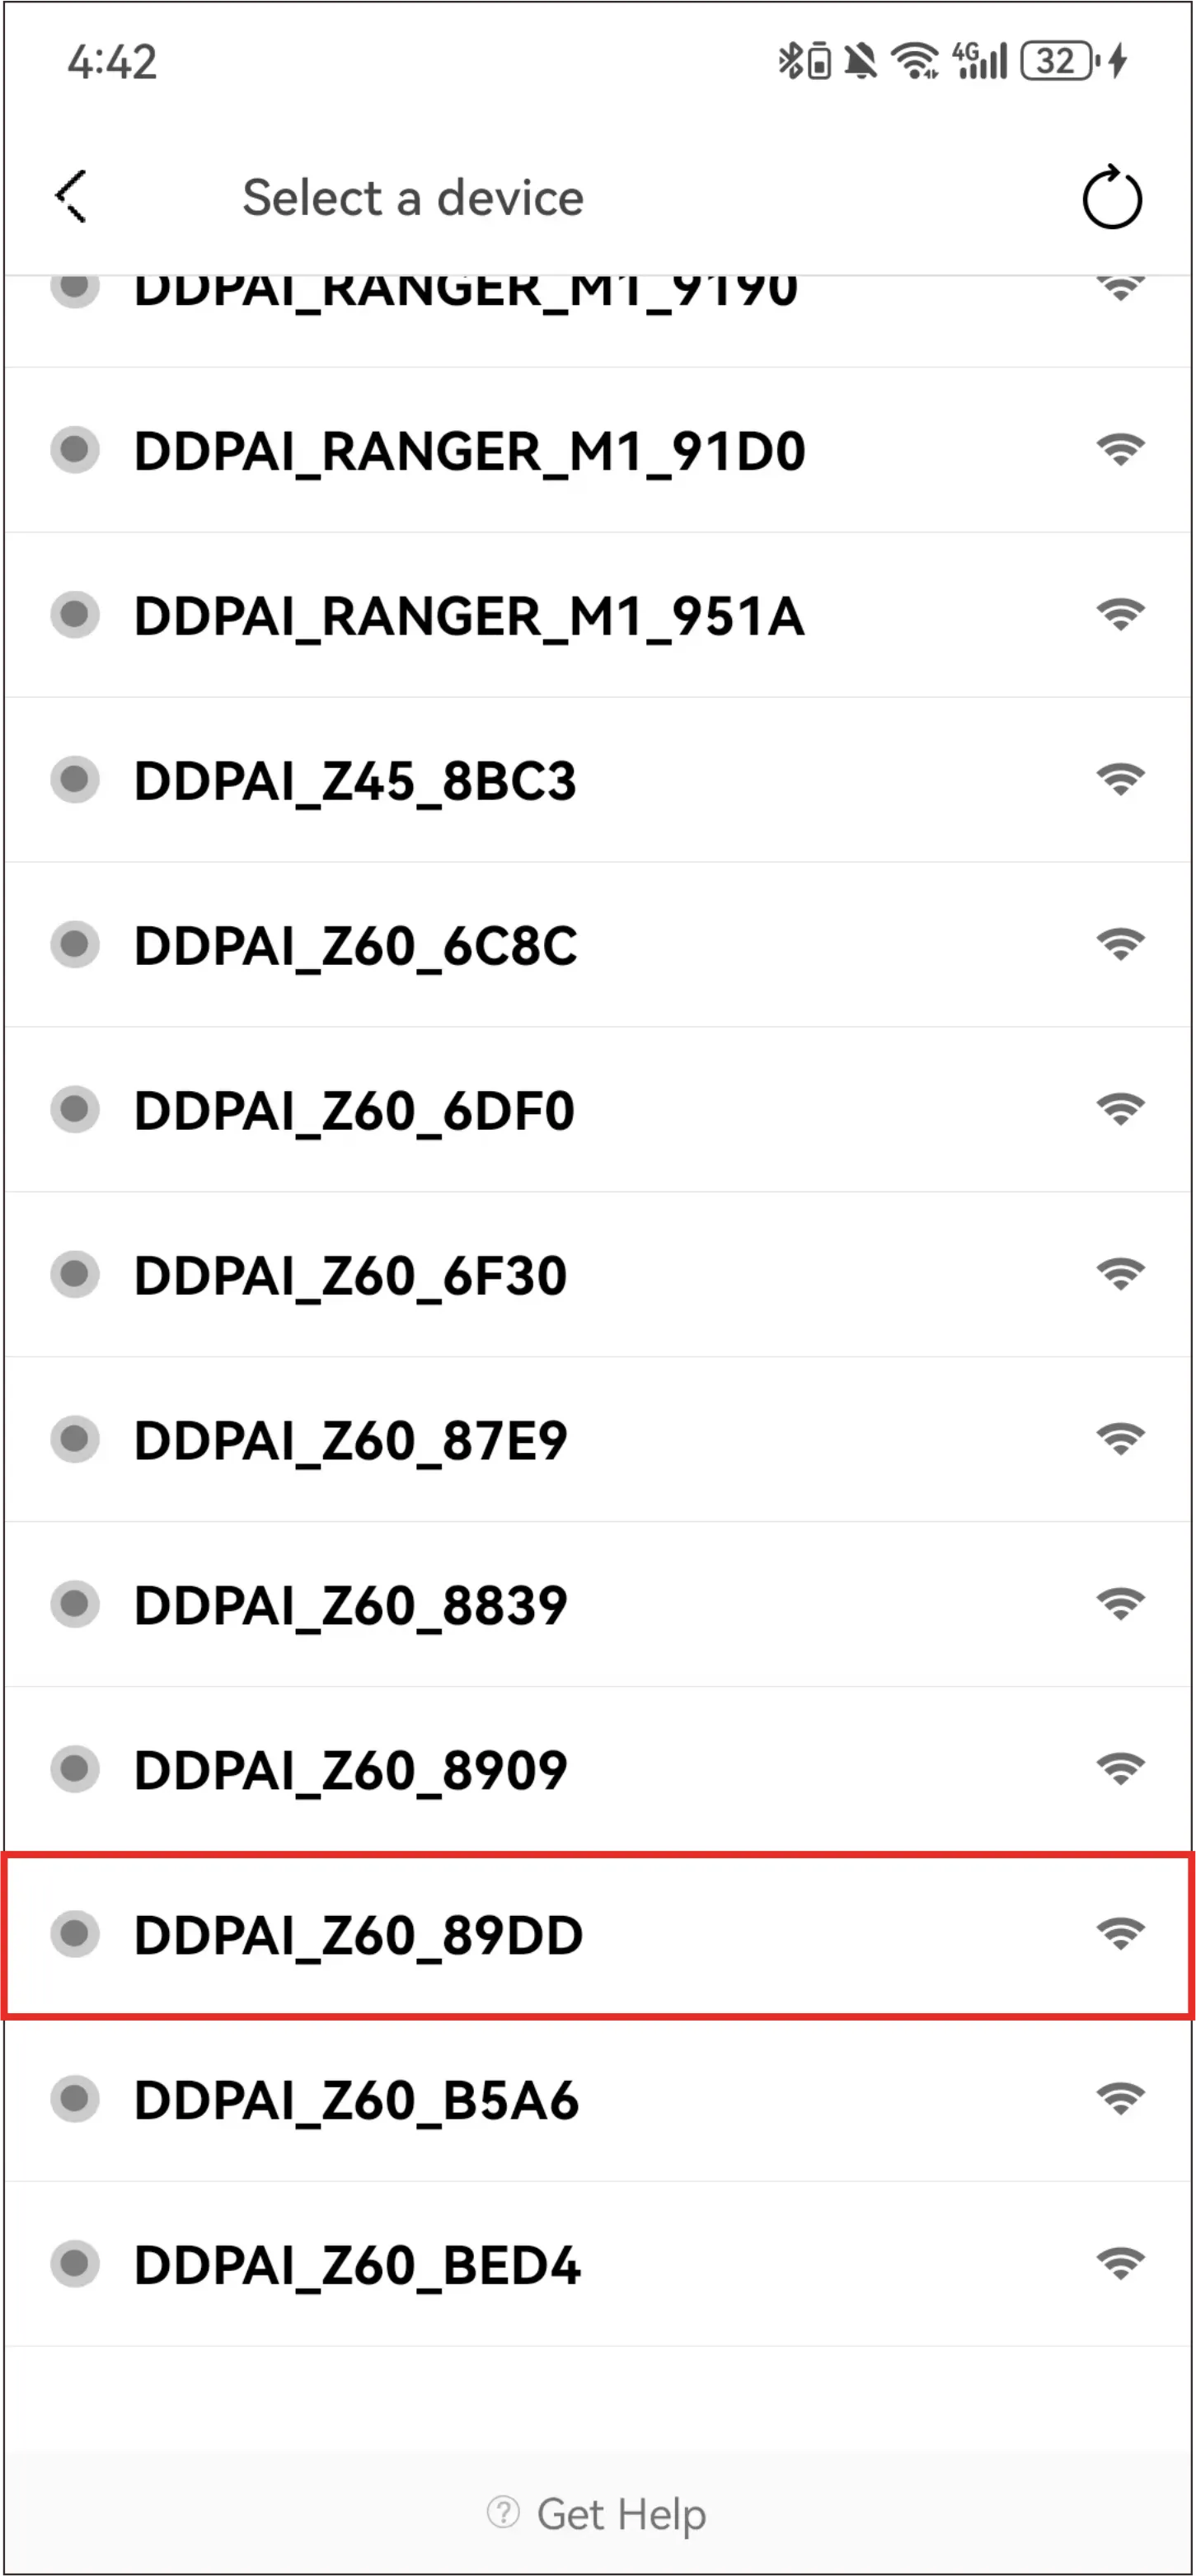
② Tap “Next” > “Connect to Wi-Fi” in turn, and the detected Wi-Fi of the Dash Cam will be displayed.

- For iPhone:When you enter the“Settings”interface, select “WLAN” > “DDPAI_Z60_XXXX“, enter the initial password (1234567890), and tap Join.

- For Android phones:In the Wi-Fi list, select “DDPAI_Z60_XXXX“, enter the initial password(1234567890), and tap Connect.
Device Interface Description
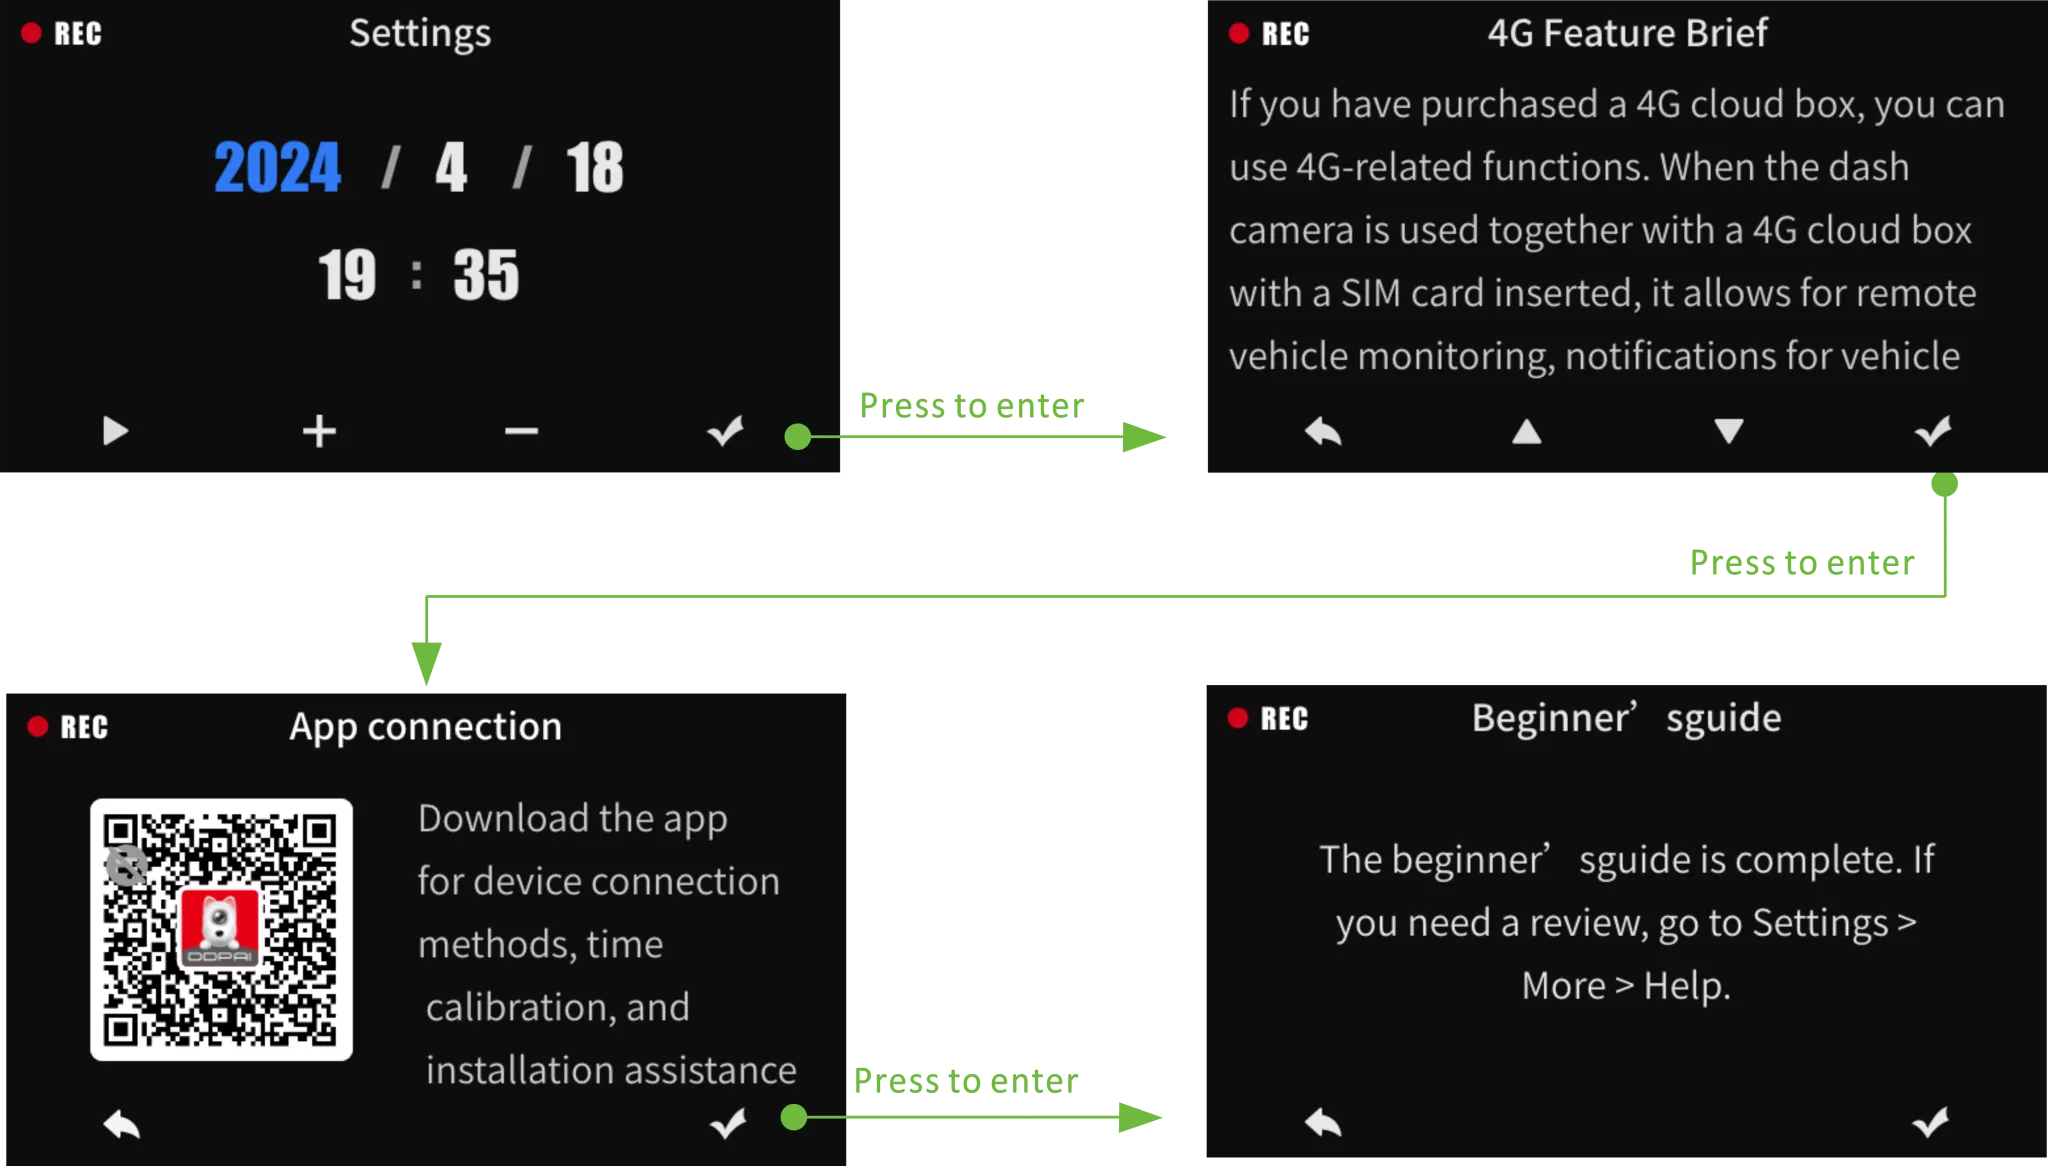
● Boot Screen
When the device is powered on, you will enter the boot screen. Please follow the instructions on the screen. For details of the app connection, please see Chapter 3 “First-time Connection”.
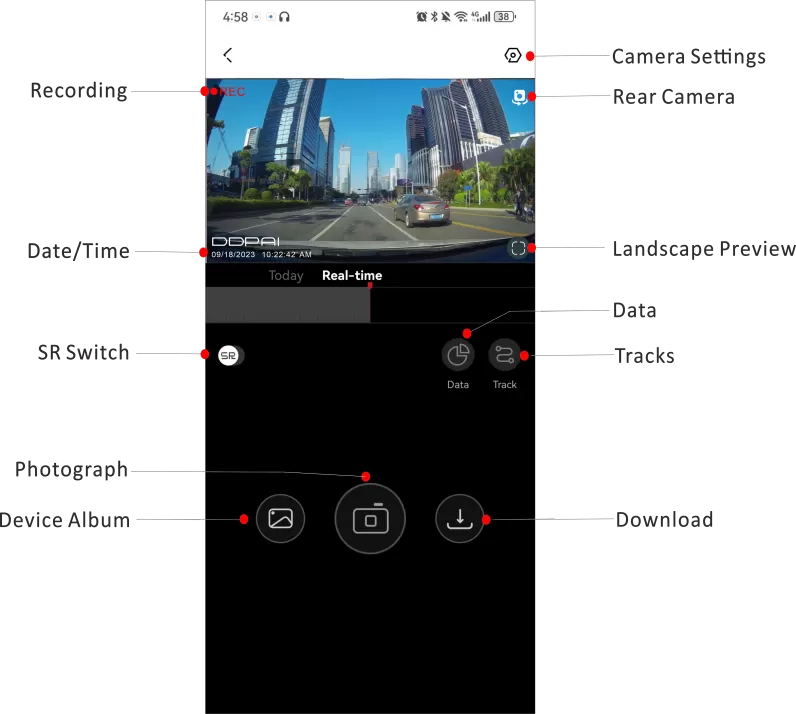
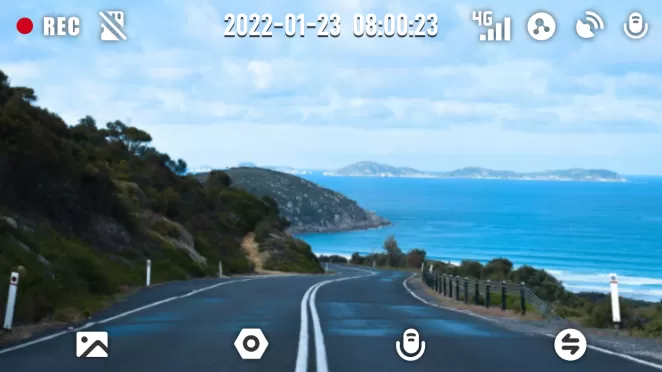
● Home Screen
After the device is powered on, you will directly enter the device main interface, which includes the top status bar, real-time preview area and function button area.
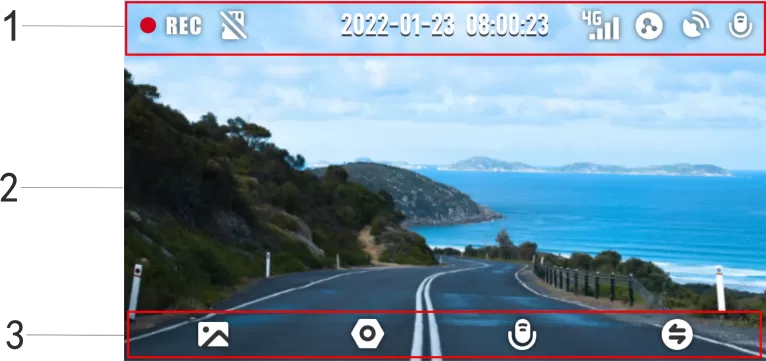
- Status bar: Displays recording status, date and time, 4G signal status, GPS, audio recording status, πLink networking status and other information.
- Real-time preview area: Plays the video recorded by the dash cam in real time.
- Functionbutton area: Press the corresponding function button to enter the album, settings, turn on/off recording,turn on/off the screen or switch lenses.
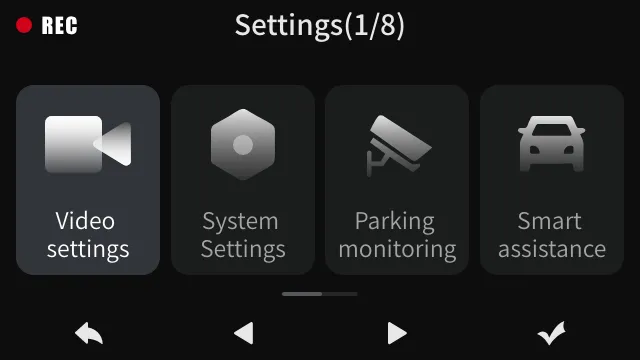
● Settings Interface
Press the ![]() (Settings) button on the main interface to enter the settings interface, where you can set various parameters of the recorder.
(Settings) button on the main interface to enter the settings interface, where you can set various parameters of the recorder.
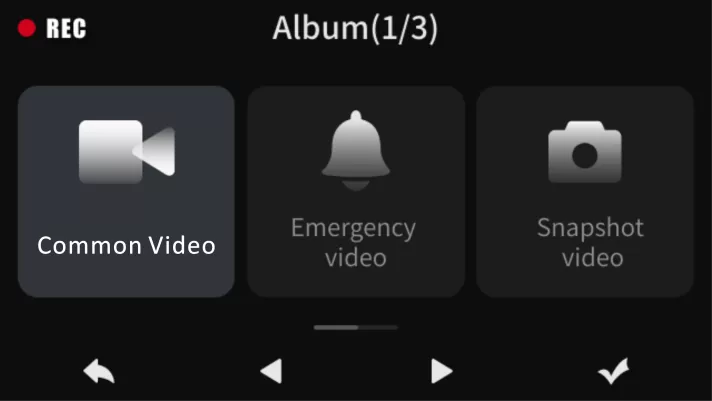
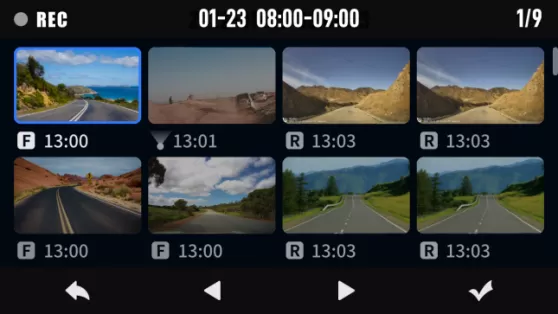
● Album Interface
Press the ![]() (Album) button on the main interface to enter the device album, where you can view all video or image files recorded by the dash cam.
(Album) button on the main interface to enter the device album, where you can view all video or image files recorded by the dash cam.
| Folder | Description |
| Common Video | All normally recorded video files will be saved in the “Common Video” folder. |
| Emergency Video | When the dash cam is in working state, if a collision is detected (such as emergency braking or collision of the vehicle), it will trigger the photo taking and generate an emergency photo and an emergency-related video. These files will be saved in the “Emergency Video” folder. |
| Snapshot Video | When you say “Take photo” to the dash cam microphone to photograph, the captured photo and the associated short video file will be saved in the “Snapshot Video” folder. |
Device Icon Description
| Displaying Area | Icon | Meaning |
| Top Status Area | Recording | |
| Not Recording | ||
 | Memory Card is Not Inserted | |
 | Abnormal Storage | |
| Date & Time | ||
 | 4G Signal | |
| GPS Positioning(Icon flashes) | ||
| GPS Positioning Successful (Icon stays on) | ||
| Recording is On | ||
| Recording is Off | ||
| Function Button Area |  | Album |
 | Settings | |
 | Recording Switch | |
 | Switch Lens |
Video Function
Note:
Due to the continuous update and upgrade of the app, the actual operation may be slightly different from the description below. Please follow the actual operation instructions in the app.
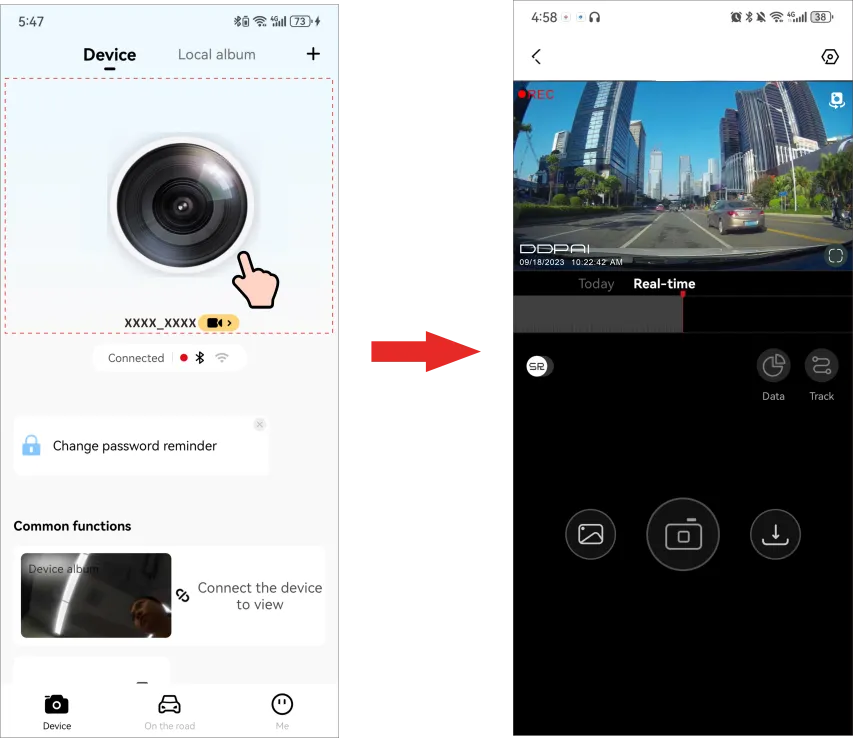
Tap on the product image displayed on the interface , and you can enter the preview interface directly.
● Preview video
Method 1: Preview the video on the device
Method 2: Preview the video on the app
After the app is successfully connected to the Dash Cam, enter the real-time preview interface, tap ![]() (Landscape Preview) or rotate your mobile phone horizontally (Your phone’s auto-rotate function needs to be turned on), and the real-time screen will automatically switch to the full-screen preview mode.
(Landscape Preview) or rotate your mobile phone horizontally (Your phone’s auto-rotate function needs to be turned on), and the real-time screen will automatically switch to the full-screen preview mode.
Note: It is currently in preview quality and can be viewed in HD quality by downloading.
● Playback video
Method 1: Playback the video on the device
Press the ![]() (Album) button to enter the album interface, and select the video file to playback.
(Album) button to enter the album interface, and select the video file to playback.
Method 2: Playback the video on the app
- After the app is successfully connected to the Dash Cam,enter the real-time preview interface.
- Drag the progress bar to select the time starting point to view.
- Tap the thumbnail or wait for 5 seconds to start playing the previously recorded video.
Note: Time progress bars of different colors represent different video types, please refer to the table below for reference.
| Color-coded timeline | Description |
| The video is triggered by an emergency event (such as a sudden braking or collision of a vehicle) | |
| The video is recorded in parking monitoring mode |
● Download video
- Method 1
- Drag the progress bar to select the time starting point to download.
- Tap
 to enter the downloading interface.
 - Tap“Complete”to complete the download. The file will be saved to the local album and can be shared and deleted.
Note:The length of each video ranges from 5 seconds to 3 minutes.
- Method 2
- Tap
 on the “Device” interface.
 - Hold the video/photo file you want to download to enter the selection state.
- Select the video file you want to download and tap Download.
Taking Photos
This Dash Cam supports the following photographing modes:
- Collision sensing photography: The Dash Camwill automatically take pictures when it senses the collision or emergency braking of the vehicle.
- Manual photographing:Enter the preview interface, tap
 to take a photo.
 - Voice photographing: Say “Take photo” to the Dash Cam MIC, and the camera will generate a photo and a related short video (when the “Duration of consecutive videos during shooting”function is enabled ).
Note:
Collision sensing photography and voice photography will generate associated videos (default duration 10 seconds) at the same time as taking photos. The photos and associated videos will be saved in the “Snap”/”Emergency” tab in the “Device Album” interface.
● View photos or videos on the device
After connecting the Dash Cam to the mobile phone, launch the DDPAI App. Tap“Device Album” on the “Device” interface, and you can view the captured photos and videos on the Dash Cam.
Note:
The video and photo files are stored in the recorder’s storage memory and are not downloaded to your mobile phone. Please connect to the Dash Cam to your mobile phone through the DDPAI App to view or download these files to the local album.
● View photos or videos on your phone
When the captured photos/videos on the device are downloaded to the local album of your phone, they will be moved to the mobile phone for storage, and can be viewed without connecting the mobile phone to the Dash Cam. Launch the app and tap the “Local Album” tab of the “Device” interface. Then you can view photos or videos downloaded to your phone.
Automatically download snapshot/emergency files:
You can choose to automatically download snapshot/emergency files to the local album after connecting the device. Launch the app, tap “Me” > “APP Settings”, and enable “Automatically download snapshot files” / “Automatically download emergency files” function.
Parking Monitoring
When you select the intelligent hardwire kit to take power, the parking monitoring function can be realized. After the vehicle is turned off, the Dash Cam will automatically enter the parking monitoring mode. If an emergency occurs, the Dash Cam will automatically take a photo and generate a related video. You can set the parking mode and vehicle battery protection voltage value.
① After the mobile phone is connected to the Dash Cam, launch the app, and tap “Device Settings” > “Enter after the vehicle has stalled”.

② Select the parking monitoring mode.
Parking Mode: Time-lapse video recording
- After the car is turned off, it will enter the time-lapse recording. It will shut down after reaching the set time or detecting low voltage. After shutting down, it can only be awakened by starting the ignition.
- If a collision occurs during the time-lapse recording,the device will take a photo (the file name starts with “G” and ends with “X”) and record the collision event (a prompt sound will be emitted when the ignition is turned on next time), then switch to normal video recording mode, and switch back to time-lapse recording after recording for 2 minutes.
- Thenight vision mode (AI-ISP technology) will be automatically turned on in time-lapse recording mode to ensure clearer night parking recording images.
Parking Mode: Normal video recording
Normal recording will be maintained after the car is turned off. It will shut down after reaching the set time or detecting low voltage. After shutting down, it can only be woken up by the ignition.
Parking Mode: Sleep
- After the car is turned off, it enters thesleep state. If a collision occurs, it enters the wake-up recording mode, performs 30 seconds of normal recording, and then continues to sleep. It shuts down after detecting low voltage. After shutting down, it can only be woken up by ignition.
- If a collision occurs again during normal video recording, a photograph is taken (file name starts with “G” and ends with “L”); if collisions continue to occur, when the normal recording lasts for 2 minutes, it switches to time-lapse recording; during time-lapse recording, if there is no collision within 30 seconds, it will re-enter sleepmode. If there are continuous events triggered, time-lapse recording will continue, and there is no limit on the working time. The low-voltage protection of the step-down cable is used to ensure that the battery is not fed.
Note:
The parking monitoring mode needs to be realized by the intelligent hardwire kit (optional).
Collision Detection & Locked Videos
When the Dash Cam is in working mode, when a collision is detected (such as a sudden braking or collision of a vehicle), it will generate an emergency photo and an emergency-related video, and store them separately. These files will not get deleted by loop recording function.
● Setting Camera Sensitivity
The higher the sensitivity of the Dash Cam, the easier it is to trigger photographing/taking videos; The lower the sensitivity of the Dash Cam, the less likely it is to trigger photographing/taking videos.
The default collision sensitivity of the Dash Cam is “Medium”, and it supports the selection of collision sensitivity in seven levels: “High”, “Medium-high”, “Medium”, “Medium-low”, “Low”, “Off” and “Custom”.
Select the appropriate collision sensor sensitivity. In emergencies such as vehicle collision or sudden braking, the Dash Cam will be triggered to take pictures and generate an emergency photo and video. If you select “Off”, in emergency situations such as vehicle collision or sudden braking, there will be no photos and videos. You can switch the collision sensing sensitivity of the Dash Cam through the following steps.
①After the mobile phone is connected to the Dash Cam, open the app, enter the “Device” interface, tap “Device Settings” > “Adjust collision sensitivity”.
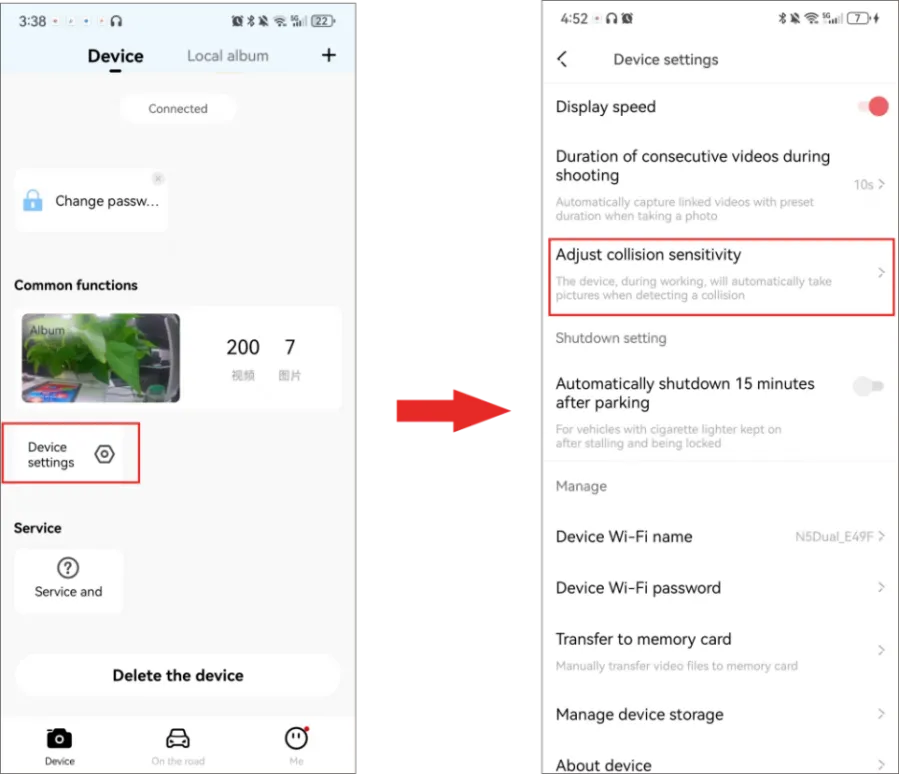
② Select “Driving” / “Parking” and set the appropriate sensitivity.
● Set the duration of related videos during shooting
The default related video duration of the Dash Cam is “10s” and supports 3 options: “10s”, “20s”, and “30s” . You can follow the steps below to set the duration of related videos during shooting.
①After the mobile phone is connected to the Dash Cam, launch the app, enter the “Device” interface, tap “Device Settings” > “Duration of related videos during shooting”.
② Set the duration of the short video according to your needs.
- 10s: After the Dash Cam detects a collision, it will generate an emergency related video of 5 seconds before and after the shooting time.
- 20s: After the Dash Cam detects a collision, it will generate an emergency related video of 10 seconds before and after the shooting time.
- 30s: After the Dash Cam detects a collision, it will generate an emergency related video of 15 seconds before and after the shooting time.
- Off: After the Dash Cam detects a collision, it will still generate an emergency related video of 5 seconds before and after the shooting time.
SR Mode
The Dash Cam has a built-in SR function, which can overlay driving data into the real-time preview/playback footage and generate an exclusive cool video, giving you a better visual experience.
● View the Real-time SR effects
1.When the Dash Cam is connected to the DDPAI App, launch the app and tap on the area outlined by the dotted line (refer to the figure below), you can enter the preview interface directly
 2. There is an”SR” switch in the lower left corner of the preview screen. After turning it on, you can view the real-time SR effects on the screen.

Note:
What you see on the preview interface is the real-time SR effect, not the final SR effect.
3. You can also tap “Data”to view the detailed data.
● Generate and Share SR Videos
- Launch the app, tap “Local Album”, select the video you need to share, and then turn on the “SR”switch in the lower-left corner of the screen to superimpose SR data in the video.

- Tap Share. You can then crop the video, customize it with SR effects and background music.
- Tap Confirmand you can share this video to social media platforms such as DDPai community, WeChat, Facebock, etc.
Note:
SR data is for reference only, and the accuracy of the data is closely related to the installation location of the Dash Cam.
GPS Function
The Dash Cam supports GPS function, and it is turned on by default.
When the dash cam is used in an outdoor open area, it can receive GPS signals. After the GPS signal is successfully located, the GPS information will be recorded in your recorded video. You can view various information such as time, speed, altitude, direction, and driving track in the DDPAI App.
Note:
GPS signal reception is affected in densely populated residential areas, underground parking lots, tunnels, and cloudy weather and etc.
● View Real-time Driving trajectory and Current Location
When the Dash Cam is connected to the DDPAI App, launch the app and tap the area outlined by the dotted line (refer the figure below), you can enter the preview interface directly.

On the preview interface, tap Track and you can view the driving trajectory and current location in real time.


● View All Recorded Driving Trajectory
Launch the app, tap “Me” > “Driving Score” to view all driving track records.

Notes:
- You need to log in to the DDPAI App before you can view the driving records.
- It is recommended that you enter the “Me”interface of the DDPAI App, select “Me” > “App Settings” > “Advanced Settings” and turn on “Allow to save the driving data”. The driving data will be stored in the cloud. If you change the phone or re-install the app later, the driving data can also be synchronized.

Advanced Driver Assistance System (ADAS)
Advanced Driver Assistance System (ADAS) supports the detection of changes in road conditions and provides you with driving reminders, including the voice reminder for the vehicle in front starting and the fatigue driving.
●Calibrate the Advanced Driver Assistance System (ADAS)
When ADAS is turned on for the first time, it needs to be calibrated to adapt to different models.
Step1: After connecting the DDPAI App to the Dash Cam, launch the app, tap“Device Settings”> “ADAS intelligent assistance reminder”> “Adjust ADAS Installation position”.
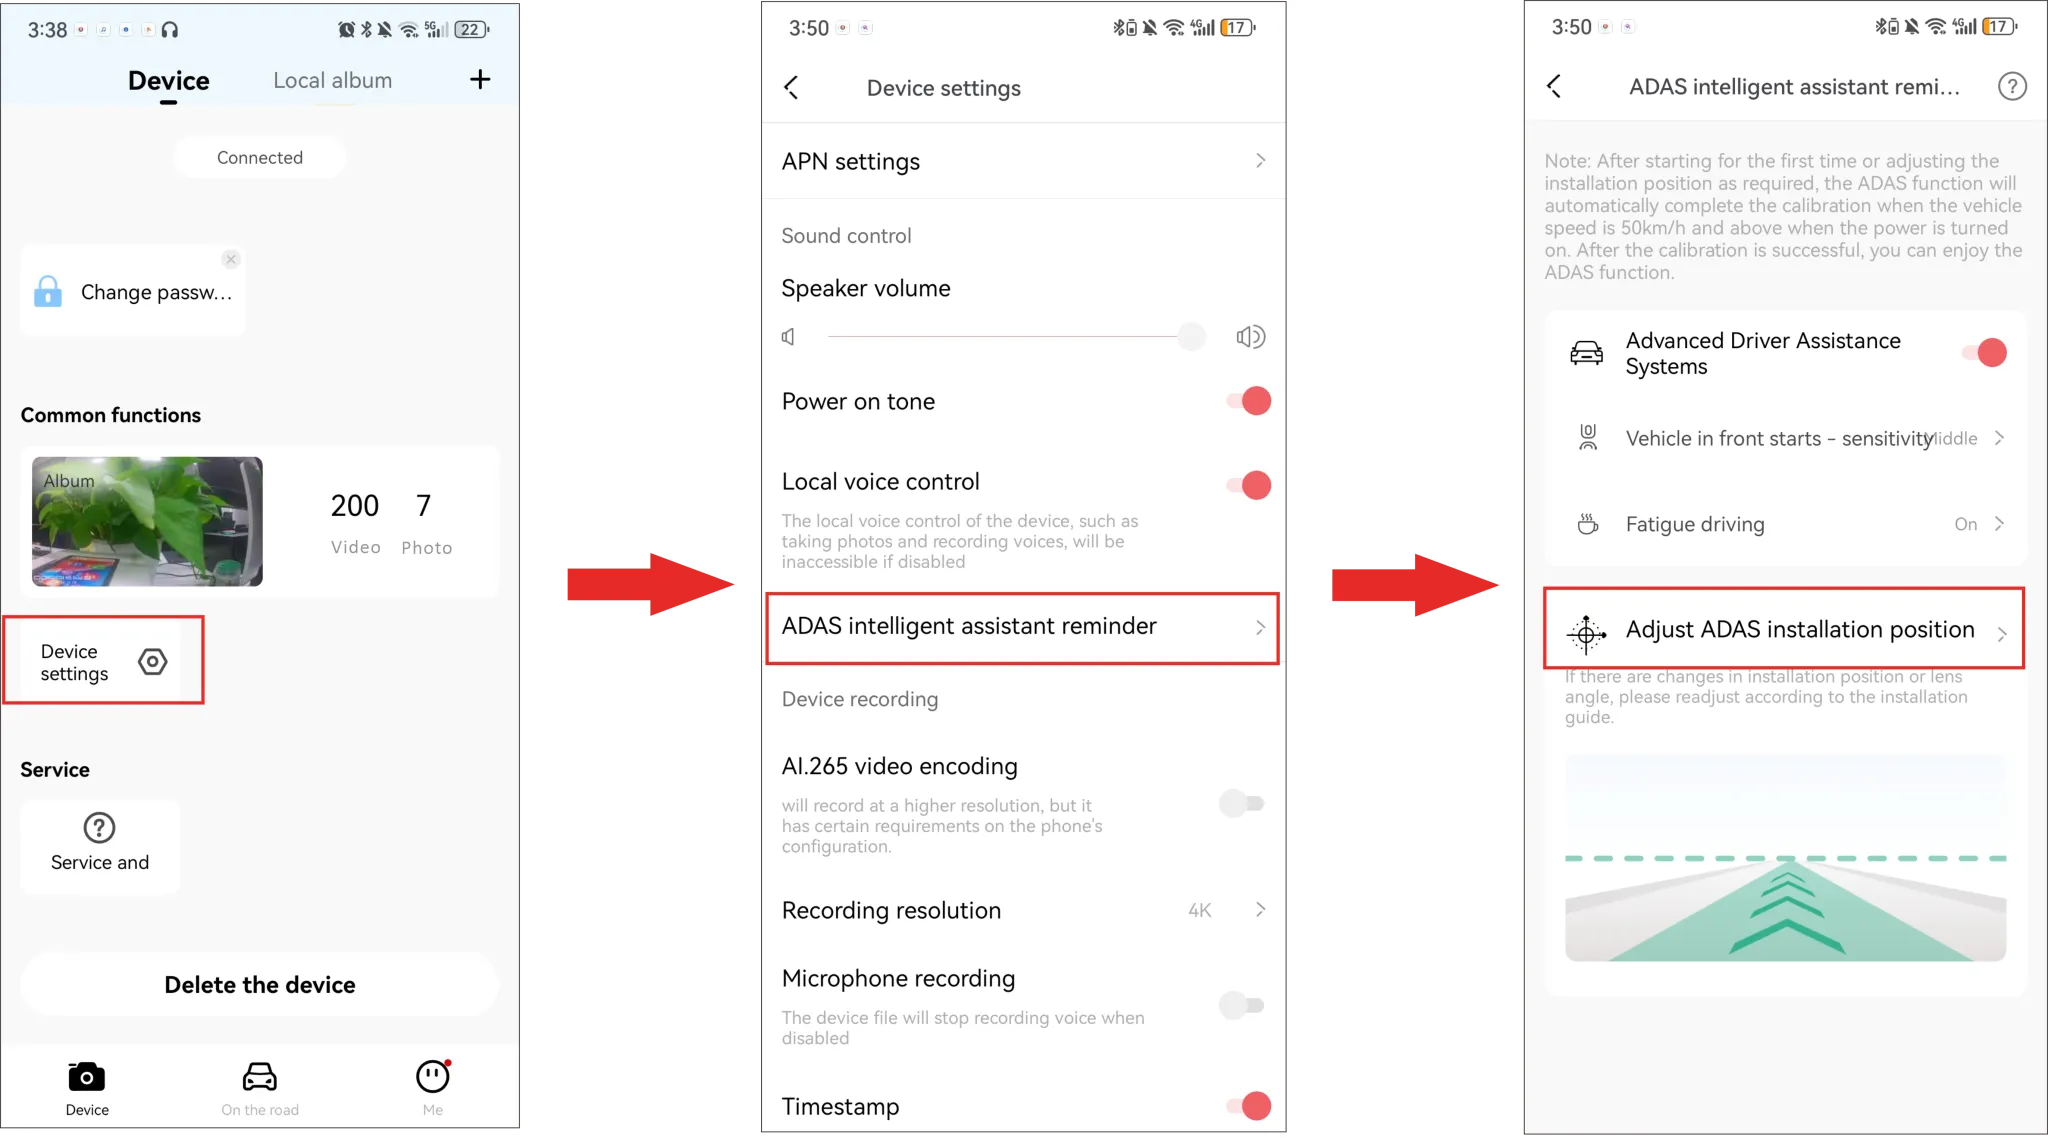
Step 2: Select “Go to live preview”>“Enter live preview”to enter the calibration interface.
Step 3: After completing the installation, tap “Calibration completed”.
Note:
In order to ensure a more accurate ADAS experience, when the Dash Cam installation position or lens angle changes, ADAS calibration needs to be re-calibrated.
●Enable the ADAS Function
After connecting the DDPAI App to the Dash Cam, launch the app, tap“Device Settings”, and turn on the “Advanced Driver Assistance System”switch.
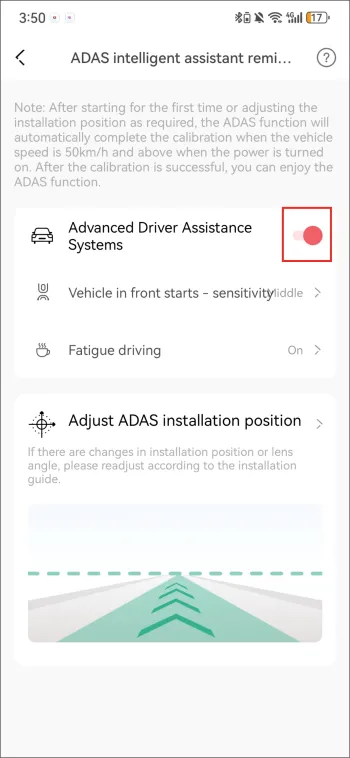
▷ Enable “ADAS Intelligent Assistance Mode”: You can set the sensitivity of intelligent driving assistance and choose to turn on/off the voice reminders for the front vehicle start and fatigue driving.
▷ Disable “ADAS Intelligent Assistance Mode”: No intelligent assistance voice reminders.
● Set the Sensitivity of ADAS
You can select to turn on/off the ADAS intelligent driving assistance, or set the ADAS intelligent driving assistance sensitivity.
When the Dash Cam is connected to the DDPAI App, tap “Device Settings” > “ADAS Intelligent Assistance Reminder”.
▷ ADAS Intelligent Assistant Reminder: High
The ADAS function is turned on. When the Dash Cam is in working condition, there will be corresponding voice reminders when the vehicle in front starts. Its alarm reminder range is wider, alarming in both high-risk and low-risk scenarios, making it easier to trigger alarms, making it suitable for novice drivers.
▷ADAS Intelligent Assistant Reminder: Medium
Moderate alarm range.
▷ADAS Intelligent Assistant Reminder: Low
The ADAS function is turned on. When the Dash Cam is in working condition, there will be corresponding voice reminders when the vehicle in front starts. Its alarm range is smaller and only warns in high-risk scenarios, making it suitable for experienced drivers.
● Set the Voice Reminder
Tap “Advanced settings” and choose to enable/disable the voice reminder for the fatigue driving.
Voice Reminder for Fatigue Driving: Enabled
When the user is driving, a smart voice prompt for fatigue driving will be given to remind the user to take a break or be more vigilant.
πLink Function
Z60 supports the πLink function, enabling multi-device interconnection. When you purchase two devices and successfully network them, you can view real-time recordings from both devices on a single mobile phone. Additionally, you can perform operations such as video playback and downloading.
● πLink Connection
Notes:
- The πLink function currently supports up to two devices to network at the same time.
- Please make sure that both devices are powered on normally before networking.
- During the networking process, the “PrimaryDevice” and “Secondary Device” are distinguished. The primary device is generally used as a front camera, and the secondary device is generally used as a rear When Z60 is networked with other devices, it defaults to a “Primary Device”.
1. Power on both devices.
2. Follow the steps below to add the two devices to the device list of the DDPAI app via Bluetooth.
① Turn on the Bluetooth of your phone.
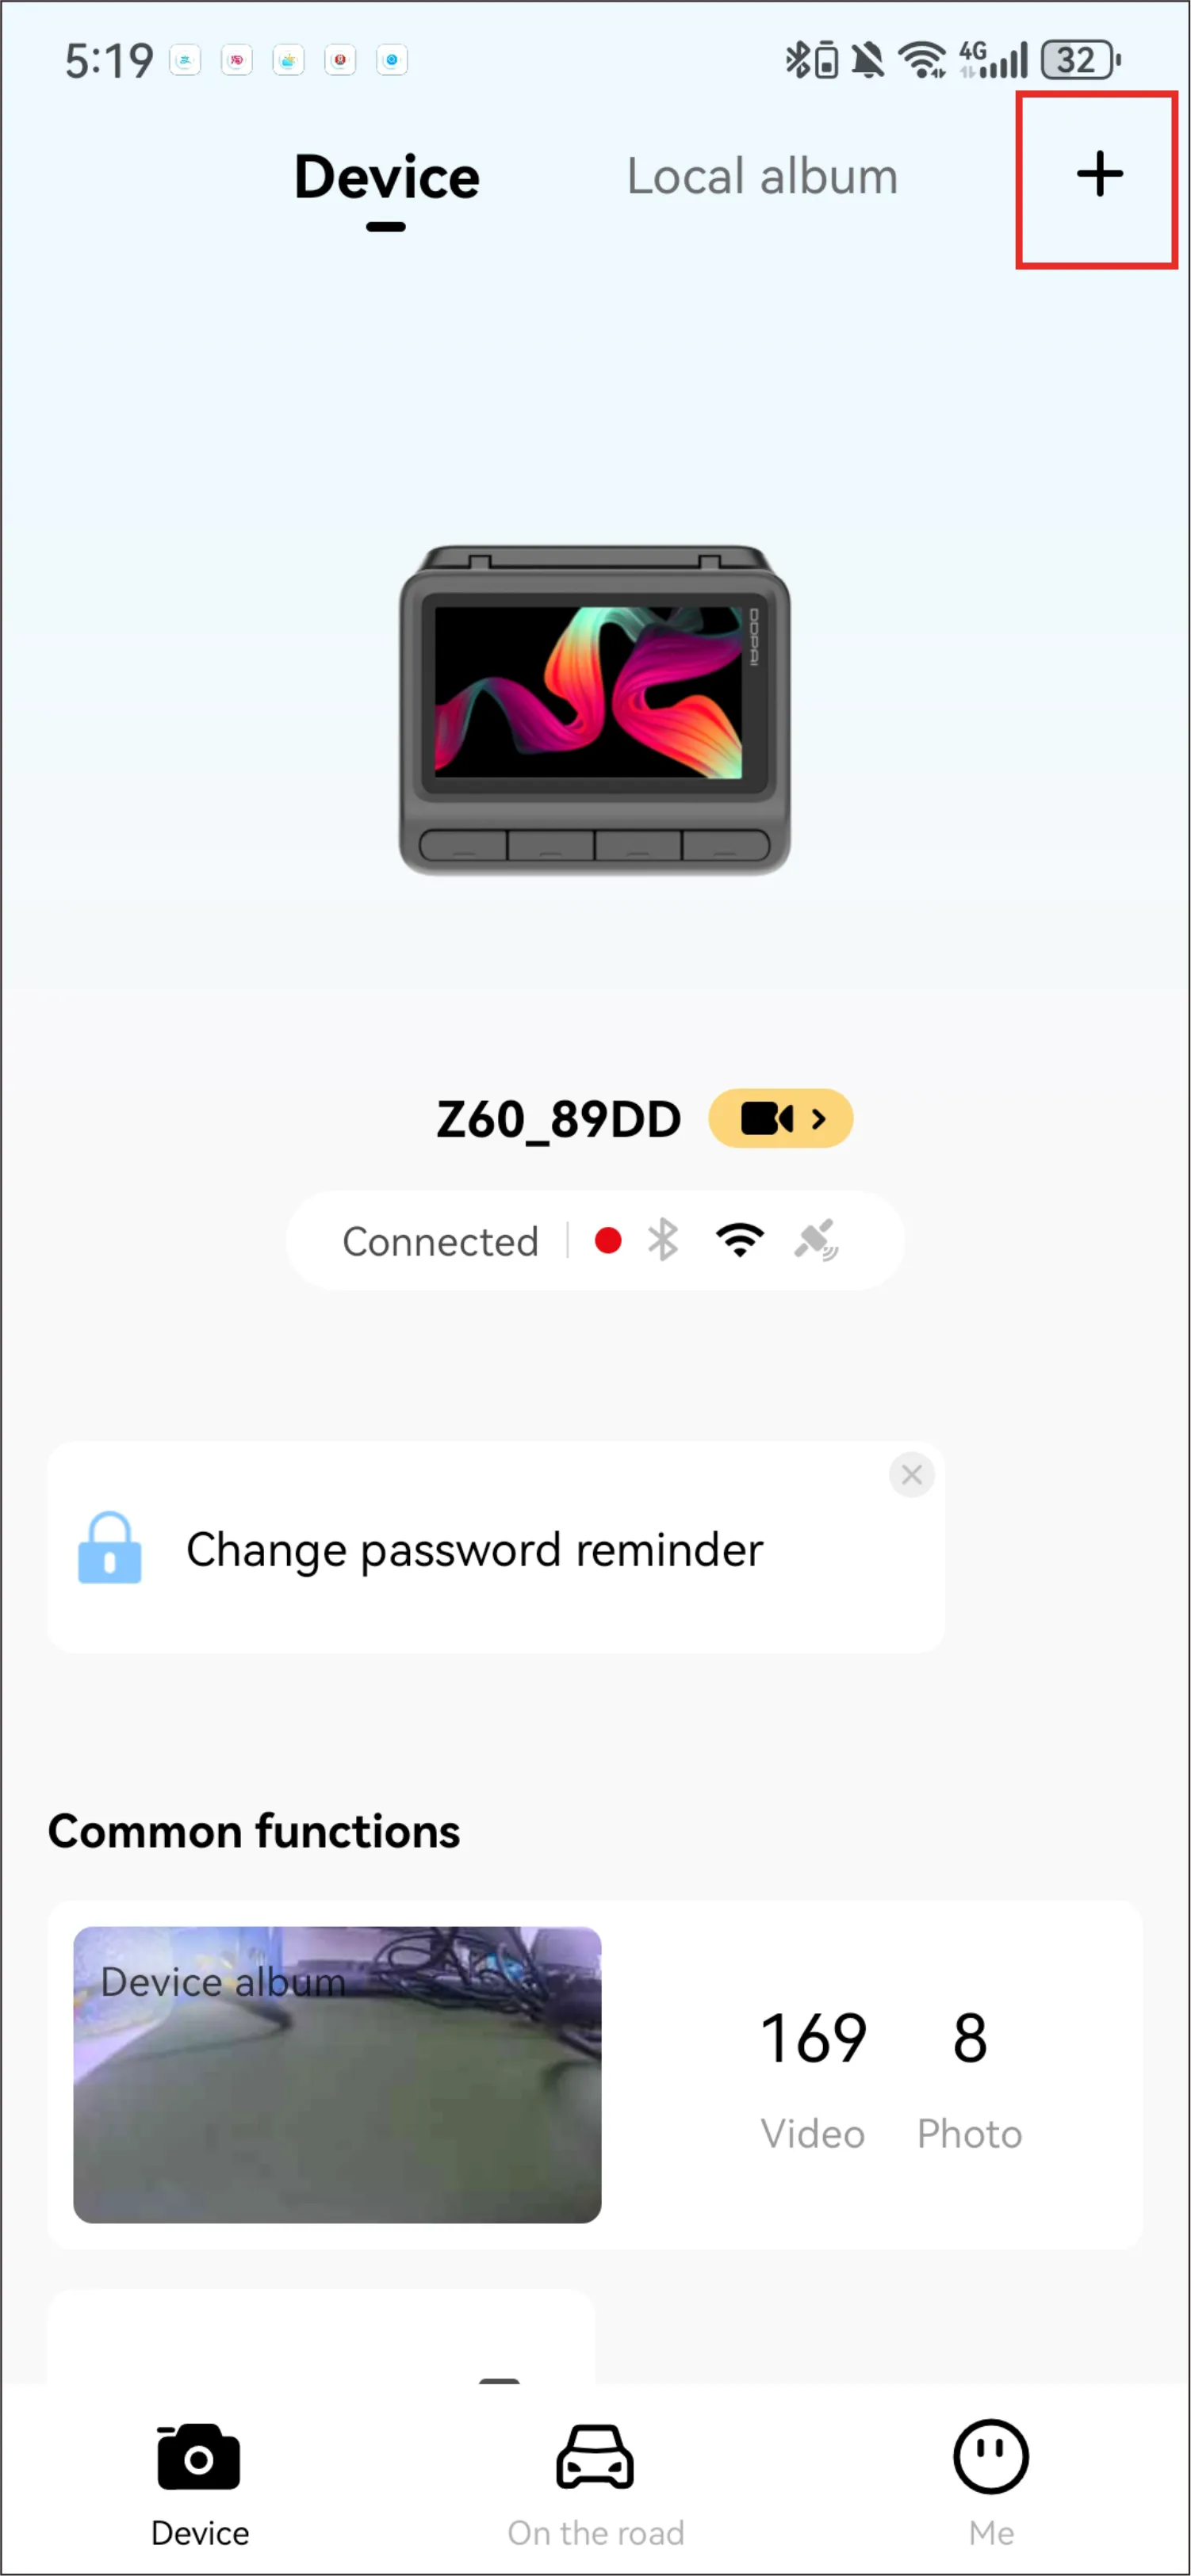
② Launch the DDPAI app, enter the “Device” interface, and tap “+ Add Device”.
③ Select the current device name (DDP10XXXX) in the searched Bluetooth list.
④ Press the function button on the device to authorize.
⑤ After the first device is successfully connected, tap “+” in the upper right corner of the “Device” interface to add a second device. For specific connection methods, refer to Step 1 to Step 4 above.
3. On the “Device” interface, you can see the two added devices. Tapthe “πLink” button. When the “Device Networking” pop-up window pops up, Tap the “Networking” button.
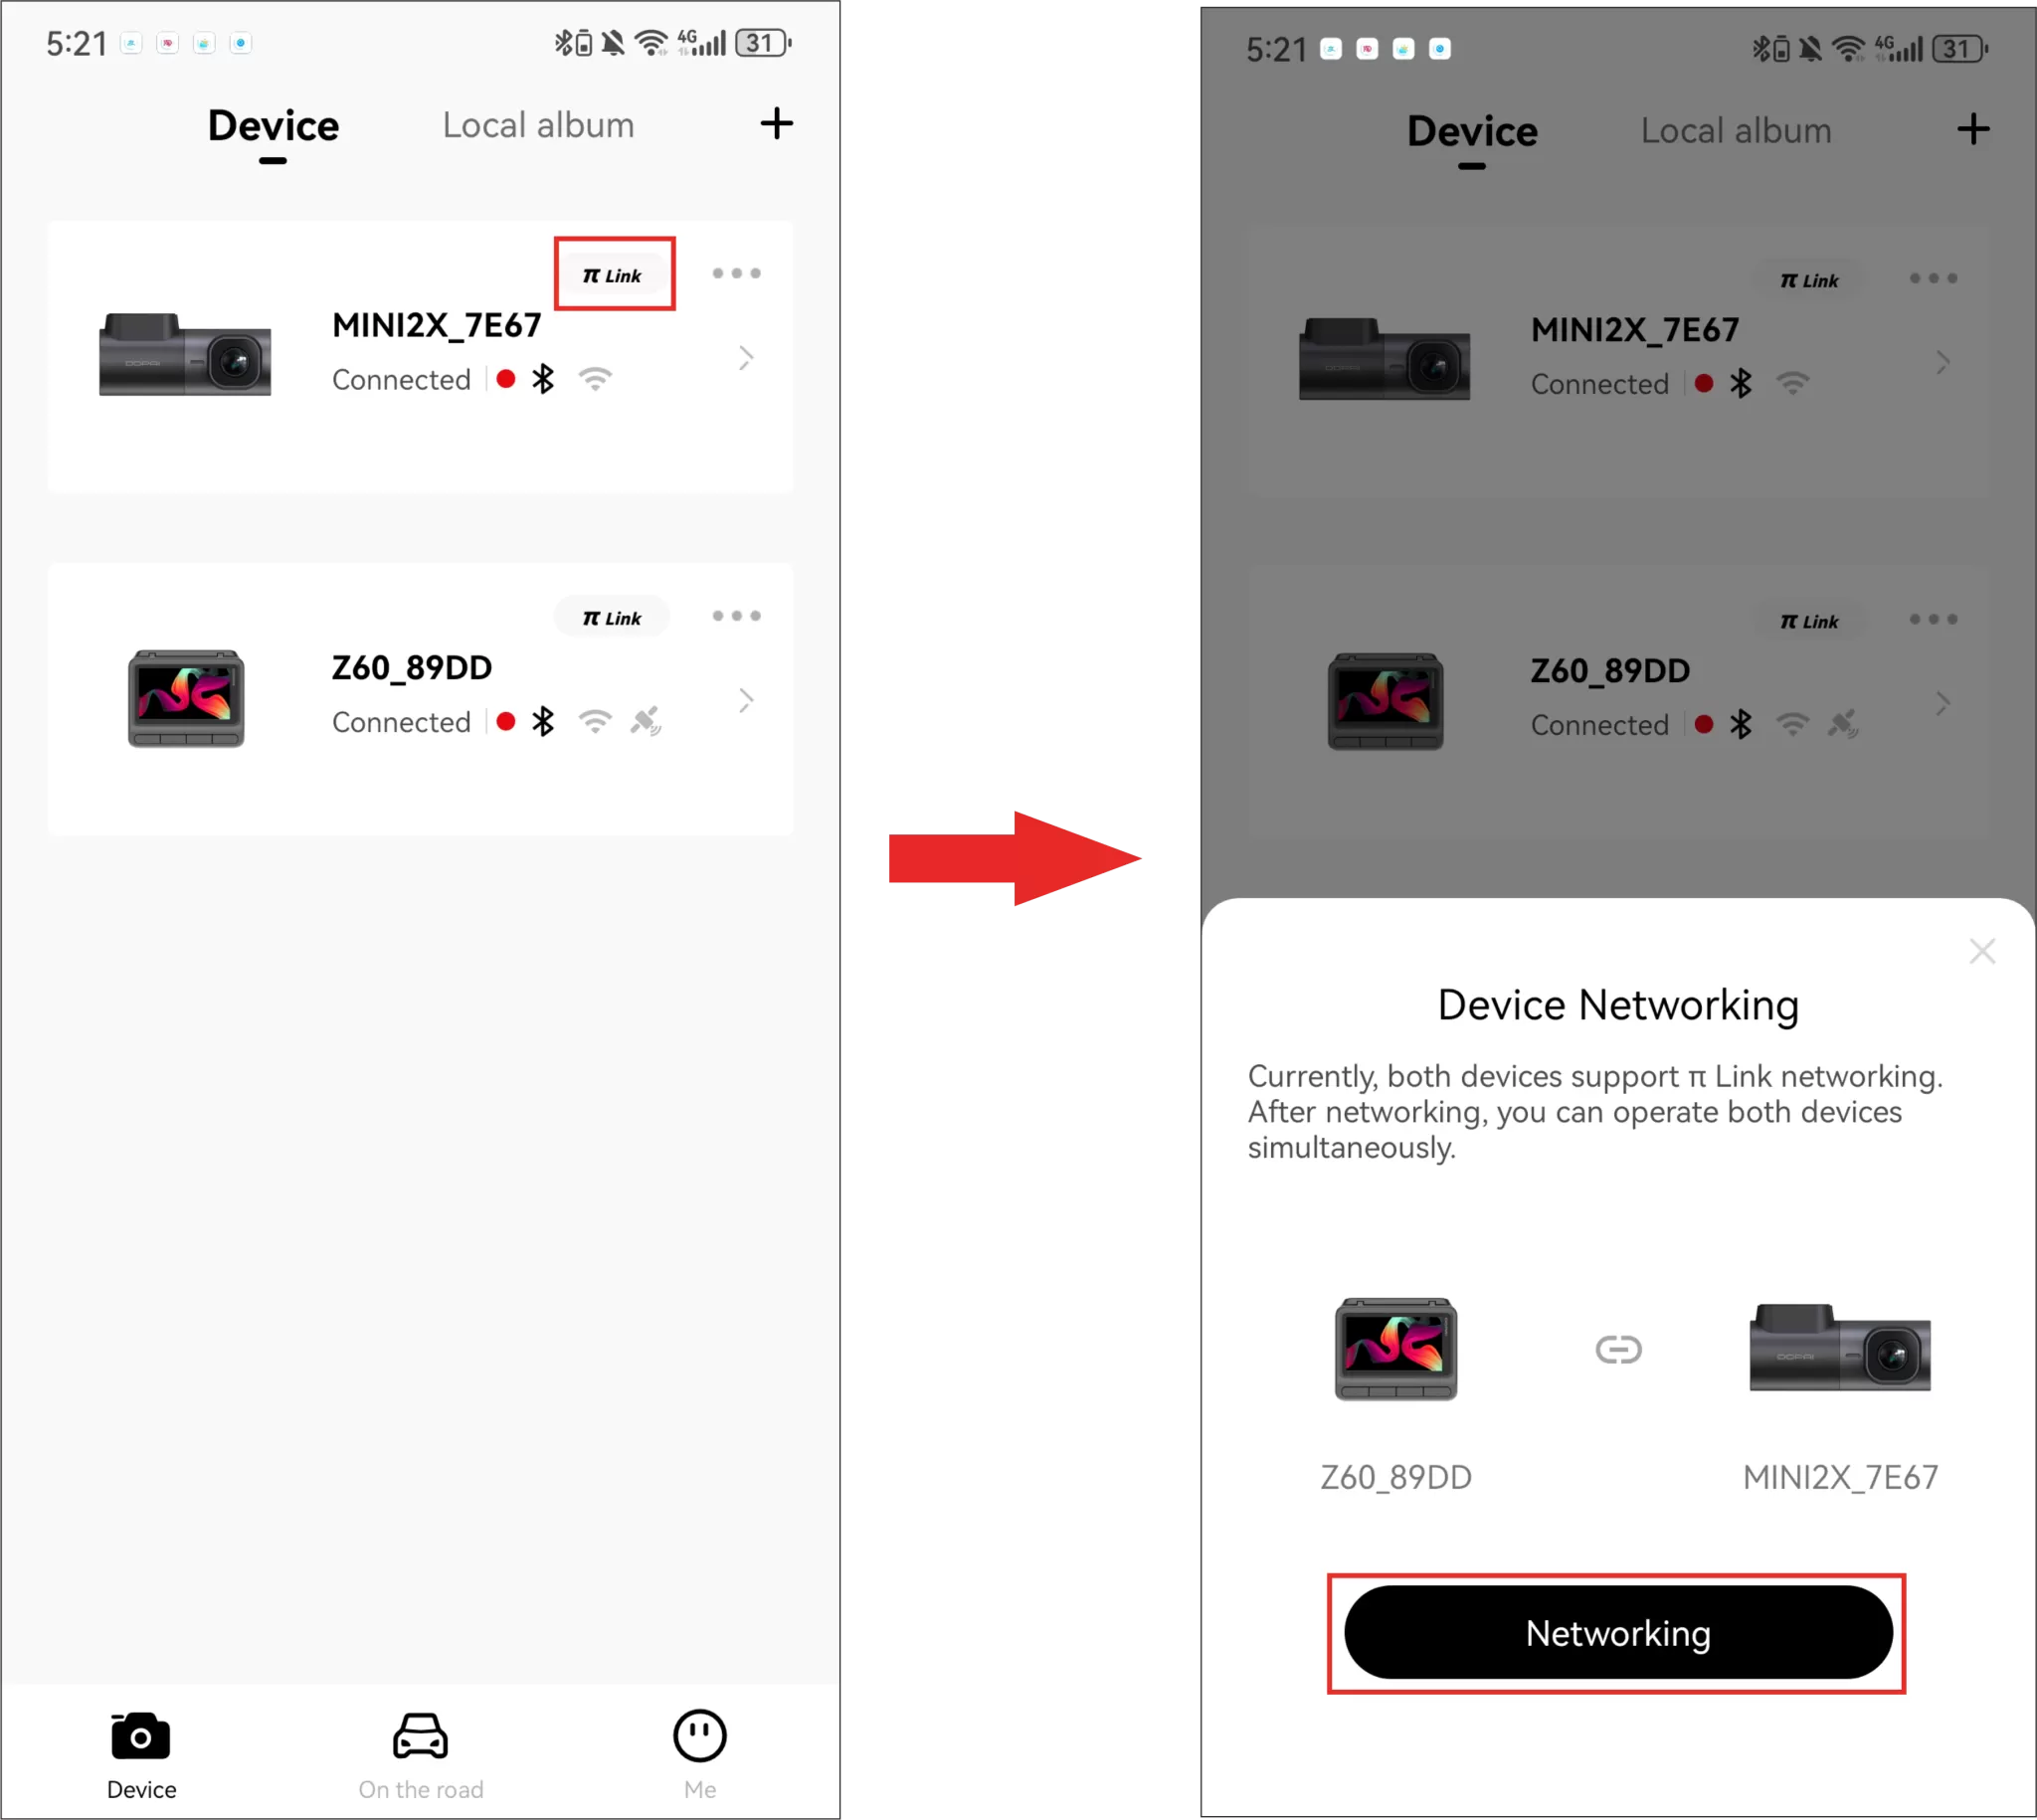
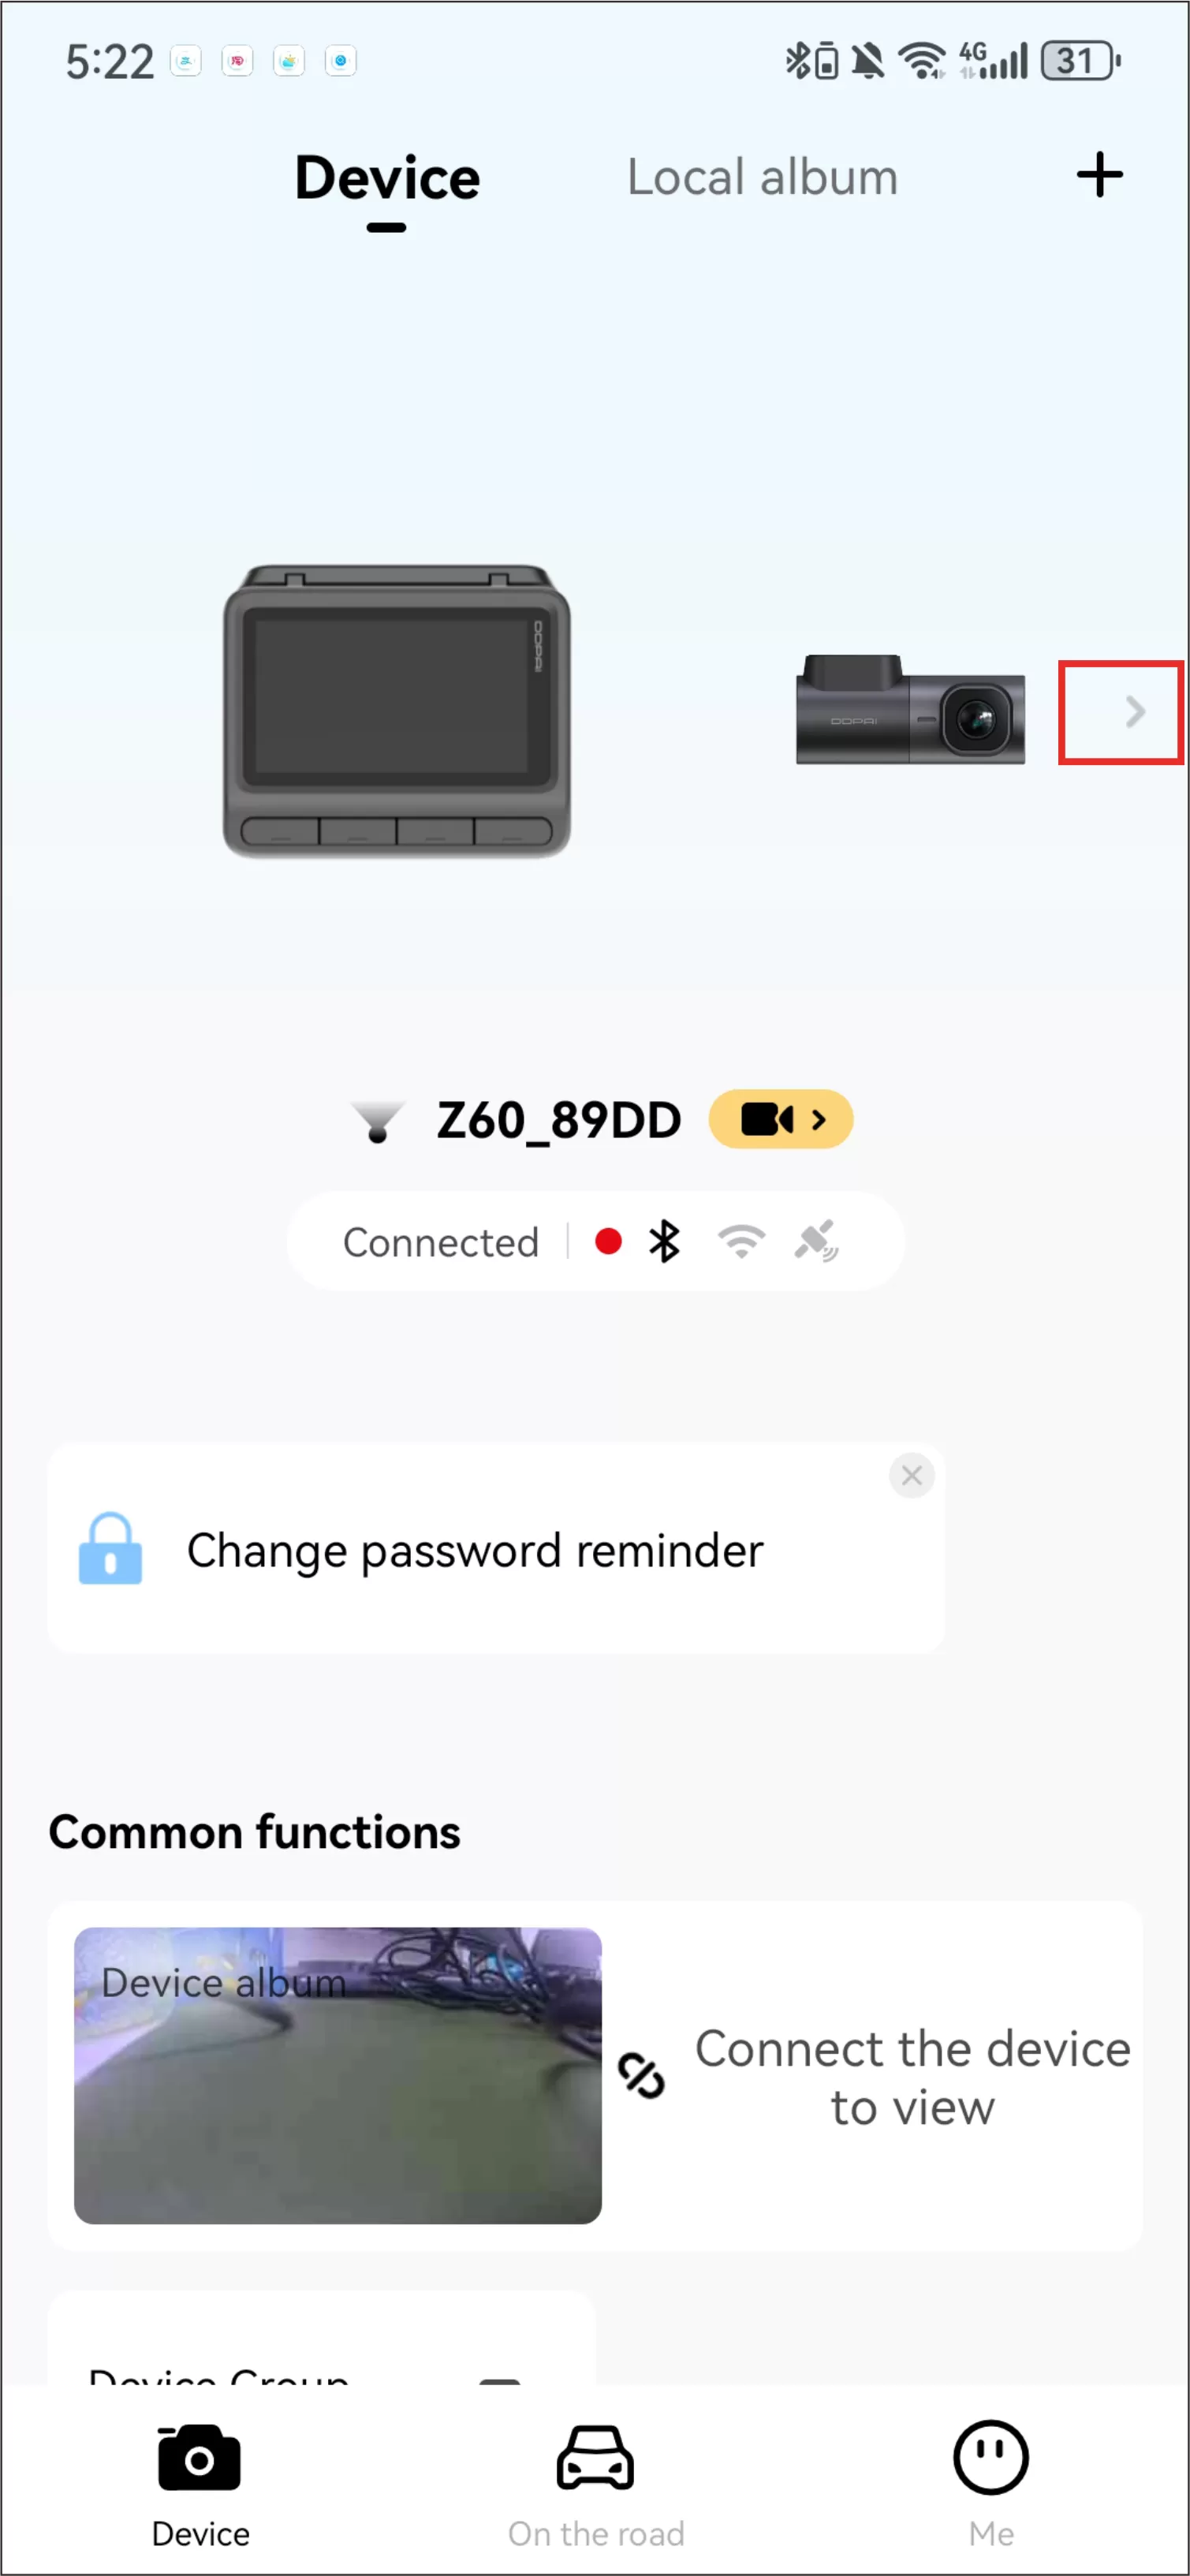
4. After the networking is successful, the images of the two devices will appear on the “Device” interface.

● Switch device
You can switch by tapping (Switch) button or tapping the device image you want to preview. After switching devices, the “Device” interface will display the function details of the current device.
● Set the orientation mark
You can set the orientation mark according to the current device installation situation to indicate the direction of the current device’s lens. Tap “Device Group Settings” > “Device Orientation Marker”, check the mark and tap the “OK” button. After the setting is completed, the corresponding mark will be displayed on the device album and other interfaces, so that you can better find the files recorded by the relevant device.
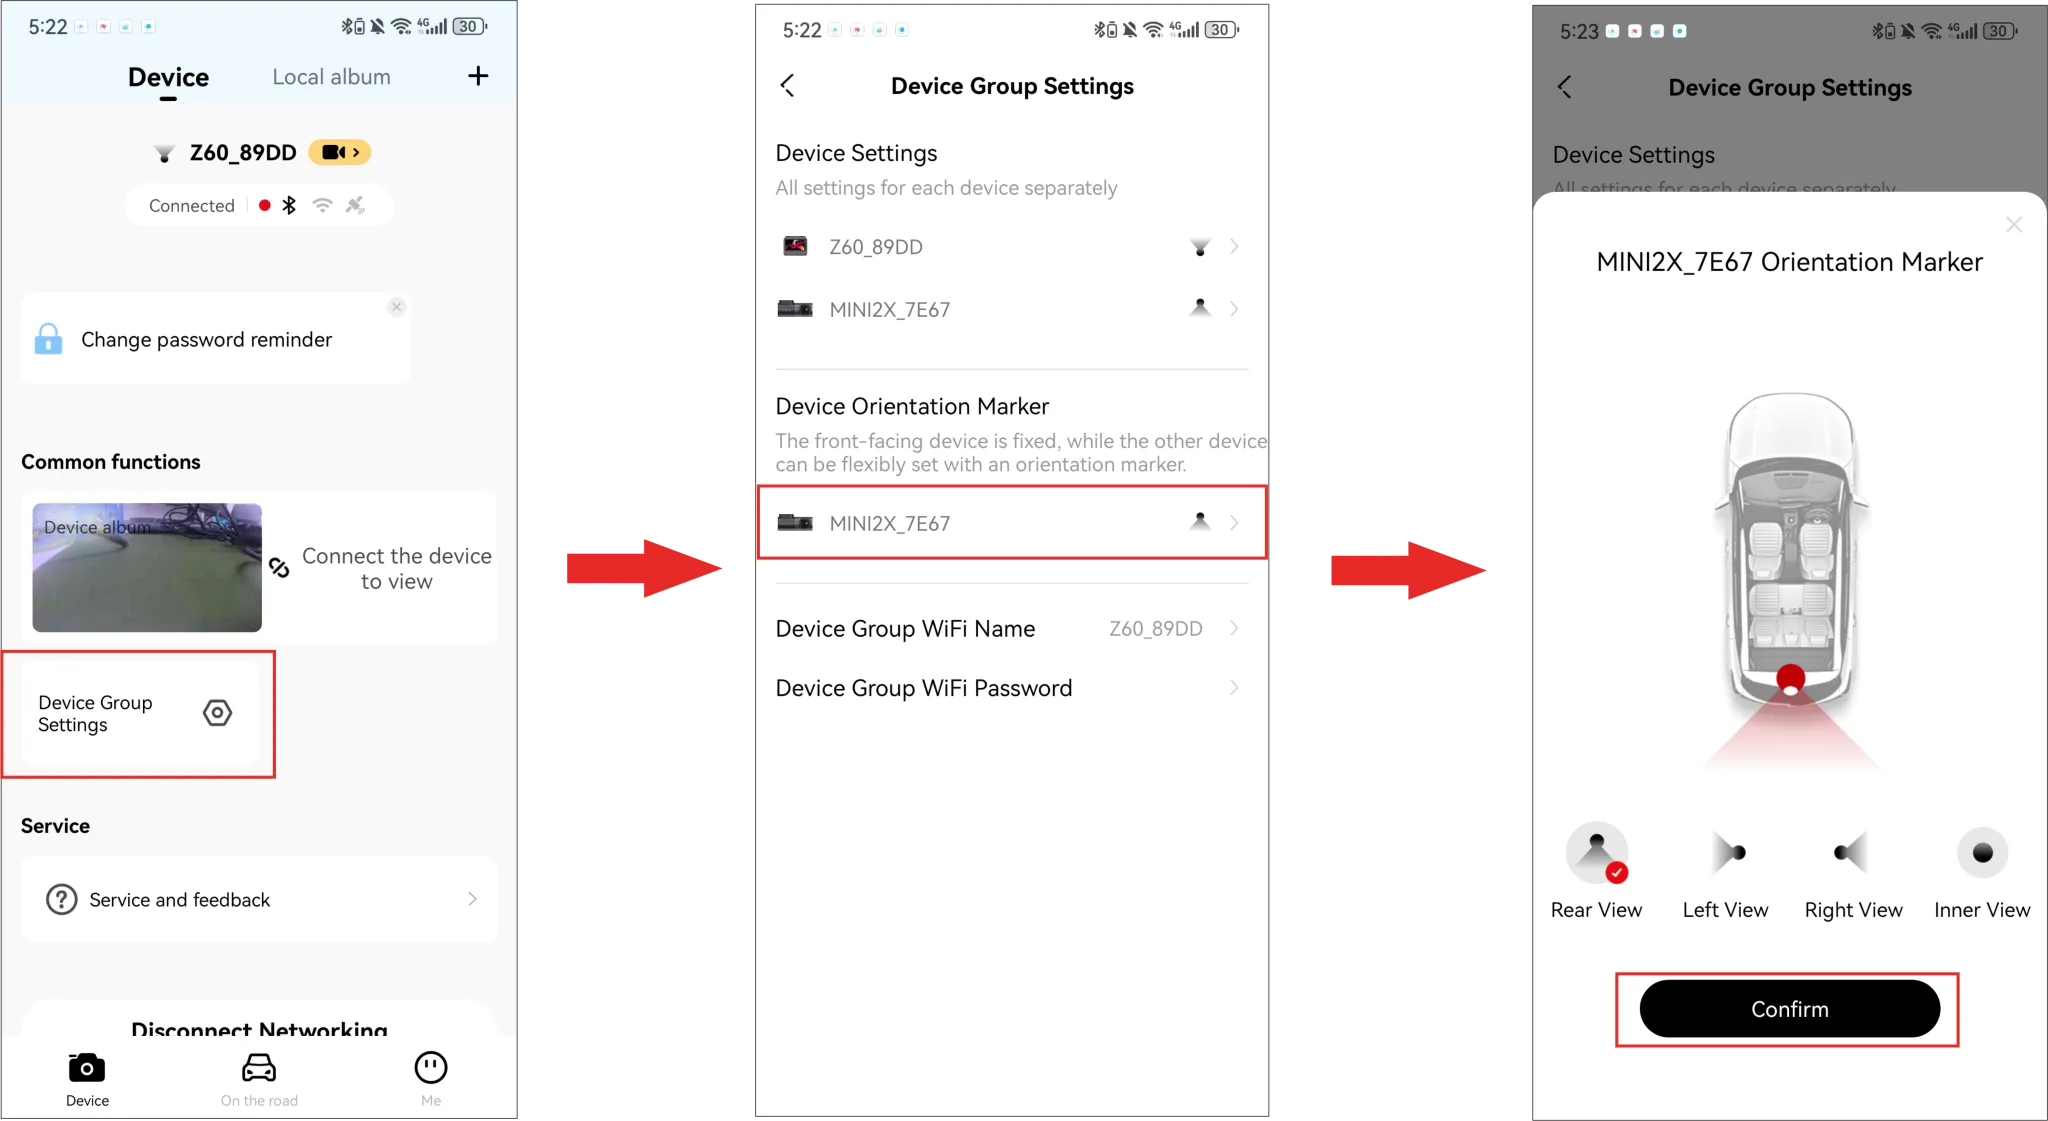
Note:
Only the orientation mark of the secondary device can be modified. The mark of the primary device is forward by default.
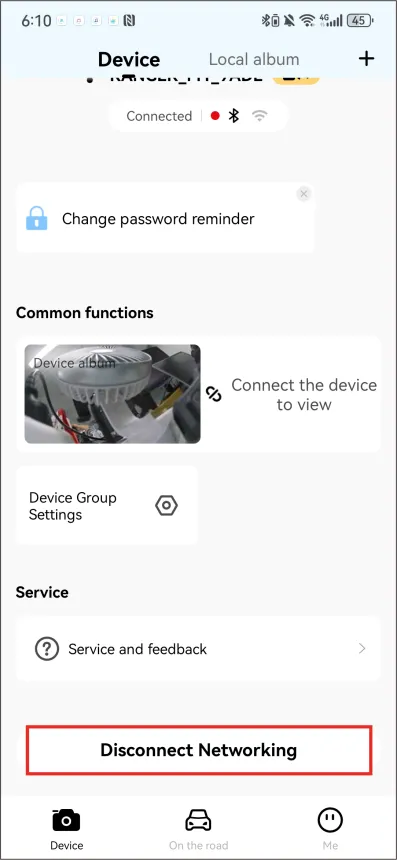
● Disconnect Networking
Tap the “Disconnect Networking” button on the “Device” interface. After ungrouping, the video files will be separated into the albums of the devices to which they belong.
4G Interconnection
Equipped with a 4G-cloud box, the dash cam supports 4G interconnection. After inserting the SIM card into the 4G-cloud box, the dash cam can support 4G functions such as remote viewing of vehicles, vehicle entry and exit notifications, cloud storage of important photos and videos, and collision warnings.
For more details of this function, you can scan the QR code below.

Note:
You can buy the 4G-cloud box separately or buy a package that includes the 4G-cloud box.

