DDPAI » Product Manuals » Mini
DDPAI MINI
User Manual
Package Contents
Package Contents
Dash Cam

USB Charger
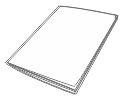
User Manual
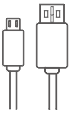
3.5m Vehicle Power Cable
3M Adhesive

Installation Tool
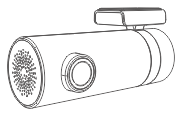
Product Overview
Product Overview
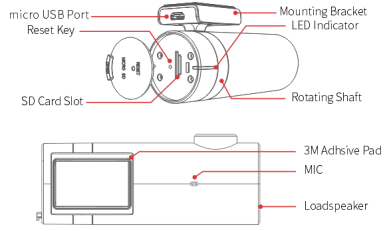
- Micro USB Port
- Reset Key
- SD Card Slot
- Mounting Bracket
- LED Indicator
- Rotating Shaft
- 3M Adhesive Pad
- MIC
- Loudspeaker
Installation
Installation
1.Clean an area on the windshield where you wish the Dash Cam to be installed, this assists in adhesion.
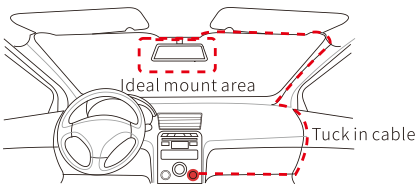
2.Remove the protective film from the back of the bracket, attach the adhesive side of the mount on the windshield where it has an unobstructed view of the road but does not interfere with the driver’s view. As shown below.
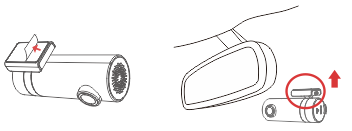
3.Use the installation tool to lift the edges of the windshield/molding and tuck in the power cable. Connect the Dash Cam to the car charger (plugged into cigarette lighter socket) and power cable.
4.Turn on the engine after installation, you will hear a boot tone, the Dash Cam powers up and starts recording, meanwhile, an LED indicator will blink slowly in normal mode.
5.Adjust the angle of the lens by rotating the Dash Cam. We recommend pointing the lens slightly downwards (≈10° below horizontal), so as to record video with a 6:4 road to background ratio. It is recommended to adjust the Dash Cam position while looking at the screen to select the best viewing angle.
LED Indicator
LED Indicator
- Working fine: Red light flashs slowly
- Booting: Red light is always on
- Storage abnormal / working abnormally: Purple light flashs quickly
- Parking monitoring: Blue light flashs slowly
- USB data transmission mode: Blue light is always on
- Upgrading: Purple light is always on
Install DDPAI APP
Install DDPAI APP
For Android/iOS phones, search for “DDPAI” in the Google Play Store or Apple App Store. Download the App and install it on your phone.
App Instruction
On the Road
When your mobile phone is connected to your mobile data network or home Wi-Fi, you can find nearby users, see the newest activities, user experience, installation tutorial etc from here.
Tap on the + icon to share pictures or videos on social media platforms like Facebook, Twitter etc.
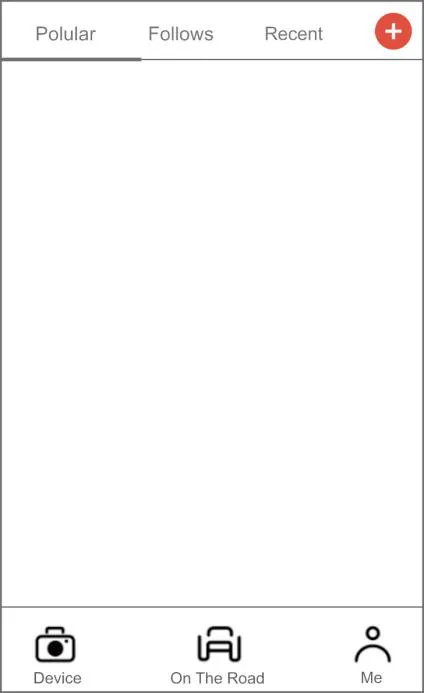
Me
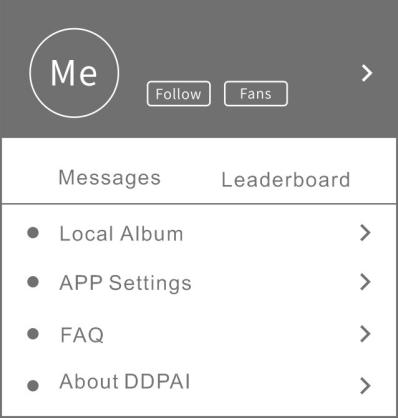
- Local Album: You can View images, videos and emergency clips, you also can edit and share them from here.
- APP Settings: Set the language, time format, App Storage Management, and so on.
- FAQ: How to use the Dash Cam.
- About DDPAI: Update firmware, contact us, information about the Dash Cam.
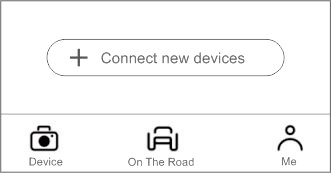
Device
After connecting your phone with the DDPAI Dash Cam Wi-Fi, you can add/delete Dash Cam, preview, playback, download, snapshot, and so on from here.
Pair Smart Phone to Dash Cam
- Keep the Dash Cam and mobile phone within 2.5 meters.
- Launch DDPAI App, tap on ”Device > Connect new devices”.
- Choose your DDPAI Dash Cam from the network list (For Android system, App will start to search Dash Cam network automatically. For iOS phone: turn on WLAN from “Settings ->WLAN”). The Dash Cam’s default SSID (or Wi-Fi name) is DDPAI_MINI_XXXX.
- Enter the password (the default password is ‘1234567890’).
- Enter DDPAI App, wait a few seconds until the preview screen show.
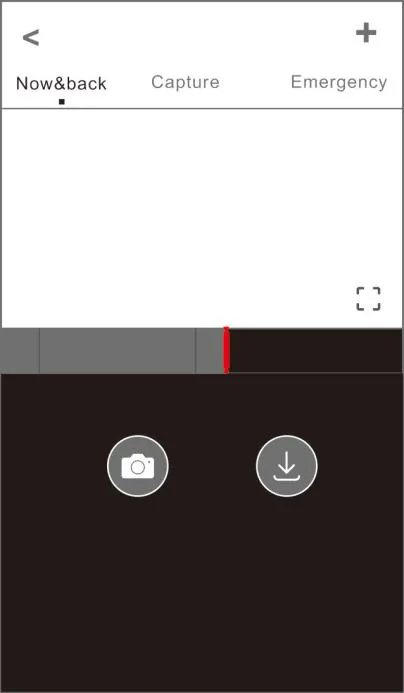
Preview
- 1.Open the DDPAI App, and add your Dash Cam.
- 2.Select ”Device > Entering” tab, this will bring you to the preview page.
Rotate your smart phone or press expand [ ] icon, turn the preview screen to landscape mode.
Playback
Tap and left/right drag time line bar at the screen bottom to create the starting point of the recording you wish to preview, then tap on thumbnail
when you have made your selection, or wait for 5 sec for buffering, now you can watch the history recording.
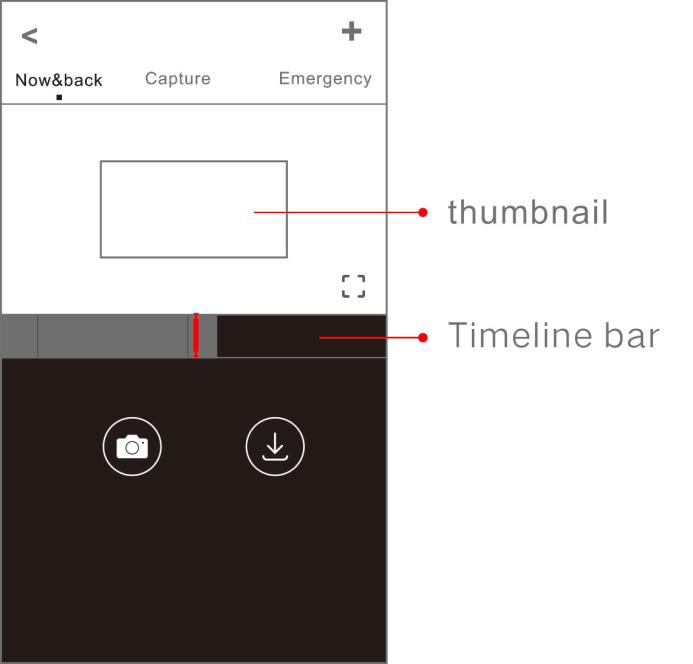
Download VideoFiles
- Tap and left/right drag time line bar at the screen bottom to create the starting point of the recording you wish to download, then tap on thumbnail when you have made your selection, or wait for 5 sec for buffering, to enter the download start screen.
- Tap on from preview screen to enter the download interface.
- After the video has finished downloading, click “Complete”.
Upgrade App And Firmware
Upgrade App And Firmware
Update via App: If a new version of the firmware is released, opening the App will prompt you to download it. You can also open the staring App, enter “Me-> About”, click to detect the new version, the App will automatically download and upgrade.
Upgrade via PC: Access your Dash Cam via PC with USB data cable. Download the latest firmware for your camera, unzip and copy the content you have unzipped onto the built-in memory. Power on the camera and it will apply the firmware automatically.
Upgrade via SD card: Download the latest firmware for your camera, unzip and copy the content you have unzipped onto the SD card, then install the SD card back into the camera, power on the camera and it will apply the firmware automatically.
Specifications
Specifications
- Product Name: Dash Cam
- Product Model: mini
- Resolution: 1080P @30fps/HD CPU
- Image Sensor: 2 MP CMOS sensor
- Lens: 140° wide angle, F2.2
- WStorage: TF card (up to 128GB), loop recording
- Video Output: Wireless video output, support Android/iOS device
- G-Sensor: Built-in 3 Gyro sensor, motion locking, adjustable sensitivity via App
- Video Resolution: 1920*1080 @30fps
- Photo Resolution: 1920*1080
- RAM: 512MB
Fcc Statement
FCC Statement
FCC Statement
This device complies with Part 15 of the FCC Rules. Operation is subject to the following two conditions:
(1)This device may not cause harmful interference
(2)This device must accept any interference received, including interference that may cause undesired operation.
RF warning statement:
The device has been evaluated to meet general RF exposure requirement. The device can be used in portable exposure condition without restriction.
FCC Radiation Exposure Statement:
This equipment complies with FCC radiation exposure limits set forth for an uncontrolled environment. This equipment should be installed and operated with minimum distance 20cm between the radiator & your body.
Caution
Caution
The product’s optimal temperature range is -20°C – 70°C.
Install the device near the rear-view mirror to obtain the best open-field view. Do NOT install the Dash Cam in a location that will obstruct your required driving view.
The Dash Cam supports a class 10 micro SD card up to 128GB. Format the SD card via the App before using, and format it regularly to maximize the lifetime of the memory card.
Do not use any cardboard, paper towel, or napkins to clean the lens.
Do not attempt to repair, dismantle, or modify the Dash Camera hardware by yourself.
Do not install the product in an environment with high humidity, or combustible gases or liquids.
Drawings for illustration purpose only. Actual product may vary due to product enhancement.

